Configuration Example: BIG-IP APM as SAML IdP for Amazon Web Services
Useful links
- Creating Temporary Security Credentials for SAML Federation - AWS Security Token Service
- Giving Console Access Using SAML - AWS Security Token Service
- AWS Metadata File
- For more information on SAML take a look at Security Assertion Markup Language
- For more information on using APM as a SAML IdP take a look at Using APM as a SAML IdP SSO portal
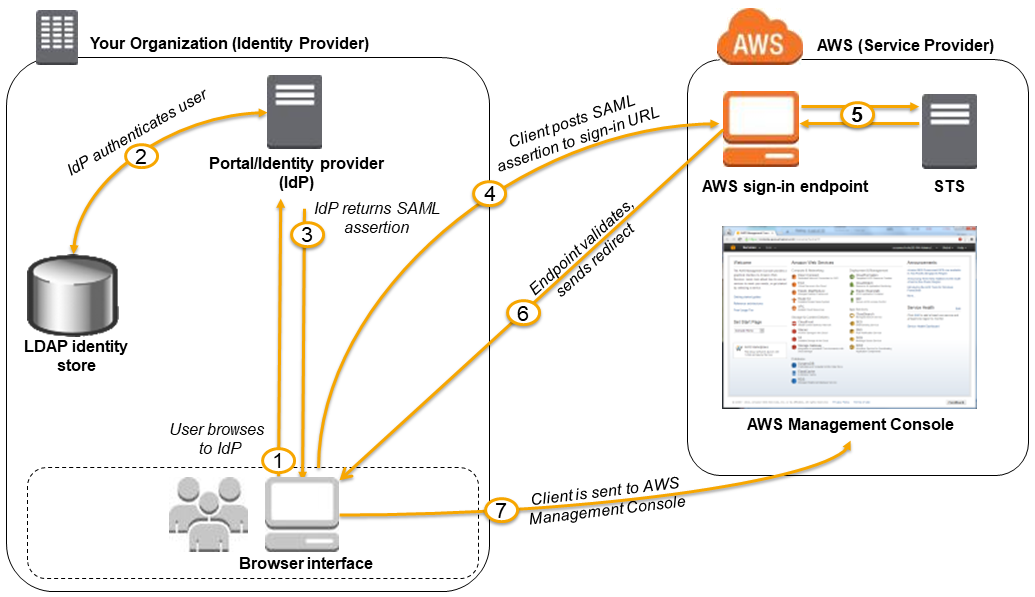
Two Attributes are required for the SAML Assertions to AWS
- Role - The attribute value provides an identifier for the AWS temporary credentials that are issued for SSO.
- RoleSessionName - This attribute contains one or more AttributeValue elements that list the IAM role and SAML provider that the user is mapped to in your IdP.
*Note – SAML sessions with AWS are only valid for up to 1 hour, for more information take a look at AssumeRoleWithSAML
Configuring the BIG-IP
Configure BIG-IP IdP Service
Create new External SP Connectors
Navigate to Access Policy > SAML > BIG-IP as IDP > External SP Connecotrs ,and Import the metadata from AWS and name it aws.amazon.com
*Note – The AWS metadata file can be found here AWS Metadata File
Create new IdP Service
Under Local IdP Services create the IdP service that will be used for IdP Initiated SAML with AWS
General Settings
- The IdP Service Name value is arbitrary and is used uniquely identify the configuration element
- The IdP Entity ID value is used to uniquely identify this SAML resource within the Service Providers sso configuration
Assertion Settings
- The Assertion Subject Type is used by the Service Provider to identify the type and format of the Subject (Different SP’s have different requirements for this field, a majority of the time Entity Identifier or Unspecified will work)
- The Assertion Subject Value contains the primary identifier of the user
SAML Attributes
There are two SAML attributes that are required for the SAML assertion. The first one is used to identify the Username that will be associated to the session and the second will identify the AWS Security Role that should be assigned to the session
- https://aws.amazon.com/SAML/Attributes/Role
- You will need to replace the [Account #] and [IdP Name] flags with the information for your environment, this attribute will map the session to the specified specific role and account number
- https://aws.amazon.com/SAML/Attributes/RoleSessionName
- This attribute will be used to identify the username for the session
| Attribute Name | Attribute Value |
|---|---|
| https://aws.amazon.com/SAML/Attributes/Role | arn:aws:iam::[Account #]:role/%{session.samlresource.aws.role},arn:aws:iam::[Account #]:saml-provider/[IdP Name] |
| https://aws.amazon.com/SAML/Attributes/RoleSessionName | %{session.logon.last.logonname} |
*Note – If you are having a hard time identifying your account number you can find it listed on the Identify Providers tab under Amazon Web Services > Identity & Access Management > [IdP Name] after importing the metadata file for your Identify Provider
Security Settings
The security settings tab is used to identify the certificate that should be used to sign and verify the SAML Assertion.
Bind SP Connector
Under Local IdP Services click the checkbox next to your newly created IdP service and select Bind/Unbind SP Connectors, search for the SP Connector you created earlier and click the checkbox next to it.
Export IdP Service Metadata
Under Local IdP Services click the checkbox next to your newly created IdP service and select Export Metadata. Store this file for later, it will be needed when we configure AWS.
Create new SAML Resource
Navigate to Access Policy > SAML > SAML Resource and Import the metadata from AWS and name it aws.amazon.com
SAML Resources are assigned to users within the APM visual policy editor, these resources can be assigned based on group membership or other logic.
*Note – The Publish on Webtop checkbox is only required for Portal initiated SAML Assertions (IdP Initiated).
Configure BIG-IP APM Access Policy
*Note – This section assumes you have already created the required APM Access Profile, if you need more information on creating an Access Profile please see Creating an access profile
VPE Initial Configuration
Typically when working with the Visual Policy Editor you will see a logical flow that looks similar to the image below. Users are presented with a login page that collects their credentials and then validates them against an authentication database of some type (In this case Active Directory).
Update VPE to query for additional attributes
To enable VPE to intelligently assign AWS Security Role we need to update the configuration to use the AD Query resource object. This object will allow us to identify the group membership attributes of a user.
The only Required Attribute in this configuration is memberof
Assign AWS Roles (Basic)
Step 1 – Group Membership
Following the successful AD Auth branch add the Empty resource object and set the branch rules to filter based on AD Group Membership
The expression logic should look similar to the snippet listed below
expr { [mcget {session.ad.last.attr.memberOf}] contains "CN=aws_SamlAdmin," }
Step 2 – Populate Assertion Roles
For each branch specified in Step 1 add a Variable Assign resource object. Each Variable Assign object should contain an entry specifying that the variable session.samlresource.aws.role will be set to a defined string of text.
*Note – the session.samlresource.aws.role maps to the variable we specified earlier in this document when creating the IdP Service
Assuming that you will assign three different groups the following maps should work
- Administrator
- session.samlresource.aws.role
- SamlAdmin
- Power User
- session.samlresource.aws.role
- SamlPowerUser
- Read Only
- session.samlresource.aws.role
- SamlReadOnly
After you create all of the required variables it should look similar to the screenshot below
Assign AWS Roles (Advanced)
It is possible to achieve the same results above using a single resource object within the VPE, to do this we will use the Variable Assign resource object. The only difference is we will us conditional logic within the “Custom Expression” section when setting the variable value.
*Note – the session.samlresource.aws.role maps to the variable we specified earlier in this document when creating the IdP Service
Assuming that you will assign three different groups the following maps should work
- Administrator
- session.samlresource.aws.role
- SamlAdmin
- Power User
- session.samlresource.aws.role
- SamlPowerUser
- Read Only
- session.samlresource.aws.role
- SamlReadOnly
As you can see this results in a much simpler VPE policy
Assign AWS SAML Resource
Now that we have created the logic to populate the appropriate variables we need to assign the SAML Resource, to do this we will use the Advanced Resource Assign object.
After adding the Advanced Resource Assign object add the SAML resource we created earlier and a webtop object.
Now when users login to the Federation Portal they should see an Icon that will initiate a SAML Assertion to the AWS Management Console.
*Note 1 => The SAML assertion will be invalid until the AWS portion of this configuration is complete
*Note 2 => The VPE logic setup in the Assign AWS Roles (Advanced) section will display the AWS icon for all users regardless if they are in the right AD Security Groups. To only display the AWS icon for the appropriate groups additional VPE logic will be required.
Configure Amazon Web Services
Import Metadata File
After logging into the AWS Management Console browse to Amazon Web Services > Identity & Access Management > Identify Providers and select Create Provider
*Note – This section assumes that you exported a copy of your metadata file after creating your IdP Service earlier.
Configure AWS Security Roles
After importing your Identify Provider into the AWS Management Console browse to Amazon Web Services > Identity & Access Management > Roles and select Create New Role.
*Note – You will need to repeat this section for each AWS Role you want to map to a different SAML Assertion attribute.
Set Role Name
The Role Name should map to the SAML Assertion value defined earlier when creating the VPE variables section
Select Role Type
When specifying the Role Type expand Role for Identify Provider Access and select Grant Web Single Sign-On (WebSSO) access to SAML providers
Establish Trust
Select the SAML Provider that you created earlier when importing the metadata file
Attach Policy
This section is used to assign permissions to the session that will be created for the user during their SAML Session. In this snippet I searched for Administrator but you can also find policies for PowerUser and ReadOnly
After saving your configuration you should now be able to initiate a SAML session from your IdP.
