Configuring an Application for Smart Card Authentication and Forms Based SSO Using a Static Username and Password
A customer recently reached out requesting assistance providing smart card authentication to an application that does not integrate with AD or LDAP and has only a single username and password. While many of you out there may have done this in the past, I for one had not and of course I too was curious how I could make such a solution work. So with that, let's get to it.
In order to successfully deploy this solution, please configure the following prerequisites.
- Local Traffic Manager licensed and provisioned
- Access Policy Manager licensed and provisioned
- CA certificate or a bundle of CA certs
Note: This CA cert or bundle will contain all CA certs which issued the client certificates you will be authenticating with.
- OCSP IP address for certificate revocation checking
Configuring a LDAP AAA Resource
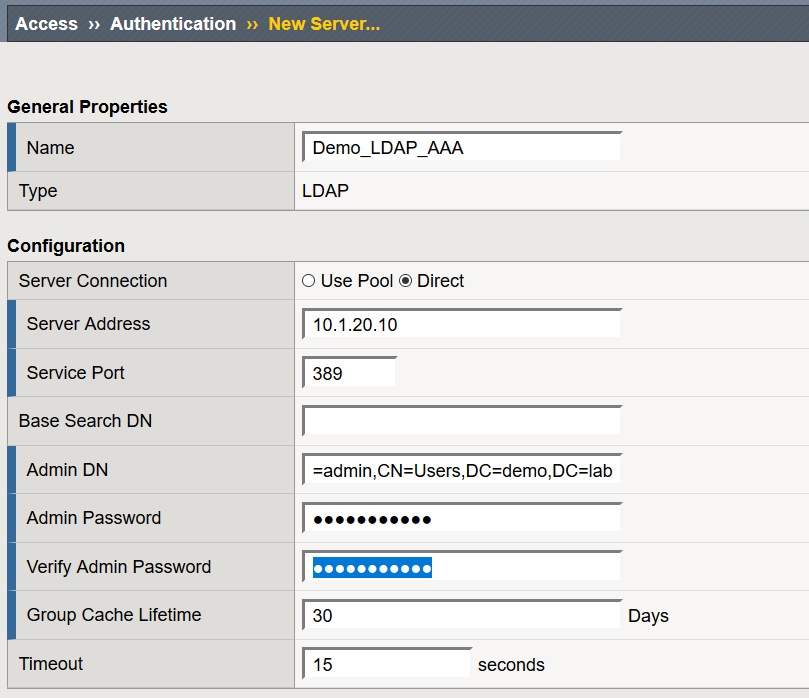
- Navigate to Access > Authentication > LDAP and select Create
- Name: Demo_LDAP_AAA
- Server Connection: Direct
- Base Port: 389
- Admin DN: CN=admin,CN=Users,DC=demo,DC=lab
- Leave all other settings at their defaults and select Finished
Configuring a OCSP AAA Resource
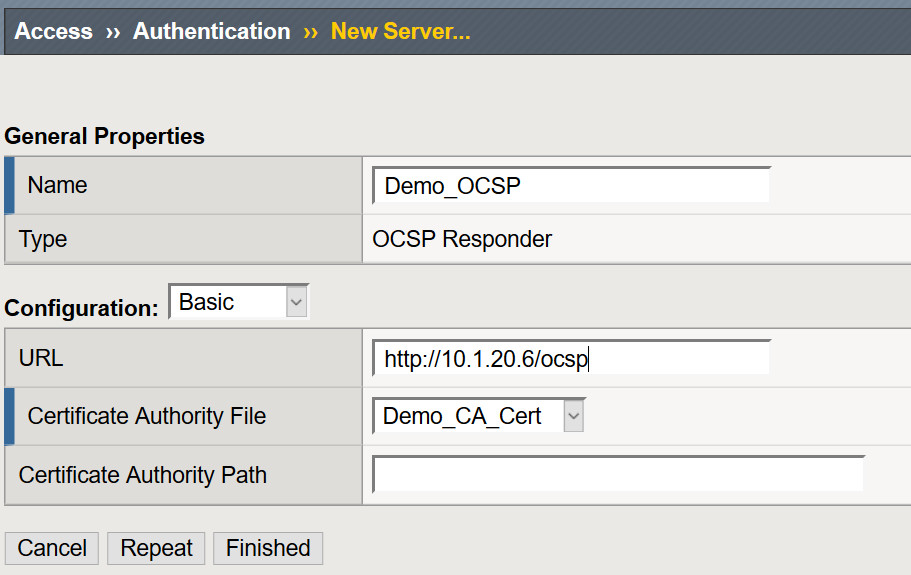
- Navigate to Access > Authentication > OCSP Responder > Select Create
- Name: Demo_OCSP
- URL: http://OCSP_IP/ocsp
- Certificate Authority File: Select the issuing CA Certificate
- Leave all other settings at their defaults and select Finished
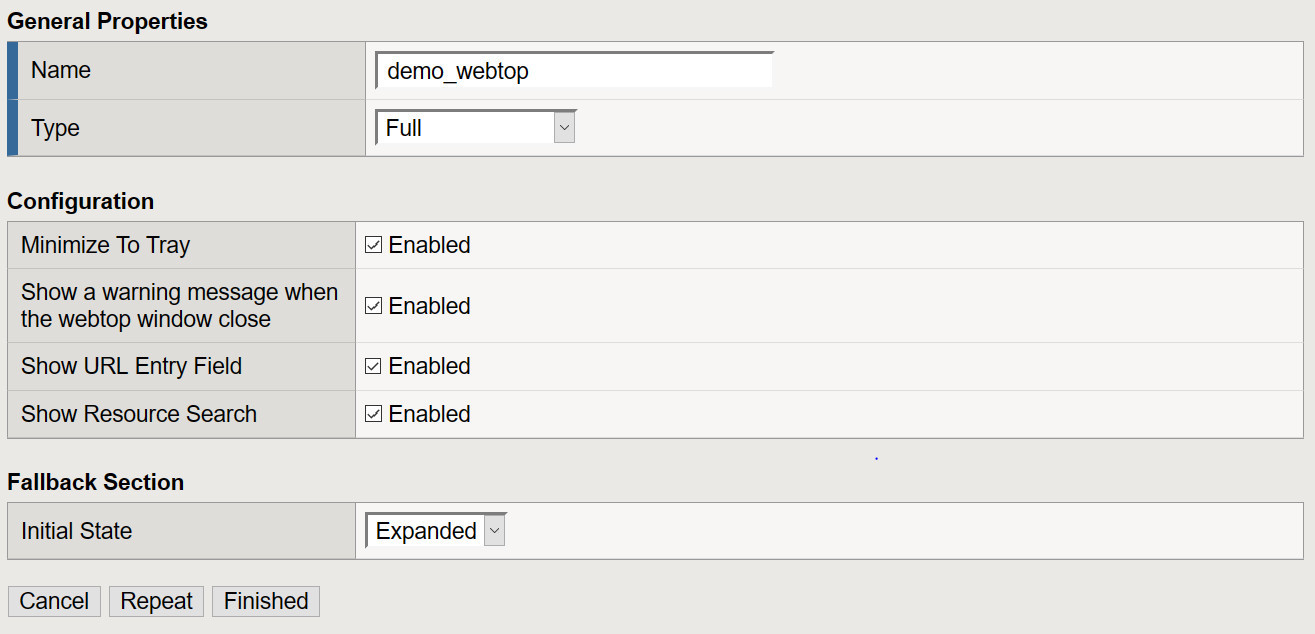
Creating a Webtop
- Navigate to Access >> Webtops >> Webtop Lists: Create
- From the drop down select Full for the type of Webtop you will be deploying, provide a name and select Finished.
Identify Form, Form Action and Form Parameters
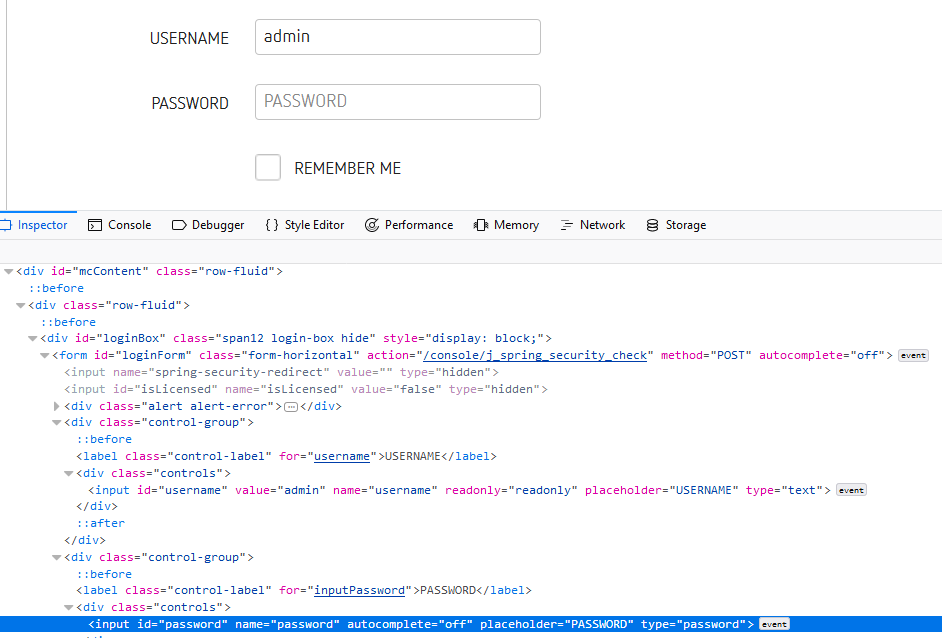
In this scenario I used Firefox though your favorite browser can also be used. This data will be used to configure our SSO profile.
- Lunch Firefox and browse to the application you are attempting to configure SSO for.
- From the Firefox Menu bar, select Tools >> Web Developer >> Click Inspector
To make it easy to identify the form I simply clicked in the USERNAME or PASSWORD in fields in the web page and Inspector took me to that content.
- Capture action: /console/j_spring_security_check
- Capture method: POST
- Capture input id for the username parameter
- Capture input id for the password parameter
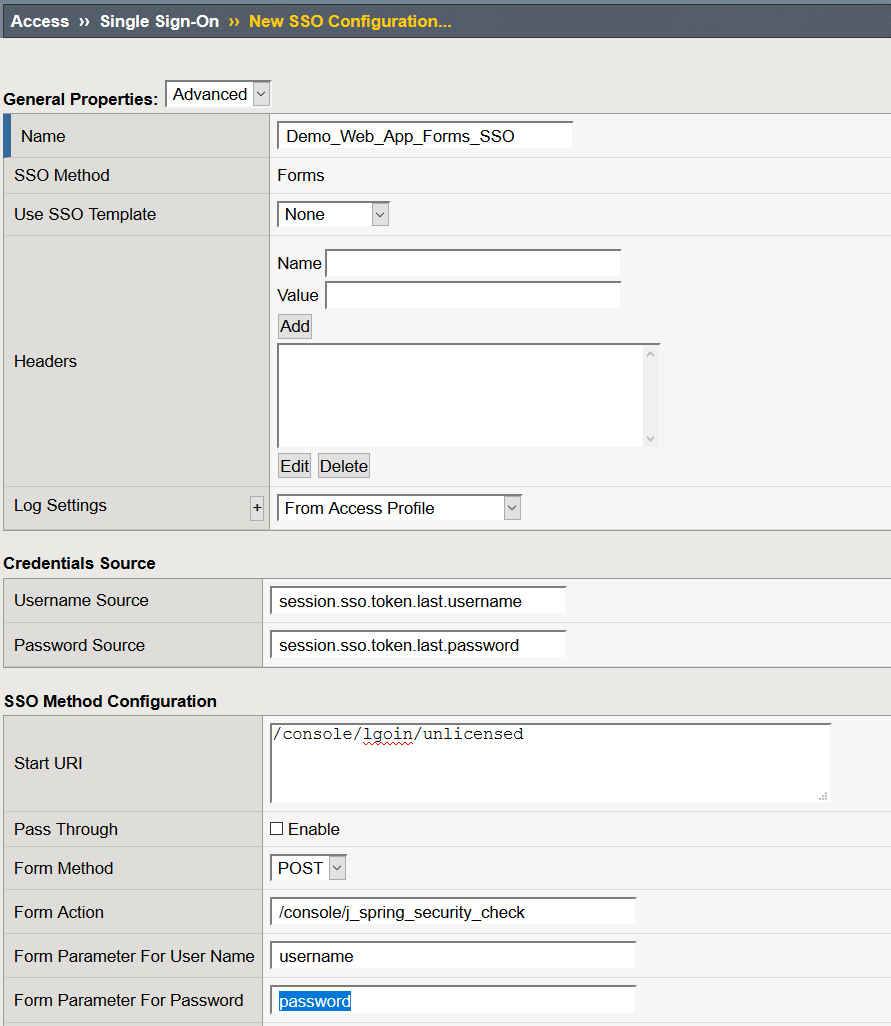
Create a Forms SSO Profile
- Navigate to Access >> Single Sign-On >> Forms Based >> Click Create
- Name: Demo_Web_App_Forms_SSO
- User SSO Template: None
- Username Source: session.sso.token.last.username
- Password Source: session.sso.token.last.password
- Start URI: This is URI of the application at the logon screen

- Form Method: Post
- Form Action: /console/j_spring_security_check
- Form Parameter For User Name: username
- Form Parameter For Password: password
- Click Finished
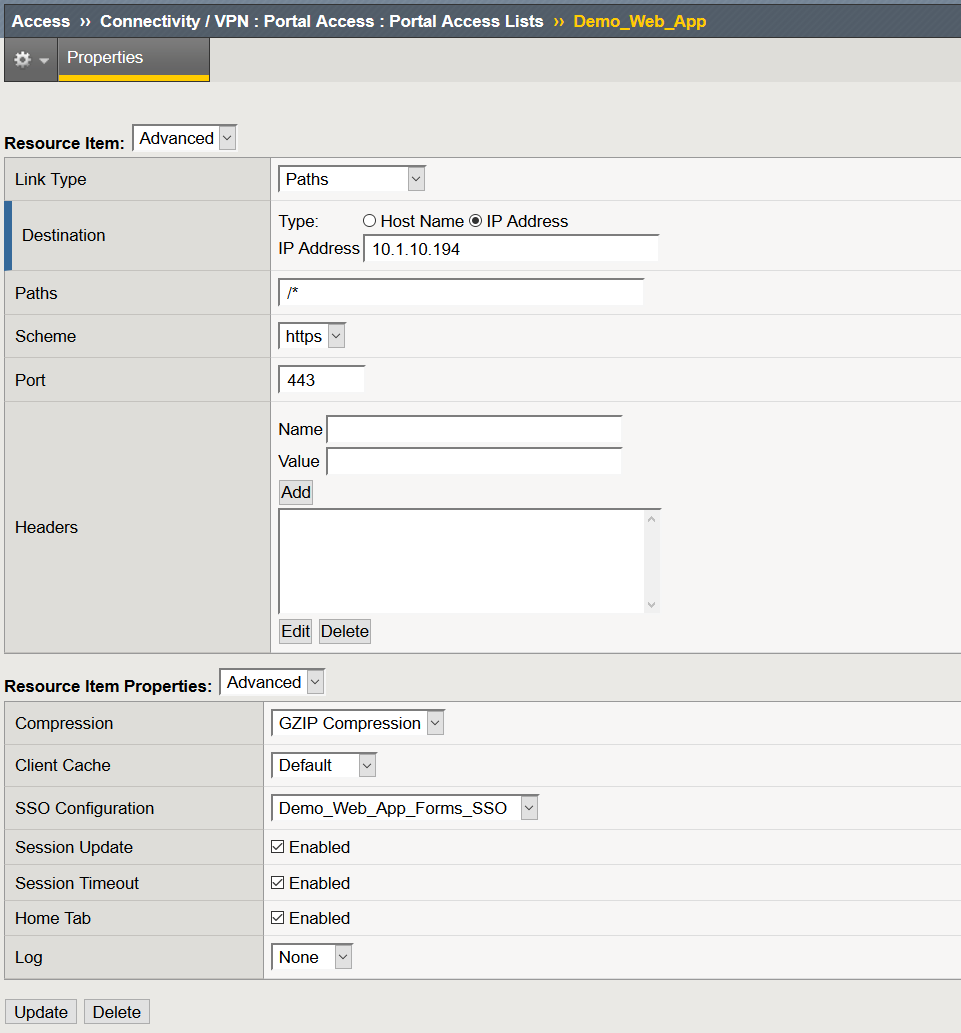
Create a Portal Access Resource
- Navigate to Access >> Connectivity / VPN >> Portal Access >> Portal Access List >> Click Create
- Name: Demo_Web_App
- Link Type: Application URI
- Application URI: URI to your web application
- Caption: Demo_Web_App
- Click Create
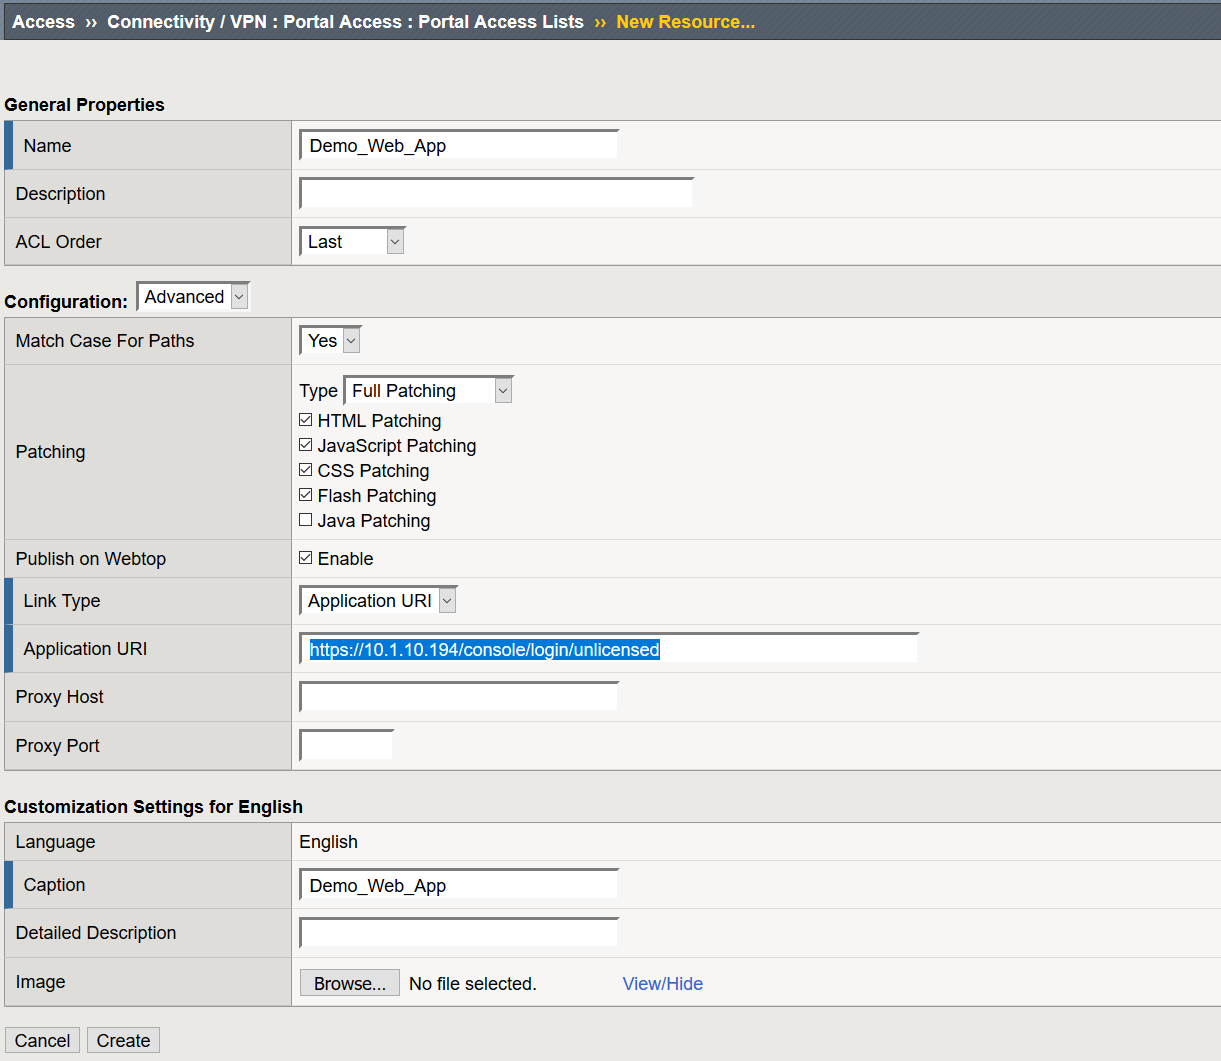
After you click Create, the page will refresh and at the bottom of the screen you will then see an option to create Resource Items
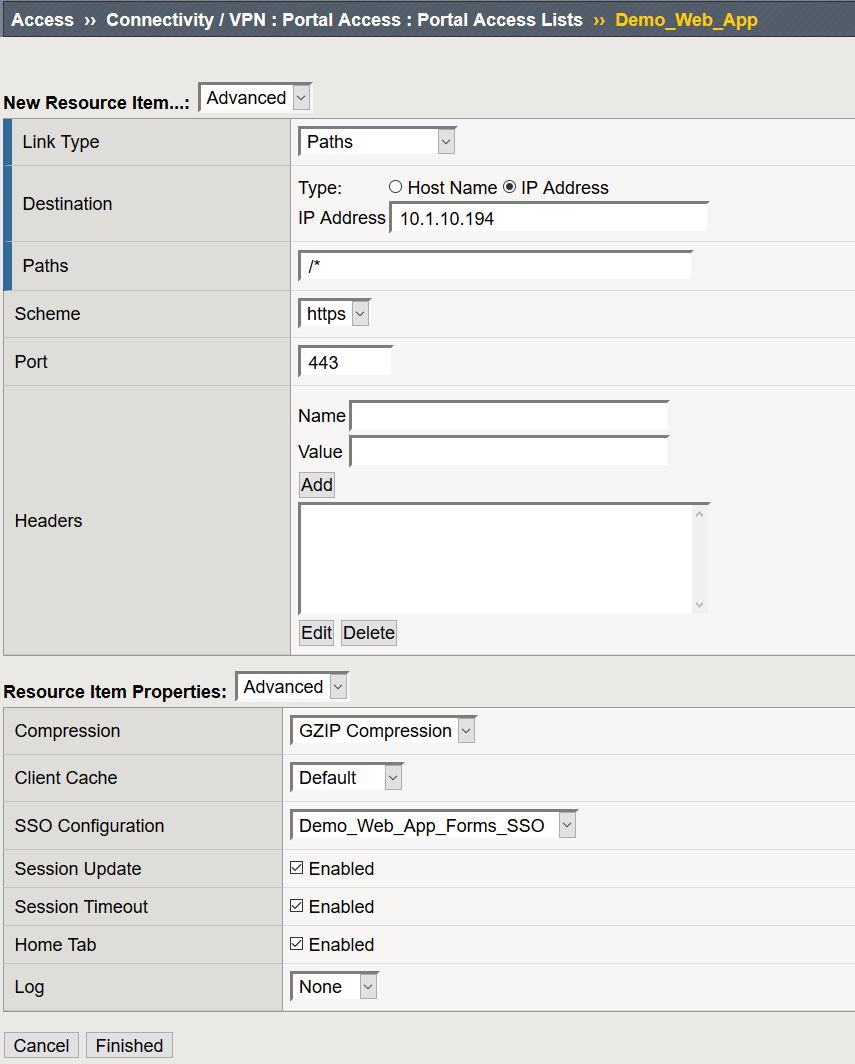
- Click Add
- Destination: IP or Host Name of the web application
- Link Type: Paths
- Paths: /*
- Scheme: https
- SSO Configuration: Demo_Web_App_Forms_SSO
- Click Finished
Create a Connectivity Profile
- Navigate to Access >> Connectivity / VPN > Connectivity >> Profiles >> Click Add
- Profile Name: Demo_CP
- Parent Profile: connectivity
- Click OK
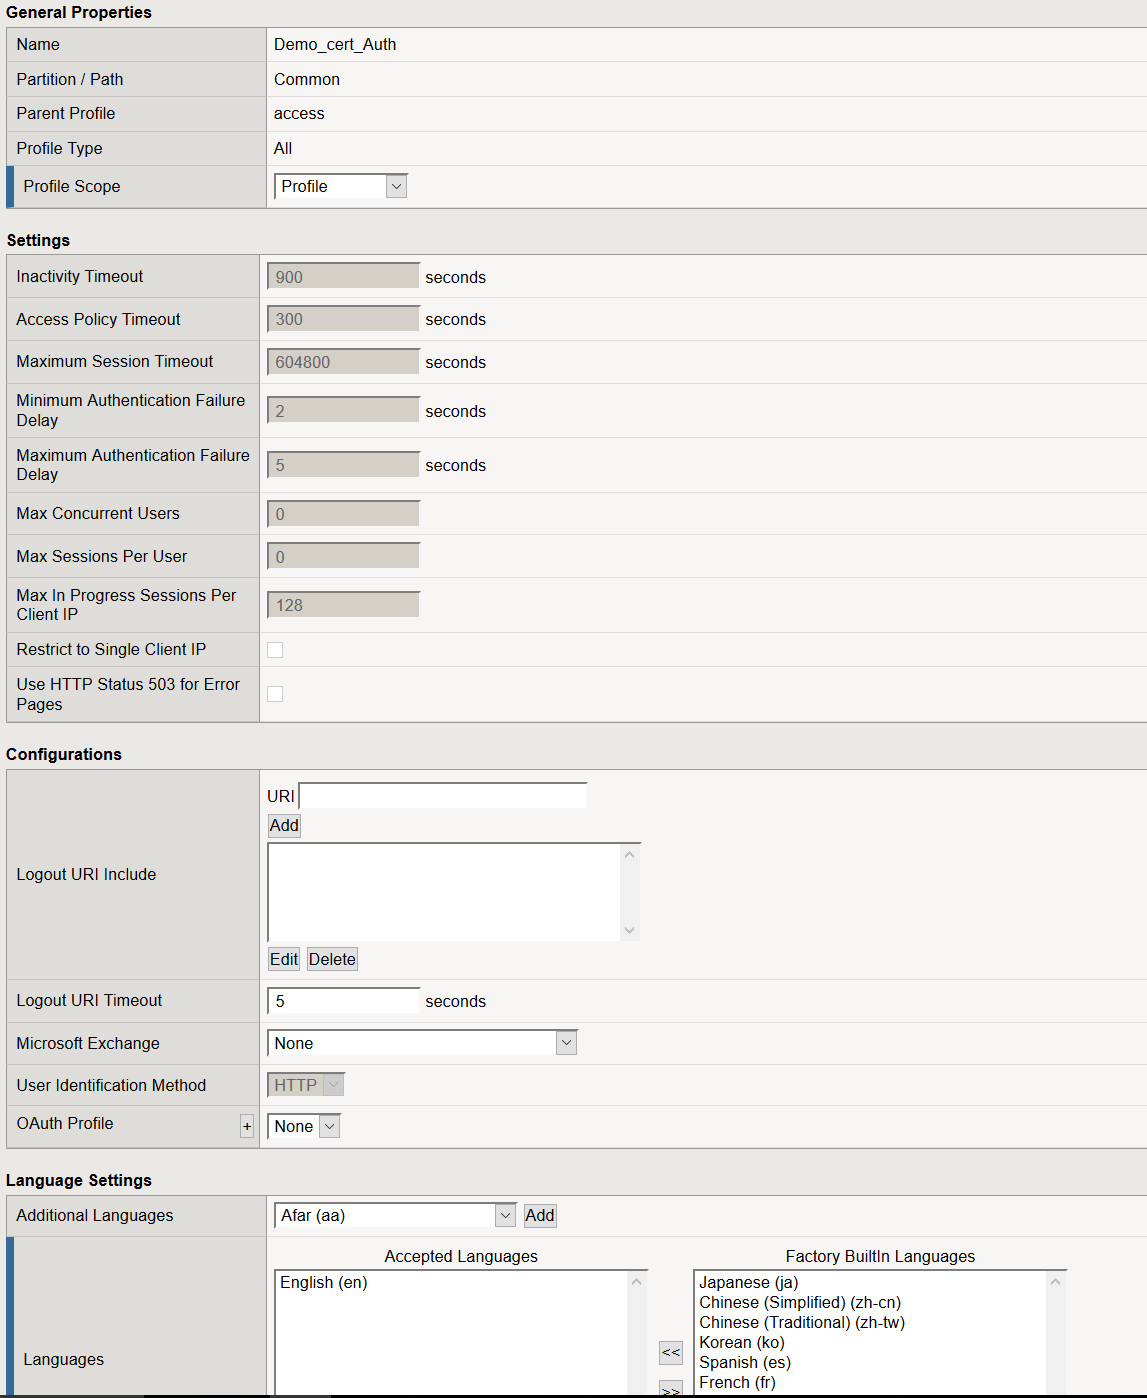
Create Client Cert Access Policy
- Navigate to Access > Profiles / Policies > Select Create
- Name: Demo_cert_Auth
- Profile Type: All
- Profile Scope: Profile
- Languages: Select your desired language and move it to Accepted Languages
- Leave all other settings at their defaults and select Finished
Modify the Access Policy Using the Visual Policy Editor
- From the Access > Profiles > Policies : Access Profiles (Per-Session Policies) page, select Edit from the access policy created in the previous step.

- Between Start and Deny select the +
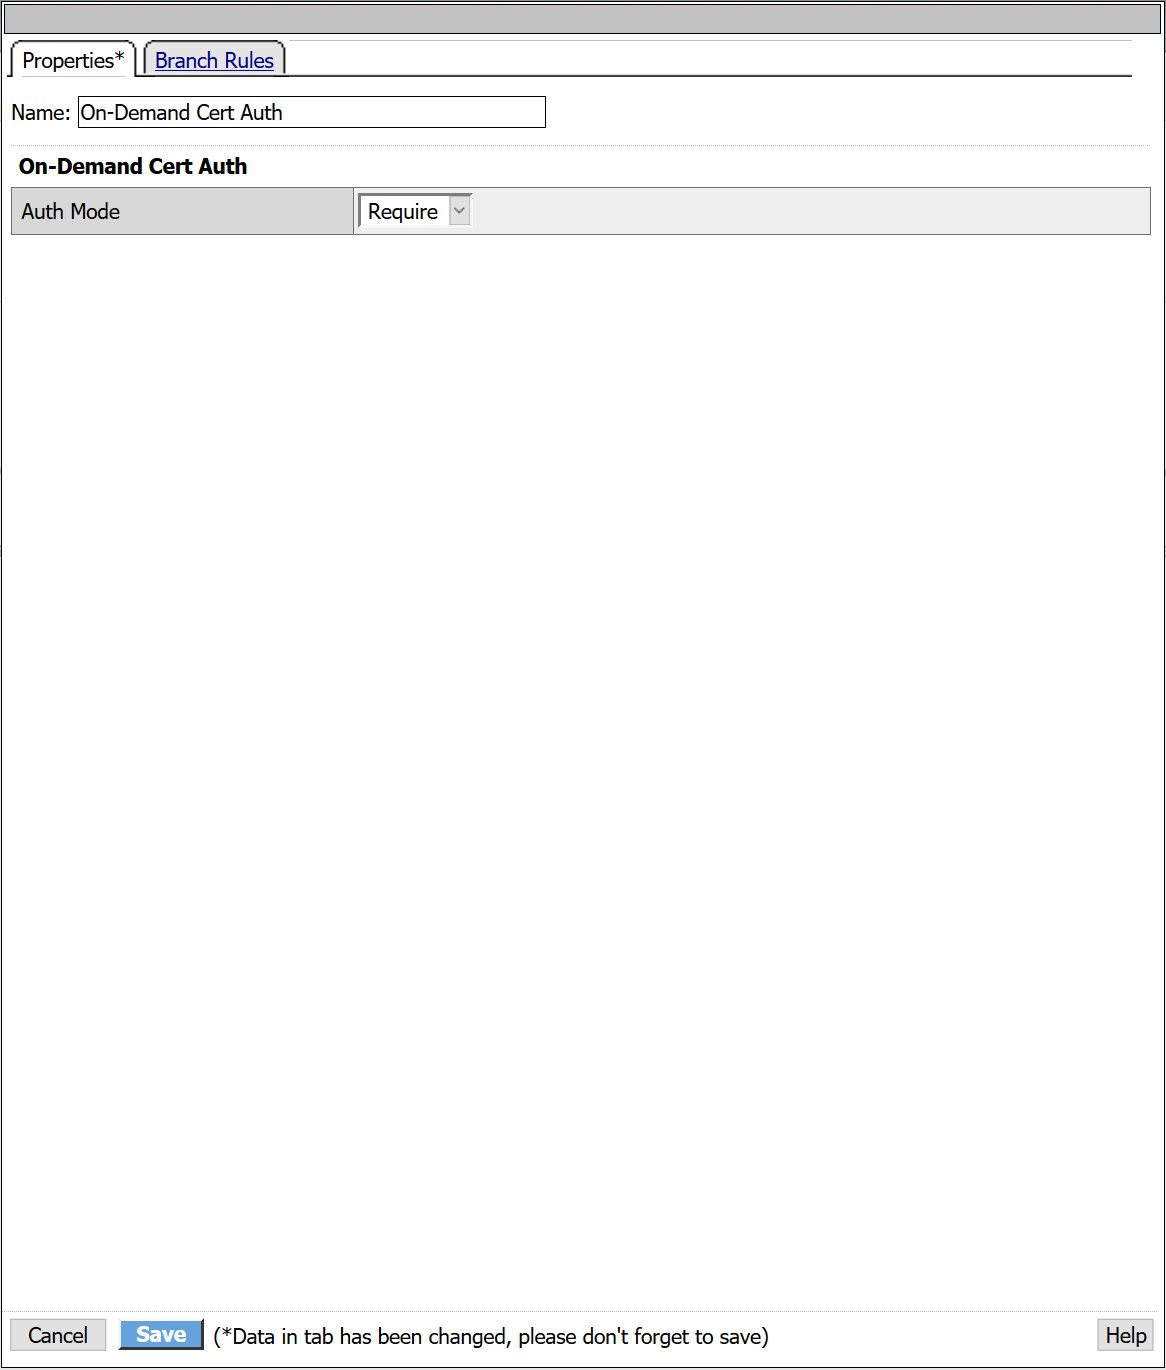
- From the popup select the Authentication tab and select On_Demand Cert Auth > Add Item
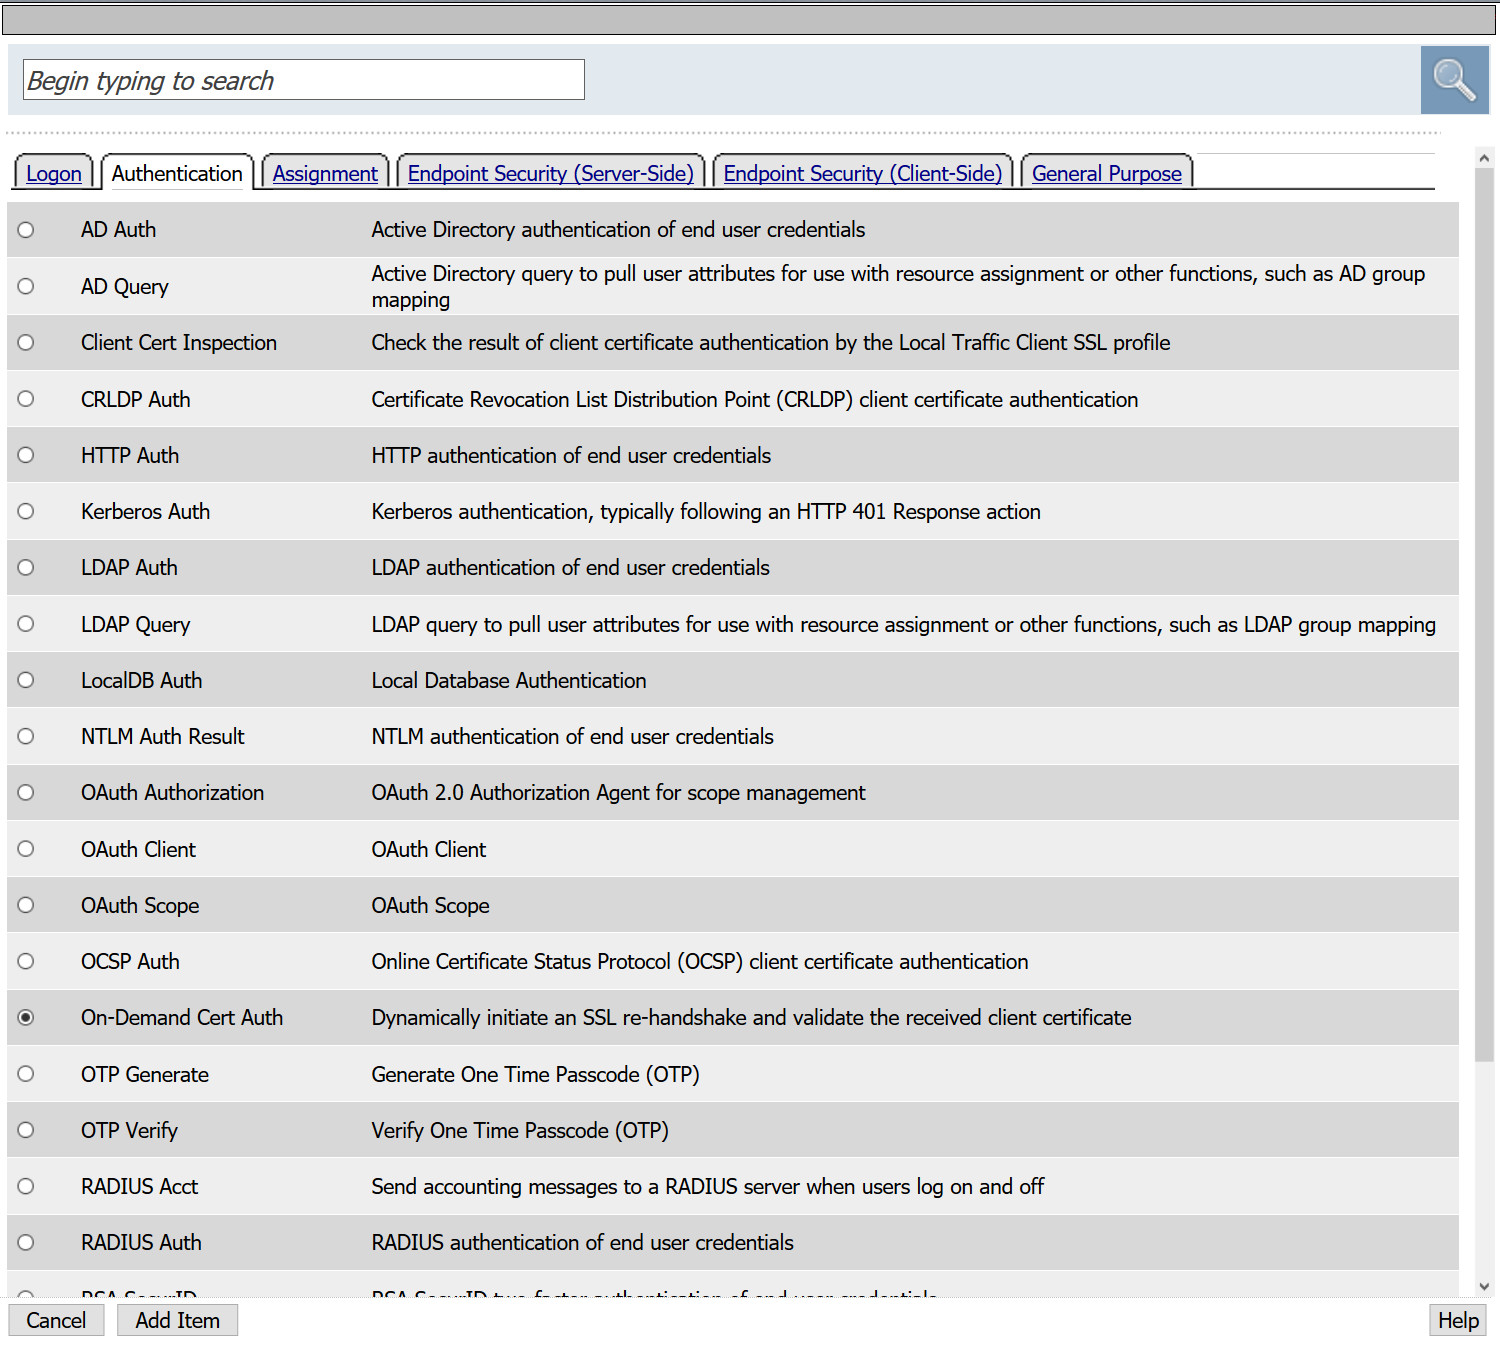
- You will be presented with an option to request or require a client present a client certificate. For this example, we will Require the client present a certificate.
- Select Save
- Following the successful branch of On Demand Cert Auth in the VPE, select +
- From the Authentication tab, select OCSP Auth > Add Item
- From the OCSP Responder drop down, select the OCSP AAA object created in previous steps.
- Certificate Type: User
- Click Save

- Following the successful branch of OCSP Auth, select +
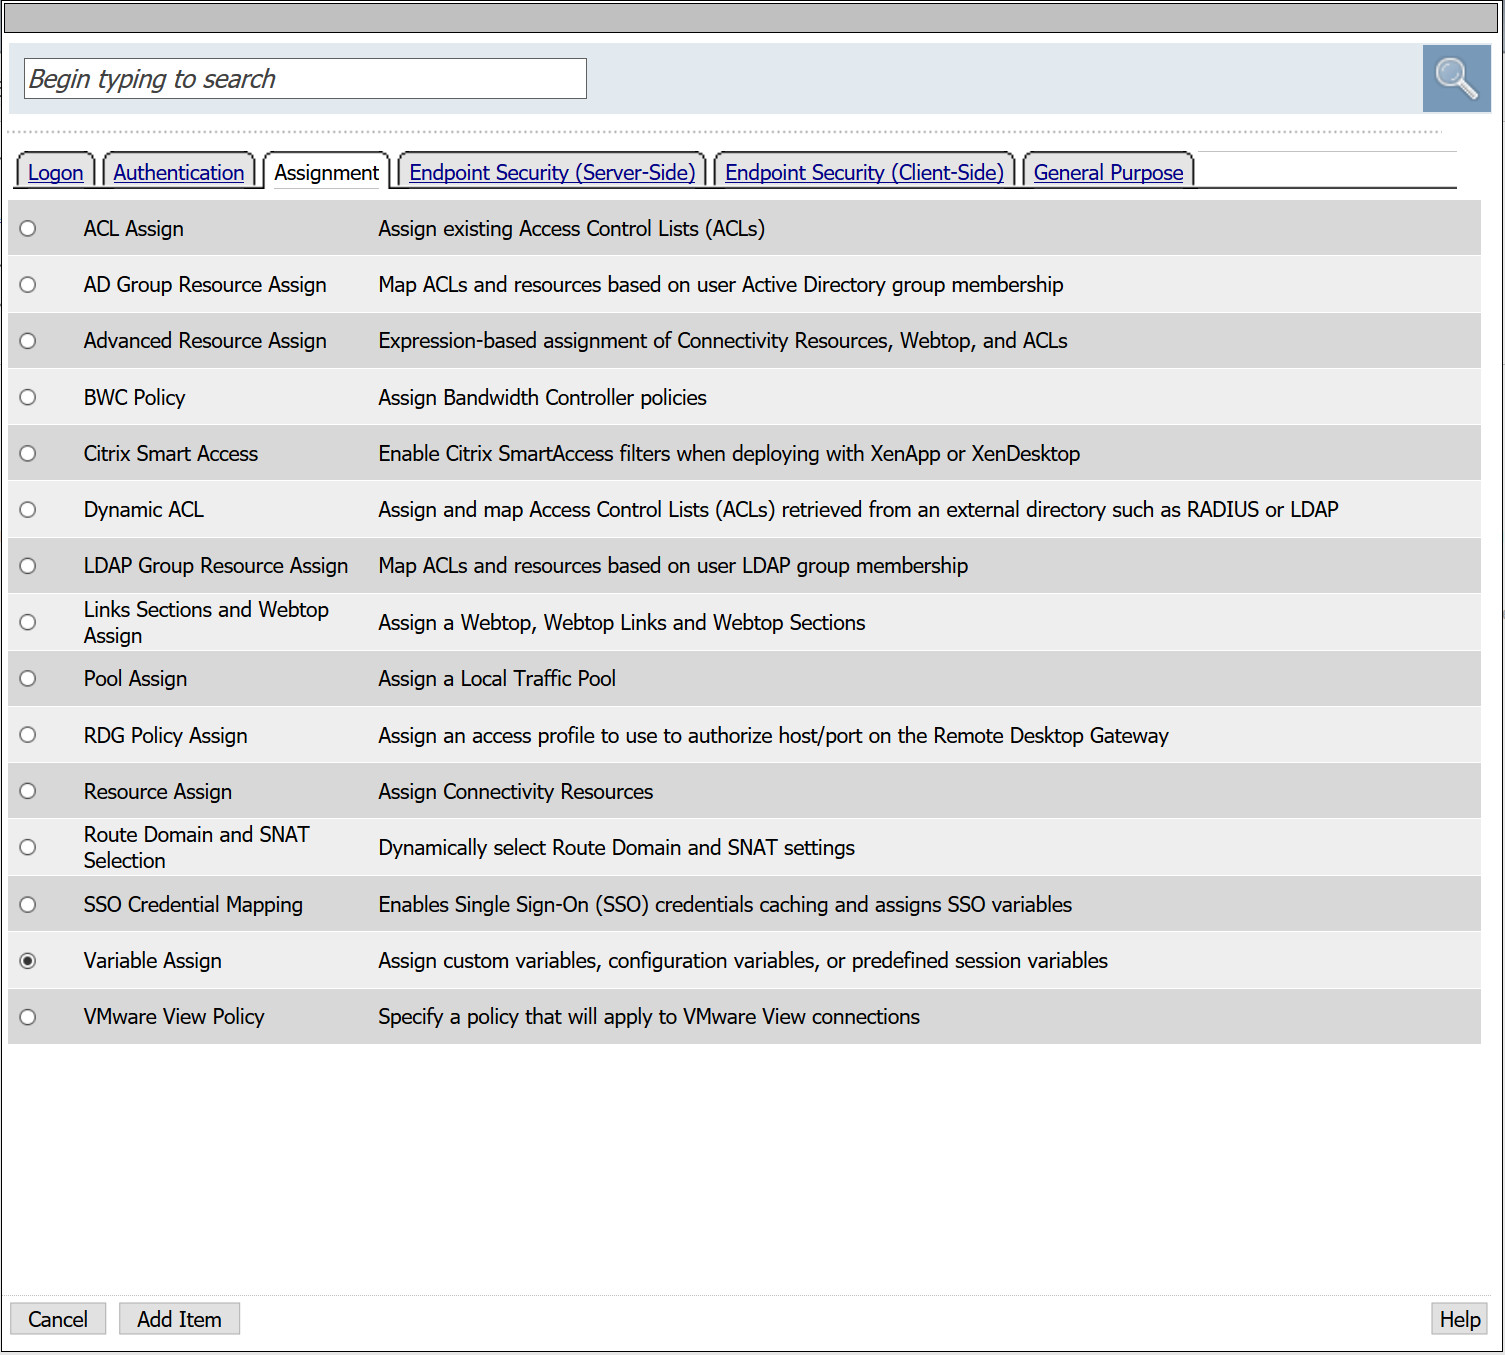
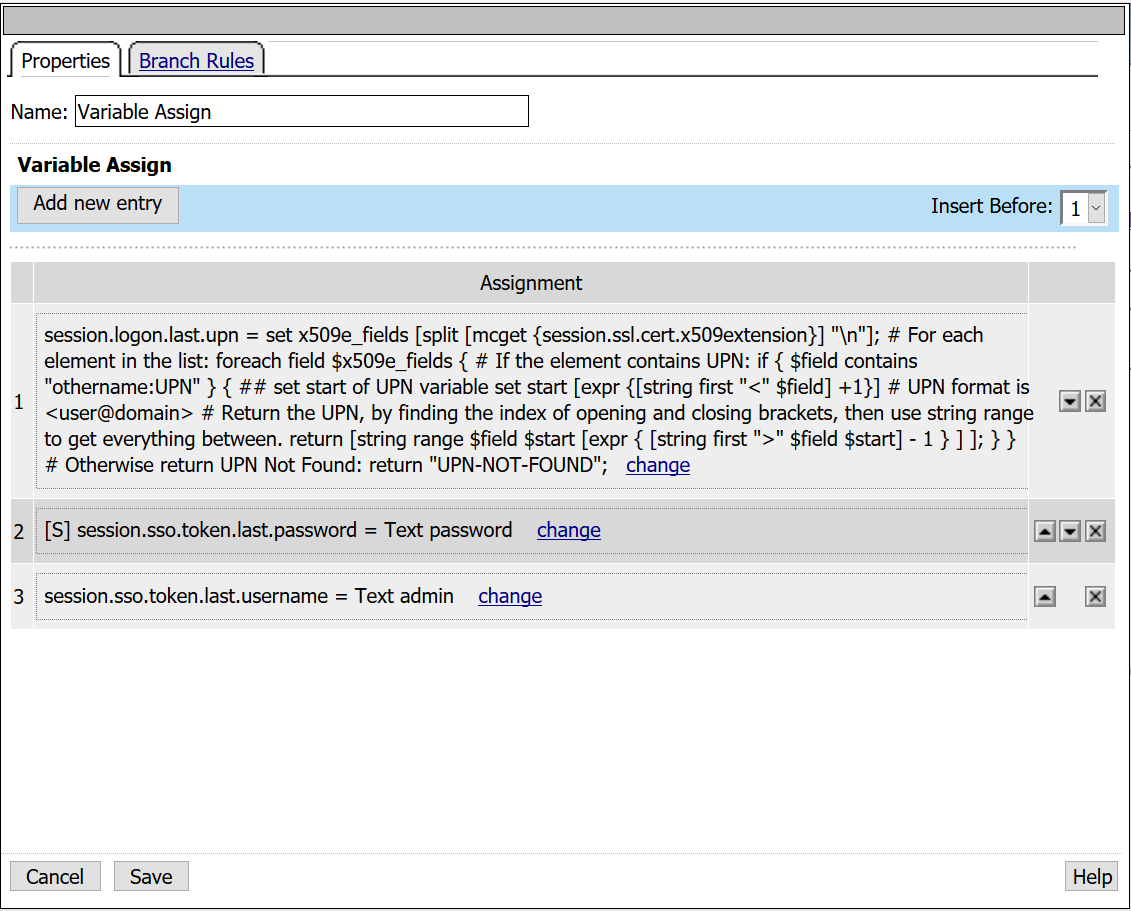
- From the Assignment tab, select Variable Assign > Add Item
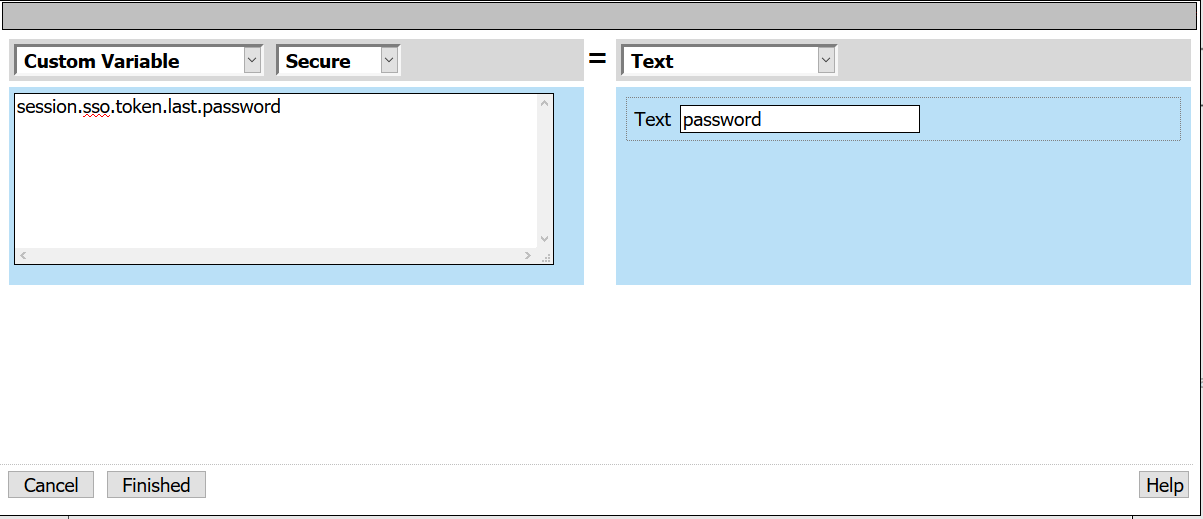
- From the first empty Assignment, select Change
- Custom Variable: session.sso.token.last.password
- Select Secure from the drop down menu
Note: Unsecure or Secure specifies whether the variable is secure. A secure variable is stored in encrypted form in the session database. The value of a secure variable is not displayed in the session report, or logged by the logging agent.
- Text: password
- Select Finished
- Under Variable Assign, select Add new entry > Change empty variable
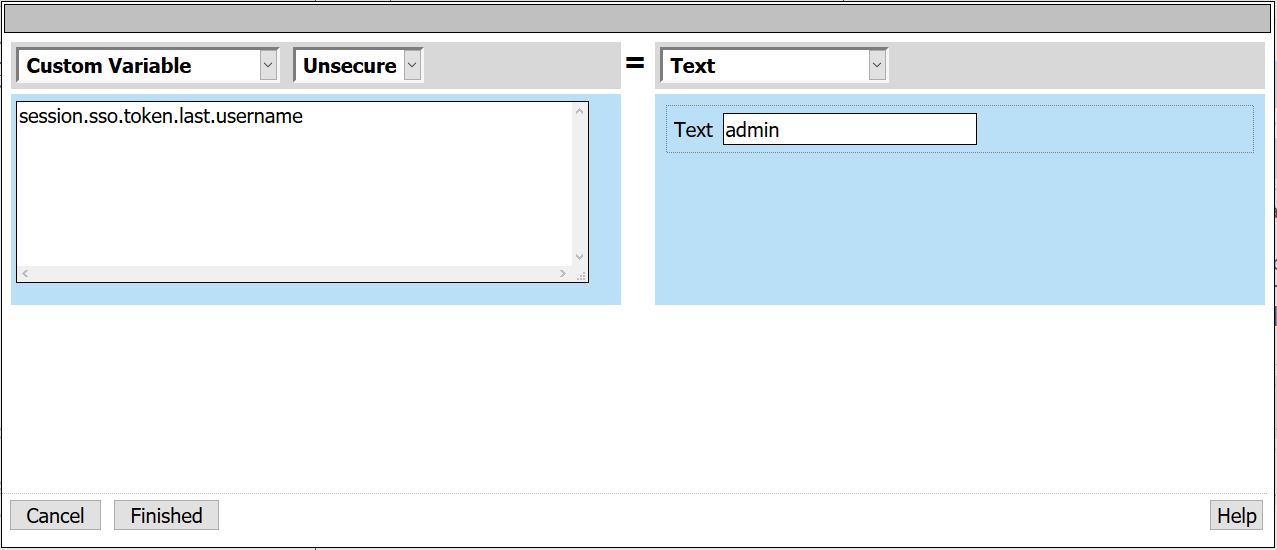
- Custom Variable: session.sso.token.last.username
- Text: admin
- Under Variable Assign, select Add new entry > Change empty variable
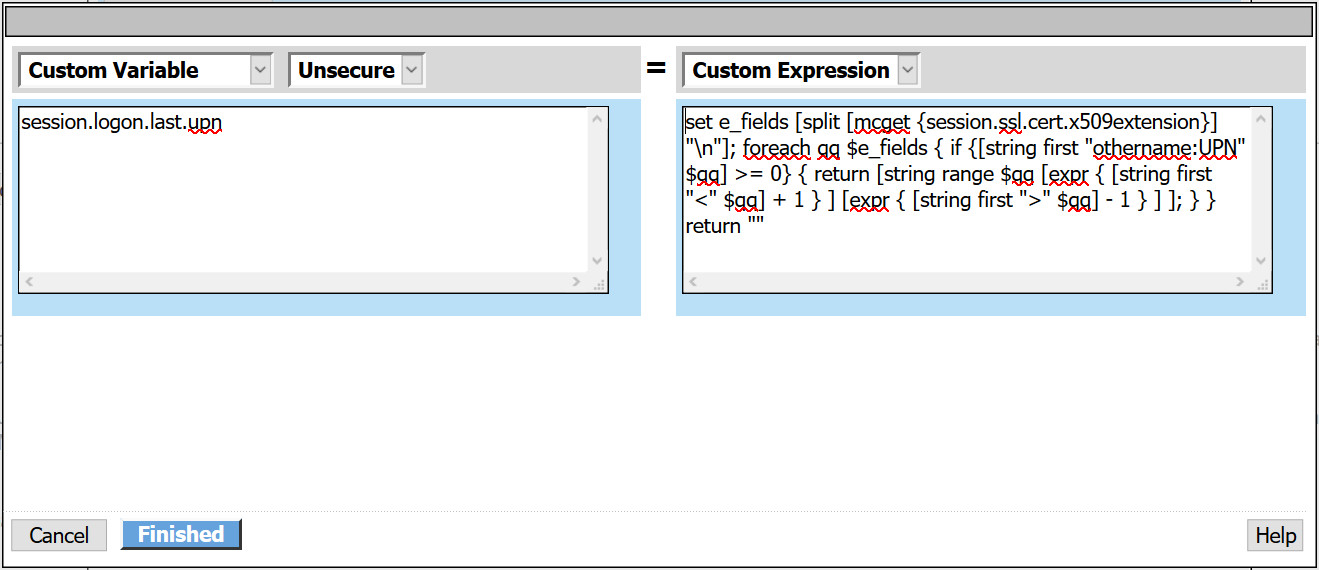
- Custom Variable: session.logon.last.upn
- Custom Expression:
set x509e_fields [split [mcget {session.ssl.cert.x509extension}] "\n"];  # For each element in the list:  foreach field $x509e_fields {  # If the element contains UPN:
if { $field contains "othername:UPN" } {  ## set start of UPN variable  set start [expr {[string first "<" $field] +1}]  # UPN format is   # Return the UPN, by finding the index of opening and closing brackets, then use string range to get everything between.  return [string range $field $start [expr { [string first ">" $field $start] - 1 } ] ];  } }  # Otherwise return UPN Not Found:  return "UPN-NOT-FOUND";
- Select Finished > Save
- Select Save
- Following the fallback branch of Variable Assign, select +
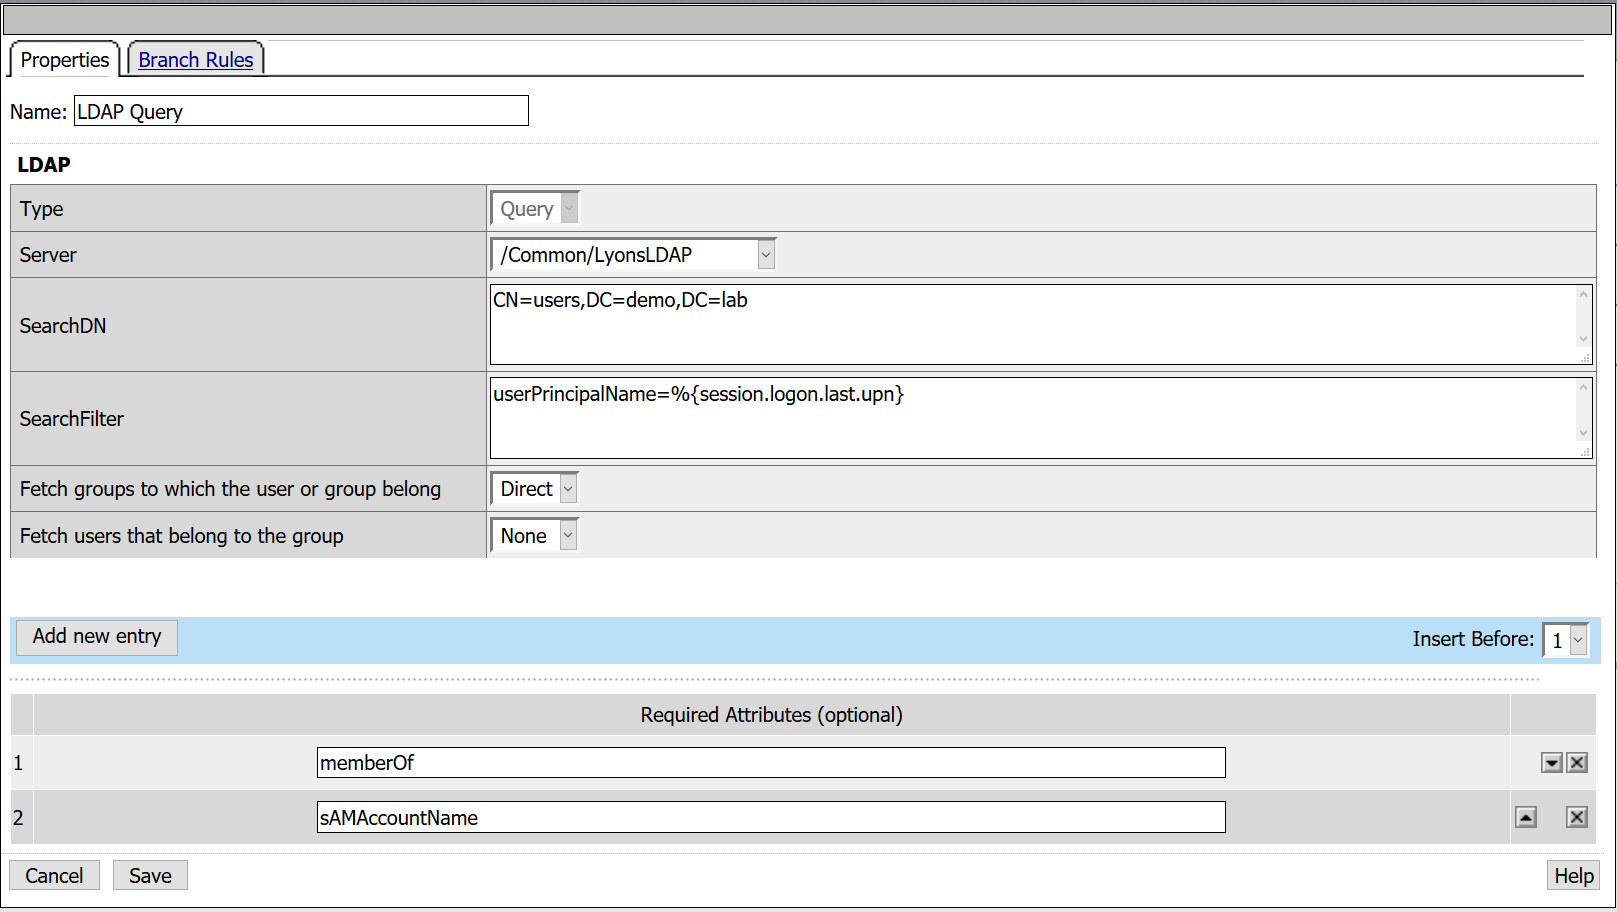
- From the Authentication tab, select LDAP Query > Add Item
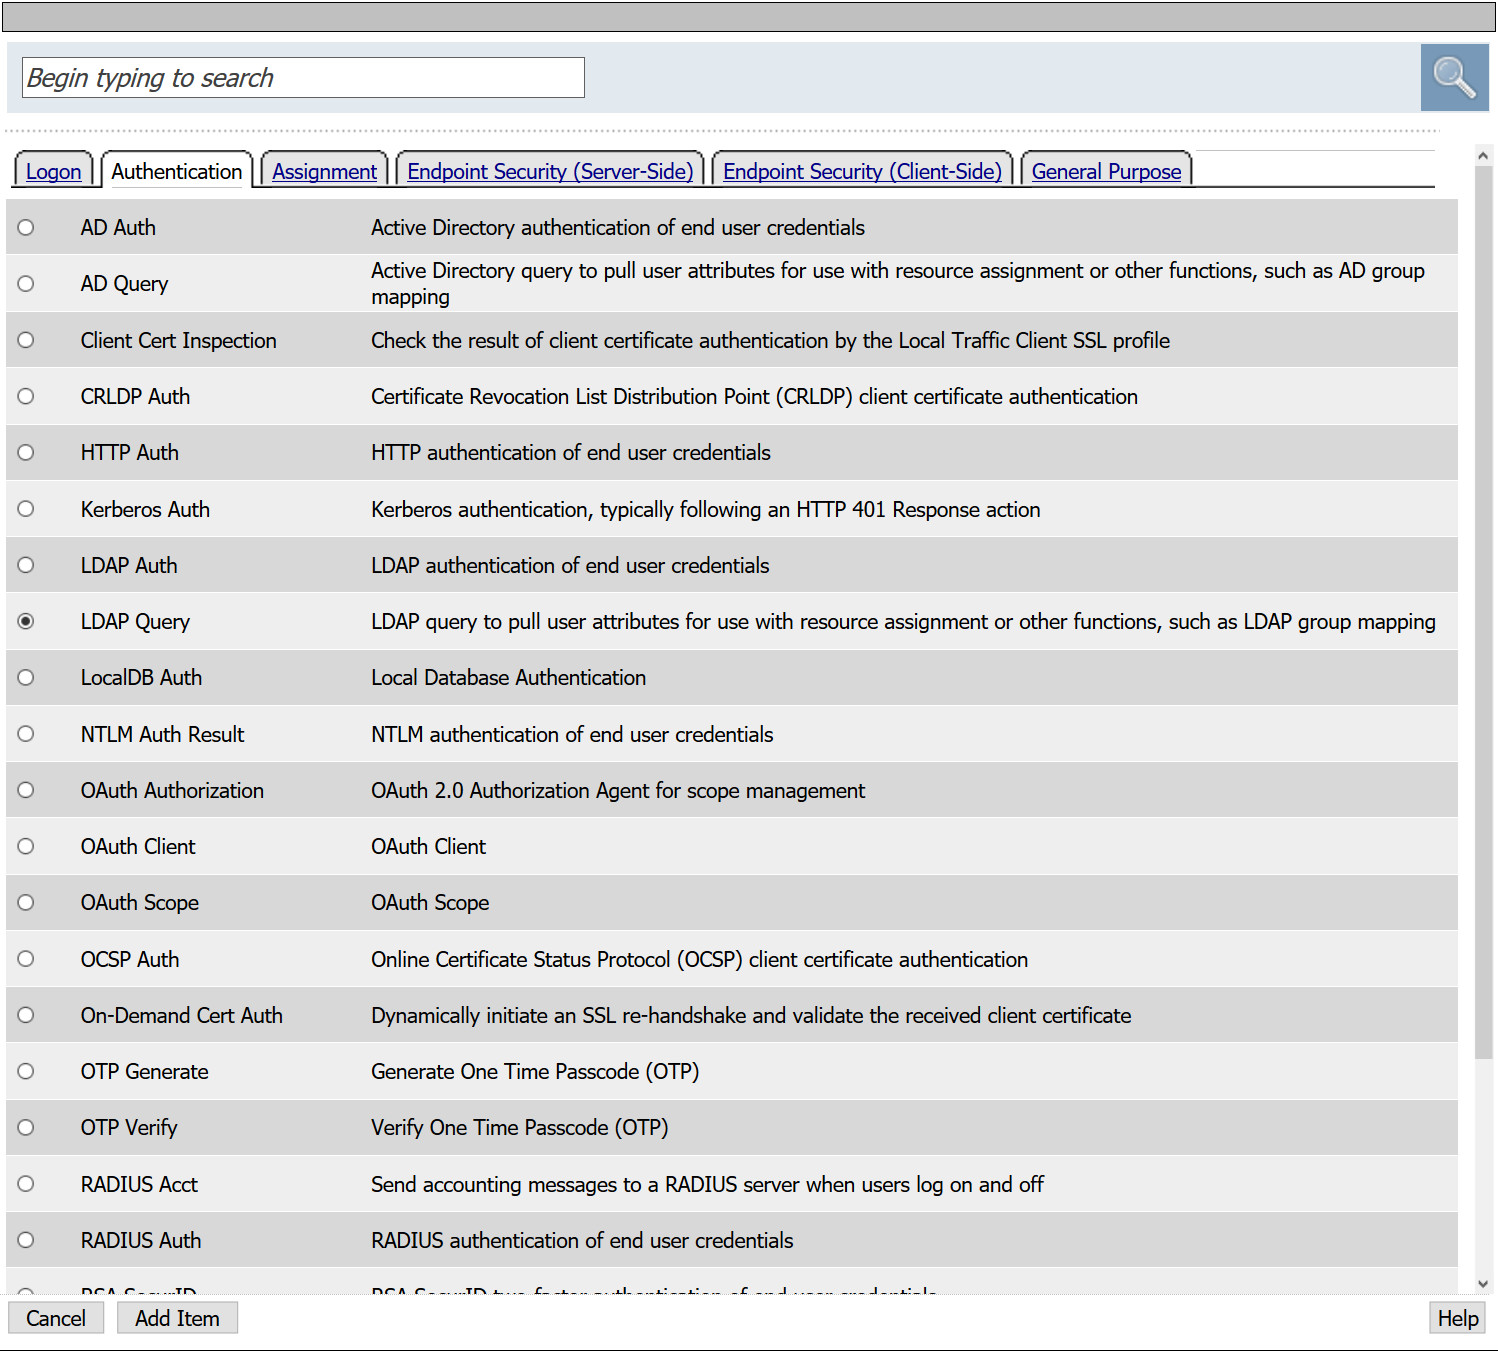
- From the Server drop down, select the LDAP AAA created in previous steps
- SearchDN: CN=Users,DC=demo,DC=lab
- SearchFilter: UserPrincipalName=%{session.logon.last.upn}
- Fetch Groups to which the user or group below: Direct
- Required Attributes: sAMAccountName
- Required Attributes: memberOf
Note: sAMAccountName is not required for successful authentication as it is when performing Kerberos KCD though it can be useful to know who is logging in by name versus a long string of characters.
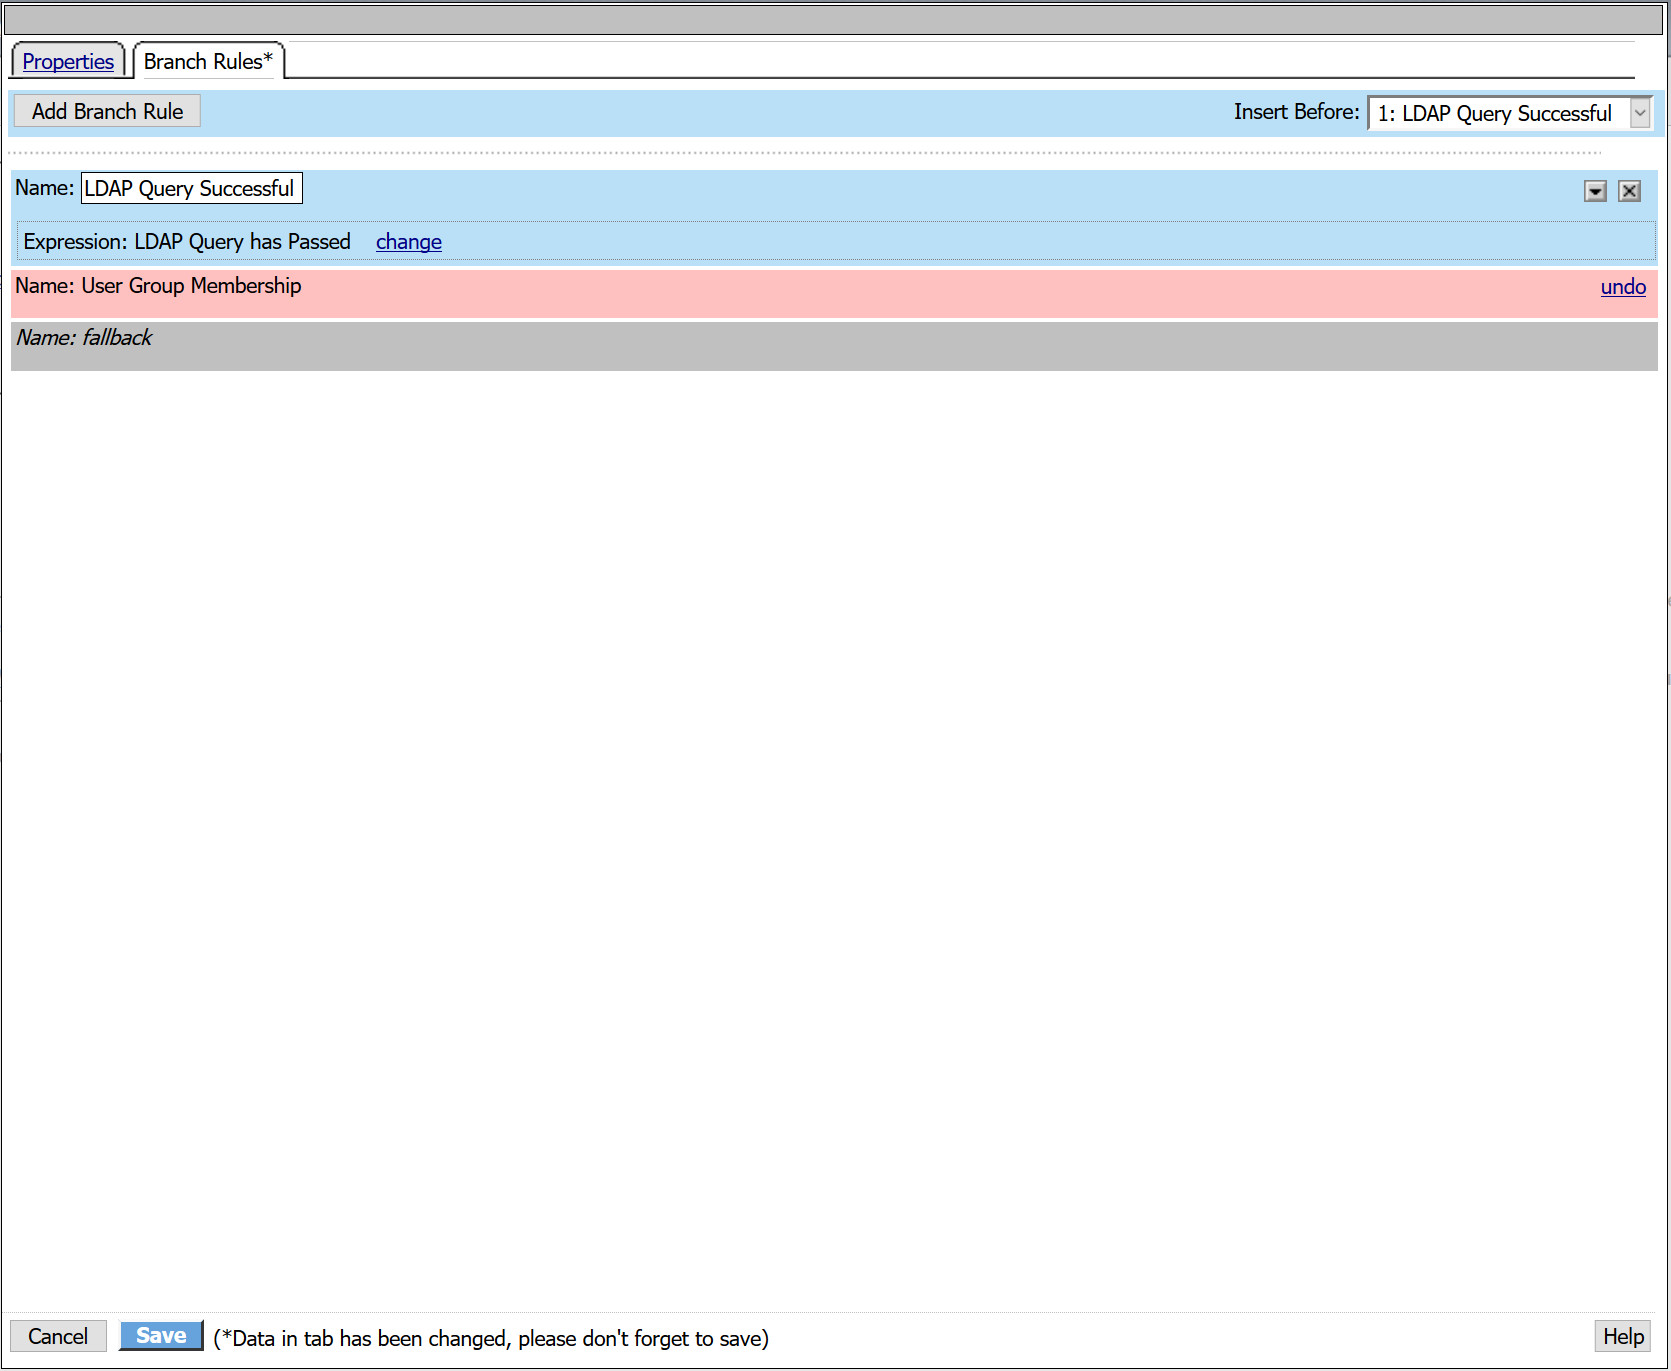
- Navigate to the Branch Rules tab
- Remove the existing Group Membership expression by selecting the X
- Select Add Branch Rule
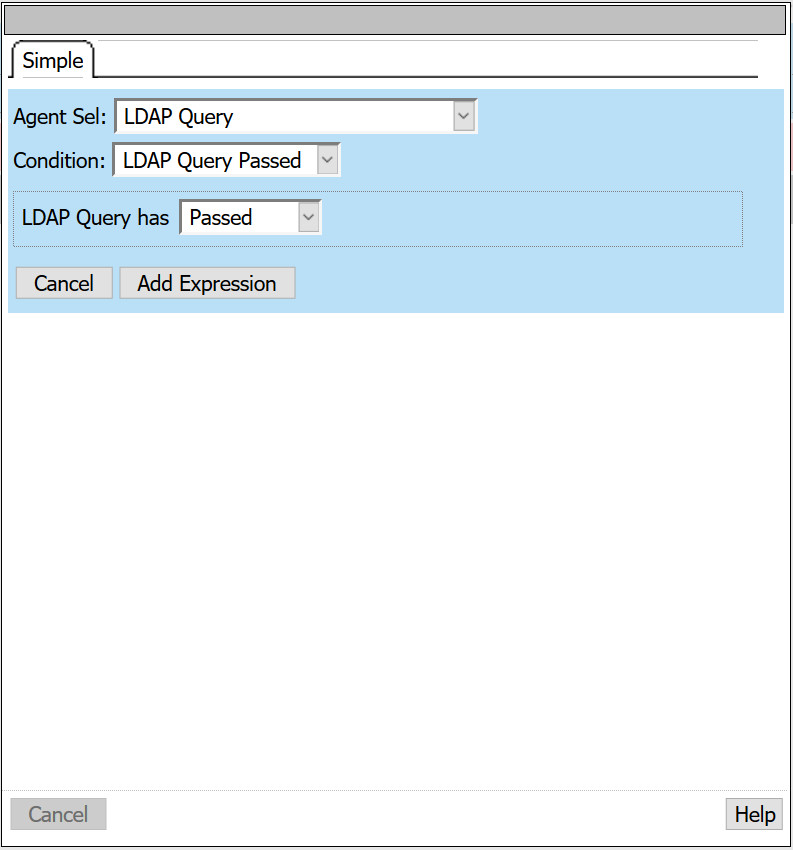
- Name: LDAP Query Successful
- Next to expression, select change
- Agent Sel: LDAP Query
- Condition: LDAP Query Passed
- LDAP Query has: Passed
- Select Add Expression > Finished
- Click Save
- Following the LDAP Query Successful branch, select +
- From the Assignment tab, select SSO Credential Mapping > Add Item
- SSO Token Username: mcget {session.sso.token.last.username}
- SSO Token Password: mcget {session.sso.token.last.password}
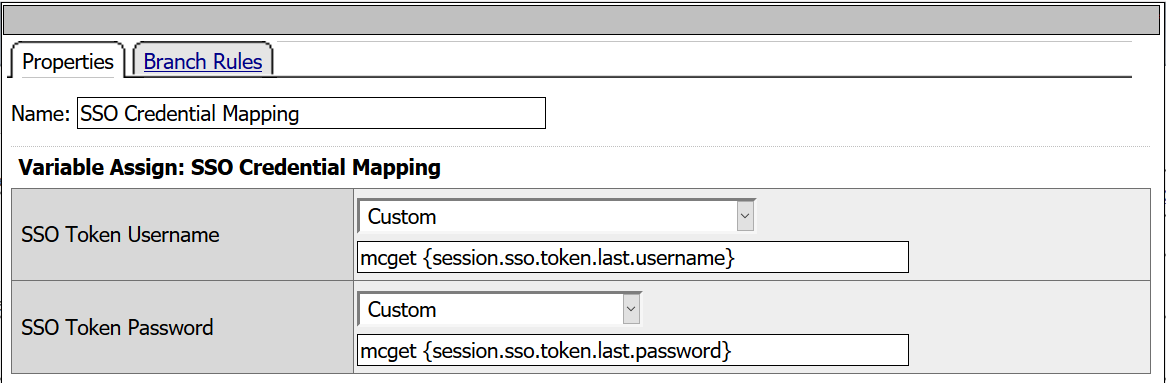
- Click Save
- Following the SSO Credential Mapping branch select +
- Select Advanced Resource Assign from the Assignment tab
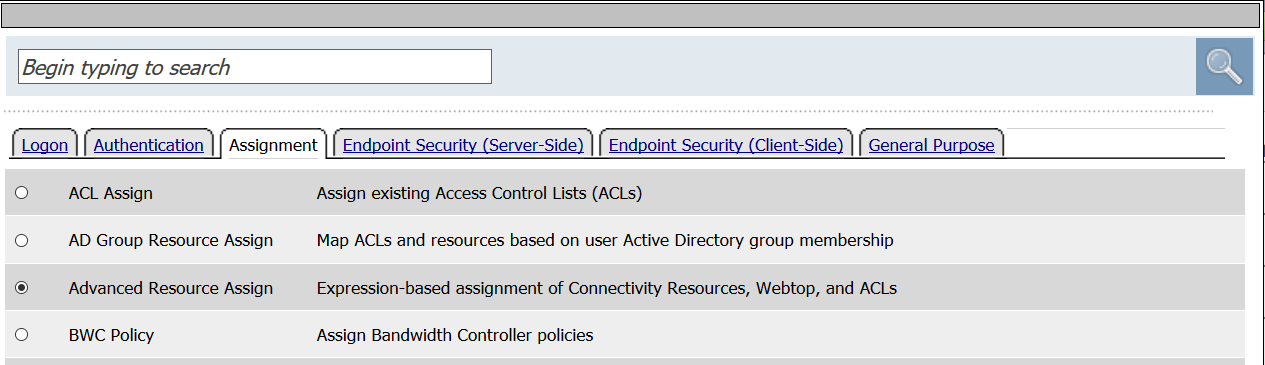
- Click Add new entry
- Click Add/Delete
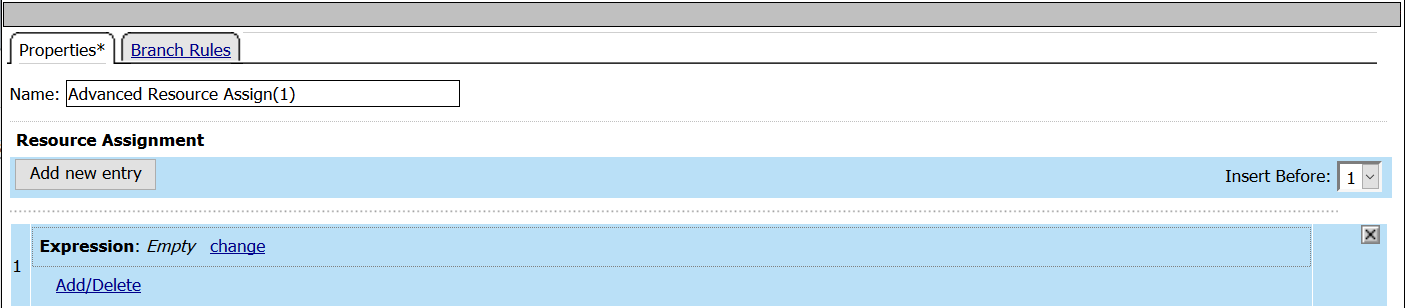
- From the Portal Access tab, select the Demo_Web_App resource created in previous tasks.
- From the Webtop tab, select the demo_webtop created in previous tasks.
- Click Update
- Click Save
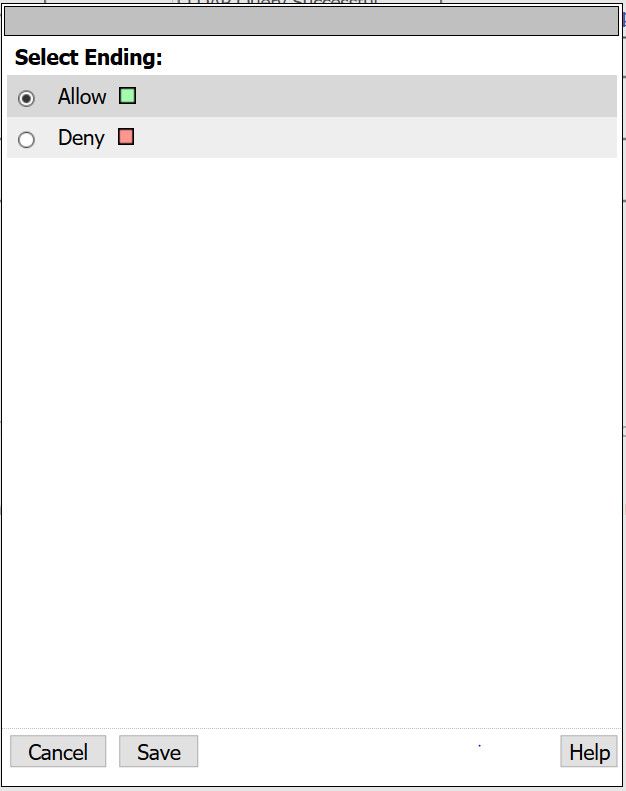
- From the fallback branch, select Deny
- Change ending to Allow and click Save
At this point, you have a fully deployed VPE capable of supporting smart card authentication and have statically created a username and password that will be included in your HTTP Post to the web application.

- Select Apply Policy
Configure SSL Client Profile
- To support client certificate-based authentication, we must also create a Client SSL Profile on the BIG-IP using the steps below.
- Navigate to Local Traffic > Profiles > SSL > Client > Create
- Name: DemoSSLProfile
- Certificate Key Chain: Place a check mark under the custom field. Click Add to select the appropriate cert/key pair.
- Client Certificate: Leave it set to ignore as the APM ODCA will perform this function.
- Trusted Certificate Authorities: Select the CA or CA bundle certificate
- Advertised Certificate Authorities: Select the CA or CA bundle certificate
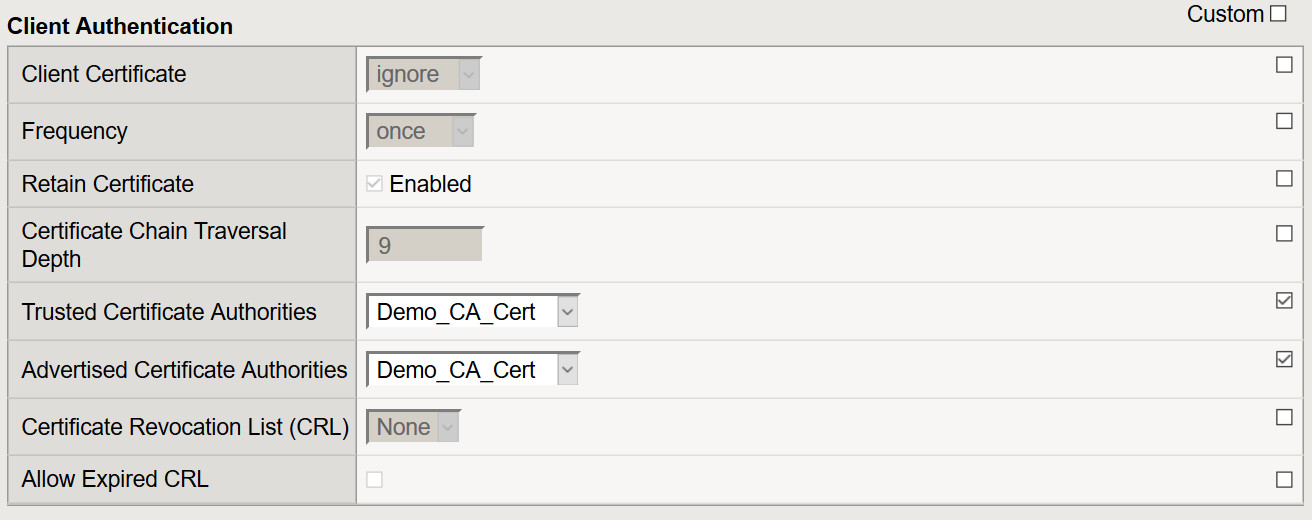
- All other settings can be left at their defaults.
- Click Finished
Create a Virtual Server for your Web Application
- Navigate to Local Traffic >> Virtual Servers >> Click Create
- Name: Demo_Web_App_VS
- Destination Address: IP that users will connect to in order to access the web application
- Service Port: 443
- Protocol Profile (Client): f5-tcp-lan
- HTTP Profile: http
- SSL Profile (Client): DemoSSLProfile
- SSL Profile (Server): serverssl
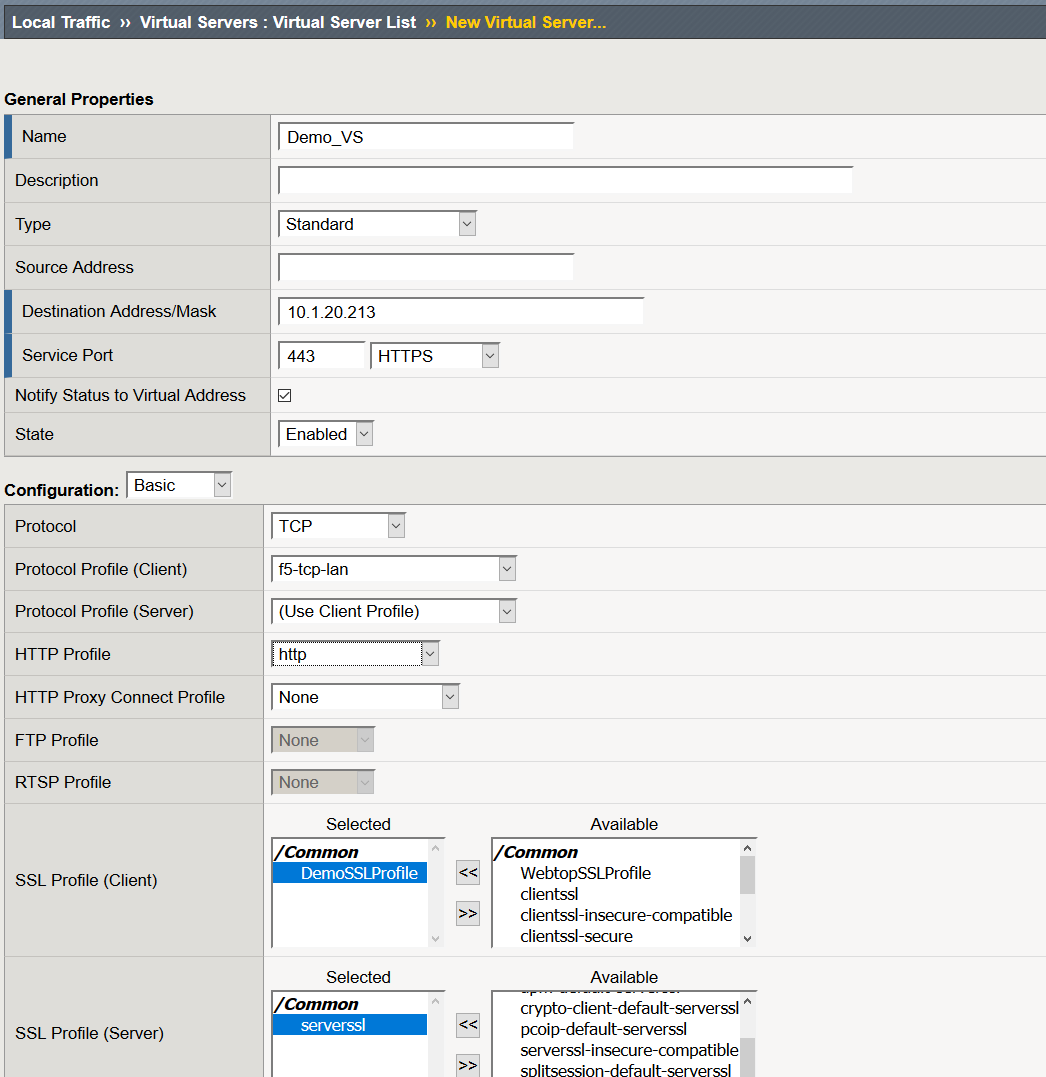
- Source Address Translation: Automap
- Rewrite Profile: rewrite_portal
- Access Profile: Demo_cert_Auth
- Connectivity Profile: Demo_CP
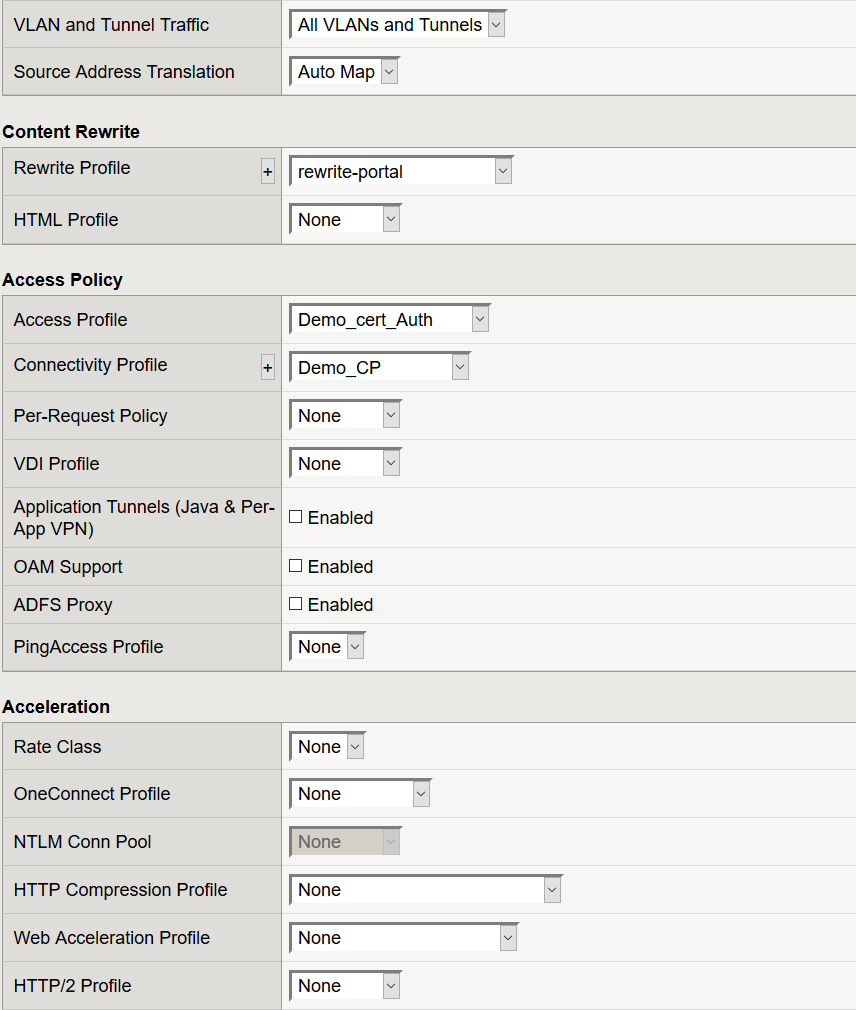
- Click Finished
At this point, we have successfully configured all components required to support this use case so let's attempt access.
Validation Testing
- From a browser navigate to the IP of your virtual server or the DNS name that resolves that IP
- You should be prompted for user certificate
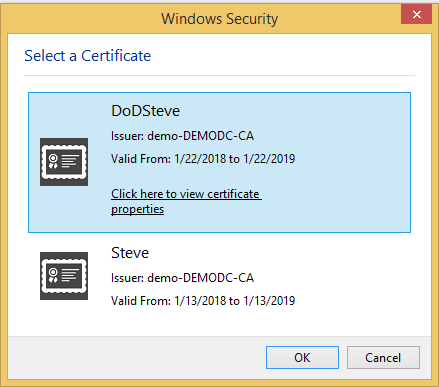
- Select your user cert and Click OK
- You should be presented with your Webtop
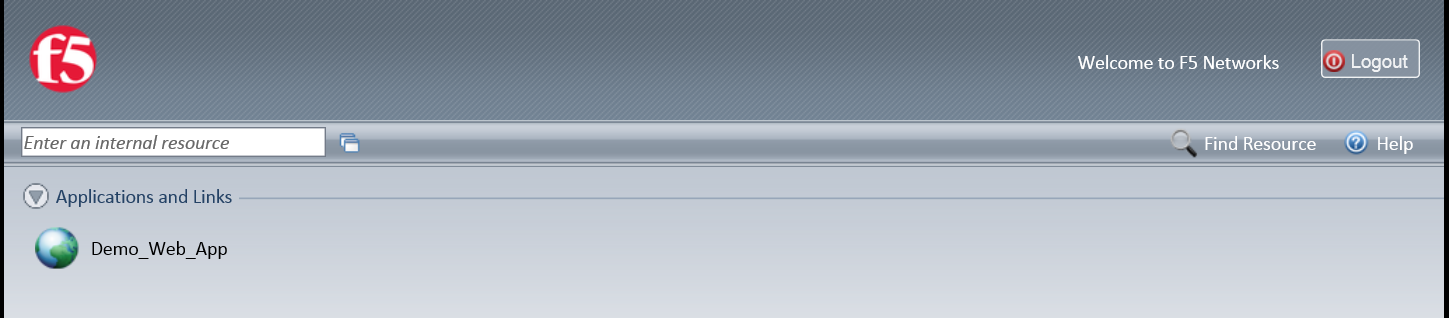
- Click on the resource item and you should be redirected to that web application
- If your configuration is correct, you will be logged in using the SSO credentials provided within the VPE and SSO profile.
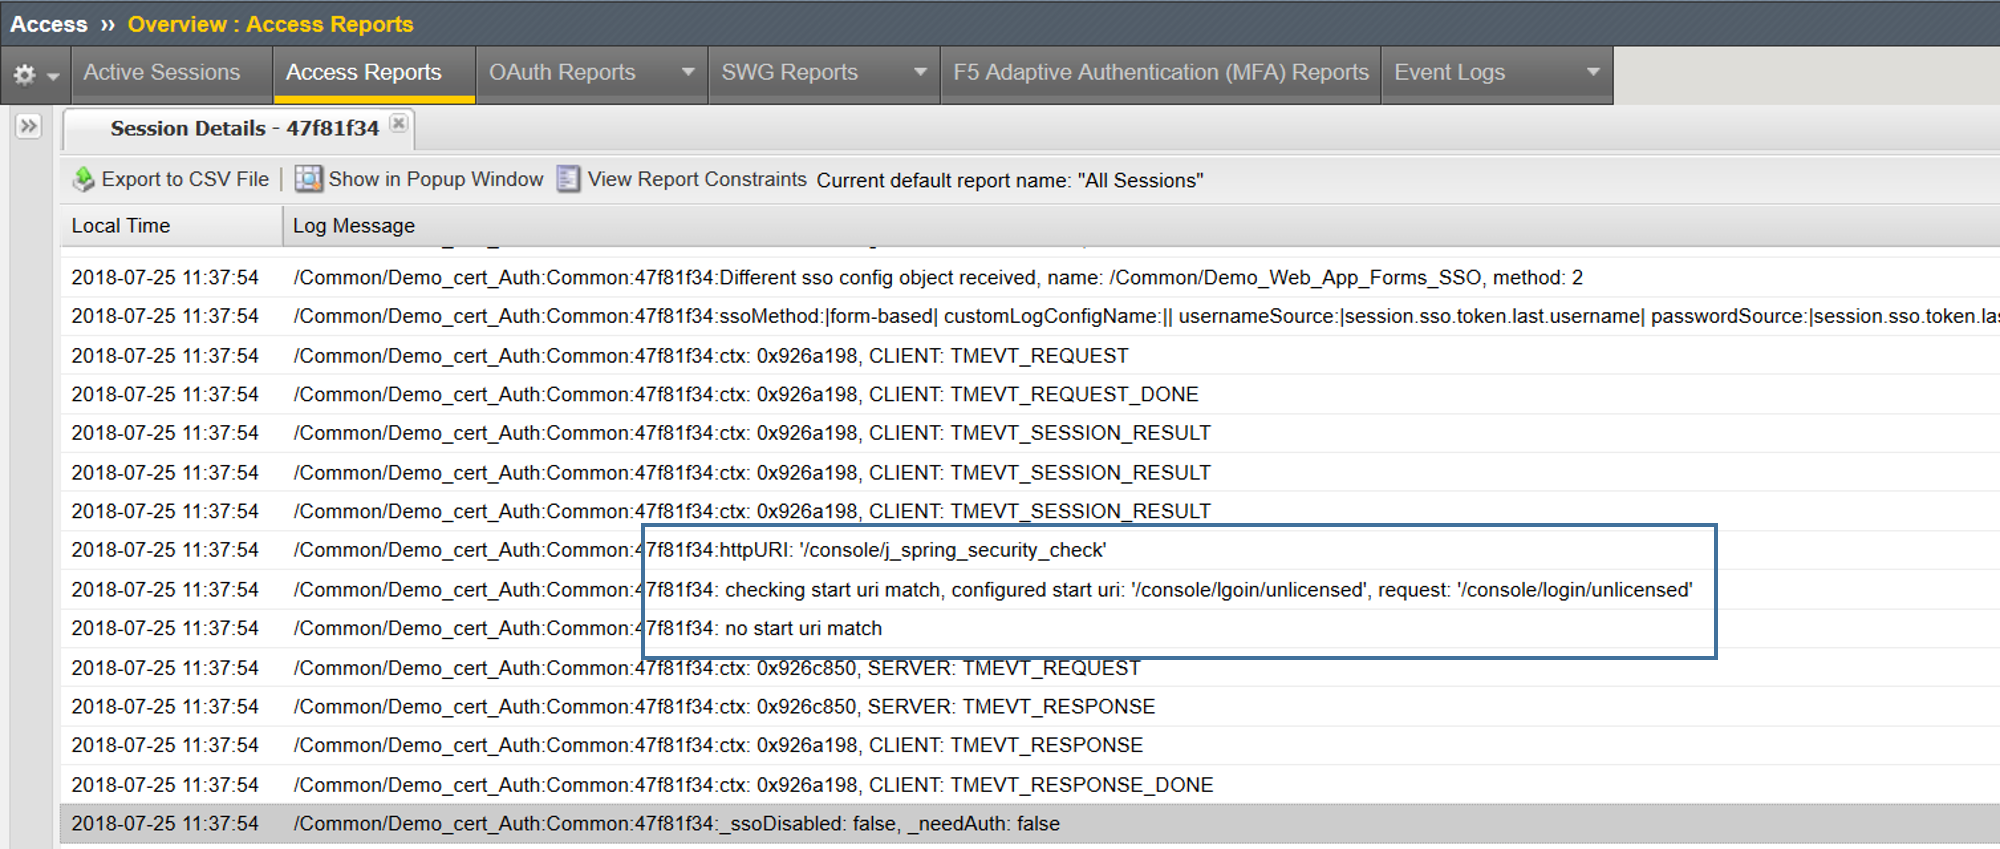
In my first attempt I actually was not successful and received no logon error. This is likely one of 2 things, either I did not assign my SSO profile or the Start URI is incorrect. Let's validate
- Validated SSO profile is assigned
Ahhh, now I see! Human error of course. I typed the Start URI incorrectly so, no there was no uri match.
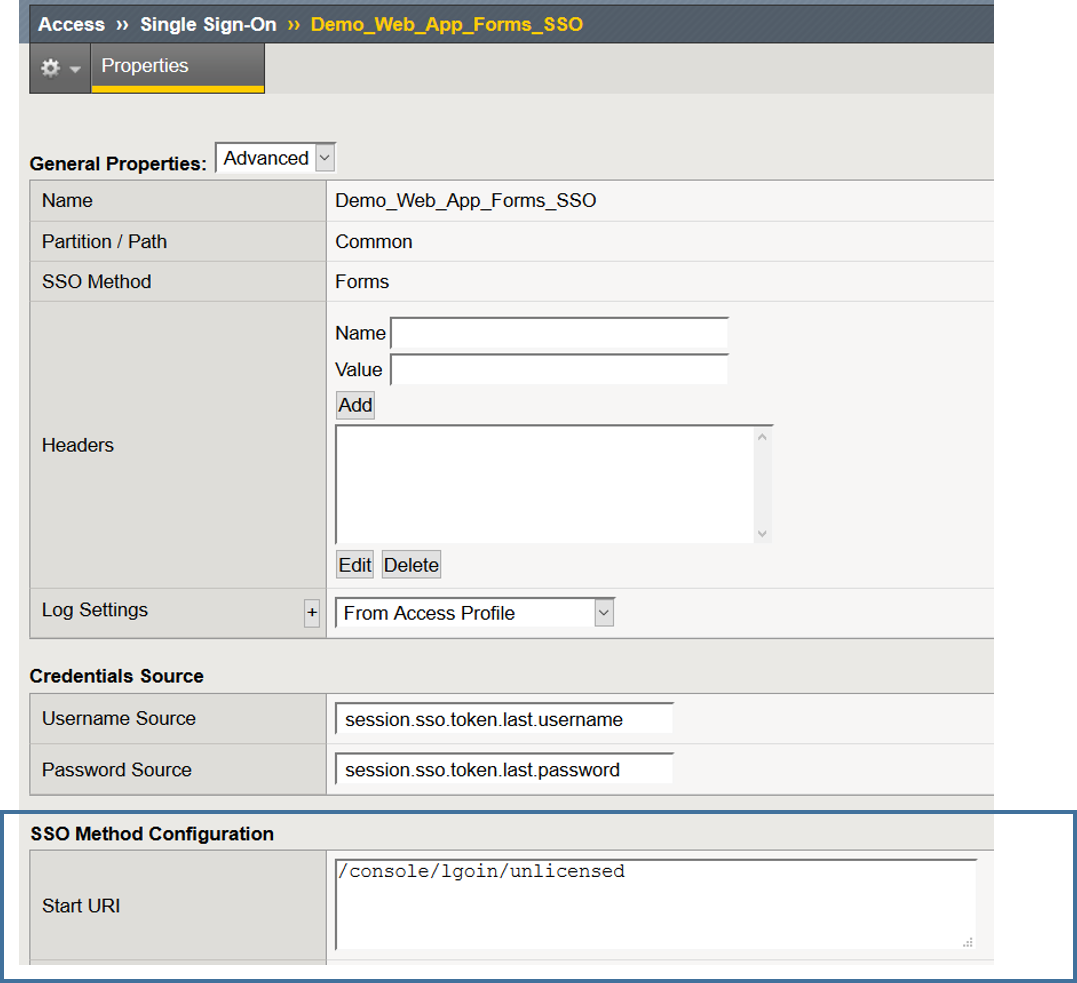
After modifying the Start URI to the correct URI, I am now able to successfully login using the SSO configuration in this guide.
I am by no means saying this will be a common configuration though it is a use case that I have seen in the field more than once. As always, if it helps at least one of you out there it was well worth it. Until next time.