Improve BIG-IP APM VPN speed with TLS dynamic record size
After successfully setting up BIG-IP APM network access, and running it for sometime, you may be looking for ways to optimize VPN speed for your users. This article discusses one way you can do that. Feature Description Beginning in BIG-IP 12.1.0, the Client SSL profile includes a feature that enables dynamic record size in TLS. When applied to a F5 BIG-IP Access Policy Manager (APM) network access VPN TLS virtual server, this can improve VPN speeds for your users. It has been found that certain protocols, notably HTTP, show better client response times using this method. For more information on the Allow Dynamic Record Sizing setting down to the packet level, refer to the following resources TheAbout dynamic record sizing section of the BIG-IP System: SSL Administration manual. Boosting TLS Performance with Dynamic Record Sizing on BIG-IP on DevCentral. SSL Profiles Part 11: TLS Optimizationon DevCentral. Important: Dynamic record size is a TLS enhancement and does not apply to BIG-IP APM network access DTLS virtual servers. Do not enable dynamic record size on DTLS. When you want to optimize network performance, you must allocate time to tune each configuration to match the requirements specific to your environment. Additionally, note that configuration changes that improve performance may increase BIG-IP system resource (CPU, memory) usage. Testing dynamic record size on VPN speeds Having discussed the theory behind the feature, we will now perform tests to see how it affects VPN speeds. Network bandwidth can vary depending on many factors, for instance, peak vs non-peak hours. When more users are connected to a VPN, download speeds can decrease significantly. It is therefore important to establish a baseline network bandwidth and download speed at the beginning: Baseline AWS environment Windows Client (Seattle) --VPN --> BIG-IP APM (Oregon) --local LAN-->Apache and iperf servers AWS environment: BIG-IP APM 17.1.0 VE on AWS (F5 BIG-IP VE - ALL modules, m5.xlarge, 1 Gbps, AWS) located in us-west-2 Oregon. Note: Ensure you use at least the recommended size (m5.xlarge) and at least 1Gbps on AWS to make sure there are no bandwidth and resource limits. Windows client in located in Seattle Using iperf3 to measure network bandwidth Using curl to download a 377MB apmclient.iso Optional: You can optionally test using the developer tools on your browser. I used firefox; as the results did not differ significantly from curl. They are not included in this article. Baseline test results These are measured with all default settings on BIG-IP APM and dynamic record sizing not enabled: curl download results Average download speed: 4950k C:\Windows\system32>curl -k -o null https://10.0.128.23/apmclient.iso % Total % Received % Xferd Average Speed Time Time Time Current Dload Upload Total Spent Left Speed 100 377M 100 377M 0 0 4950k 0 0:01:18 0:01:18 --:--:-- 4988k iperf3 results Network bandwidth: 4873 KB/sec c:\Users\klau\Desktop\iperf-3.1.3-win64>iperf3.exe -c 10.0.128.24 --get-server-output -i 1 -f K -R Connecting to host 10.0.128.24, port 5201 Reverse mode, remote host 10.0.128.24 is sending [ 4] local 10.0.128.31 port 61284 connected to 10.0.128.24 port 5201 [ ID] Interval Transfer Bandwidth [ 4] 0.00-1.00 sec 4.33 MBytes 4434 KBytes/sec [ 4] 1.00-2.00 sec 4.67 MBytes 4785 KBytes/sec [ 4] 2.00-3.00 sec 4.86 MBytes 4977 KBytes/sec [ 4] 3.00-4.00 sec 4.77 MBytes 4878 KBytes/sec [ 4] 4.00-5.00 sec 4.72 MBytes 4834 KBytes/sec [ 4] 5.00-6.00 sec 4.78 MBytes 4898 KBytes/sec [ 4] 6.00-7.00 sec 4.87 MBytes 4989 KBytes/sec [ 4] 7.00-8.00 sec 4.81 MBytes 4925 KBytes/sec [ 4] 8.00-9.00 sec 4.71 MBytes 4823 KBytes/sec [ 4] 9.00-10.00 sec 4.82 MBytes 4934 KBytes/sec - - - - - - - - - - - - - - - - - - - - - - - - - [ ID] Interval Transfer Bandwidth Retr [ 4] 0.00-10.00 sec 48.0 MBytes 4919 KBytes/sec 9 sender [ 4] 0.00-10.00 sec 47.6 MBytes 4873 KBytes/sec receiver Server output: [...] [ 5] 0.00-10.04 sec 48.0 MBytes 4900 KBytes/sec 9 sender Test 1: Enabling dynamic record size from baseline Comparing with baseline results after enabling dynamic record size Baseline: Dynamic record size disabled dynamic record size enabled Percentage improvement curl average download, k 4950 5272 6.51% iperf3 network bandwidth, KBytes/sec 4873 5138 5.44% While this may not appear to be too high on the AWS cloud, there is also received feedback from customers that they see greater improvements in environments, especially in cases where the end-to-end latencies increase. Implementation strategy and recommendations As you plan to introduce this in your environment, take note of the following recommendations: Every environment is unique Many factors can affect network performance. This can range from VLAN settings (For example. MTU), TCP settings, intermediate network device throttling, and so on. You must perform testing in your own environment before enabling the feature. Implement the feature incrementally for a selected group of users. There are different ways to do this. For example, use an iRule to redirect users based on a URL, to a separate virtual server using a different Client SSL profile that has the feature enabled. Refer to SSL::allow_dynamic_record_sizing on Clouddocs. Monitor BIG-IP system logs and resource usage After you enable dynamic record size, make sure that your BIG-IP system continues to function as expected by monitoring the following monitor /var/log/ltm and /var/log/apm log files monitor BIG-IP CPU and memory usage. For example, you can select Dashboard on the Configuration utility, generating a QKview and analyze it in iHealth and so on. For more information, refer to K71764661: Understanding BIG-IP CPU usage and K16419: Overview of BIG-IP memory usage Verify and analyze SSL statistics Use the tmsh command inK41057430: Enhanced SSL profile statistics and check for failures. The SSL Dynamic Record Sizes section should also indicate use of large record sizes. Boosting TLS Performance with Dynamic Record Sizing on BIG-IP Conclusion There are a variety of different ways to improve VPN speeds, and this article describes just one. For other options and considerations, refer to K31143831: VPN for business continuity | Chapter 5: Optimizing Network Access VPN.176Views2likes0Comments
Solving Secure Mobile Access with F5 and iOS 7 Per app VPN - Part 1
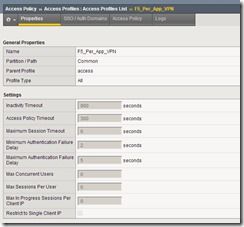
Overview As an F5 engineer out in the field I’m fortunate in the fact that I get to talk with customers about their projects and security concerns. While it probably would not surprise you to learn that Mobility is a key project for many organizations what does surprise me is how many are still using a layer-3 VPN approach on mobile devices. The major problem with this design is that once the VPN is established any application on the mobile platform can now access the corporate network. As we hear more and more about malware on mobile devices it is critical to start protecting corporate infrastructure by limiting access to corporate applications only. With iOS 7 Apple introduced a great way to accomplish this with their Per app VPN. Per app VPN allows iOS to control which applications have access to the VPN tunnel. This gives organizations the ability to designate which applications are corporate apps and treat everything else as personal. Per app VPN also works in Safari with a per-tab level of granularity. So I can have one tab open watching who the Houston Texan’s take in the first round draft (Johnny Manziel of course) and a second tab that is securely connected to my corporate SharePoint site. To take advantage of the iOS Per app VPN functionality Apple requires an Enterprise Mobile Management (EMM) solution to configure the mobile device and an Enterprise VPN solution like F5’s Access Policy Manager. So, if you’re anything like me you’ve scrolled past this text and straight to the pictures below because you need to deploy this ASAP right? We’ll here we go… Configuration The iOS Per app VPN uses F5’s APM SOCKS Proxy functionality so we'll need TMOS 11.4 or higher installed on the BIG-IP and Edge Client 2.0 or higher installed on the mobile device. 1. Create a new Application Policy Profile and select your default language. 2. Customize the Profile's Visual Policy Builder by adding a Client Cert Inspection object and set the successful branch to Allow 3. Create a new LTM Client SSL Profile: set Client Certificate to request set Trusted Certificate Authority to the CA that signed the certificate installed on the iOS device. 4. Create a new LTM Virtual Server: Add your customer Client SSL profile Select your Access Profile Select the default Connectivity Profile of create a custom connectivity profile with default settings Click the VDI & Java Support box to enable SOCKS proxy capabilities User Experience So What does the end result look like? In the example below I tested the Safari per-tab capabilities by clicking the F5 shortcut icon and seamlessly had access to my test web server. Next Steps In Part 2we will walk through how I configured AirWatch to perform the user experience demonstration.1KViews0likes10Comments