Cipher Suite Practices and Pitfalls
Cipher Suite Practices and Pitfalls It seems like every time you turn around there is a new vulnerability to deal with, and some of them, such as Sweet32, have required altering cipher configurations for mitigation. Still other users may tweak their cipher suite settings to meet requirements for PCI compliance, regulatory issues, local compatibility needs, etc. However, once you start modifying your cipher suite settings you must take great care, as it is very easy to shoot yourself in the foot. Many misconfigurations will silently fail – seeming to achieve the intended result while opening up new, even worse, vulnerabilities. Let's take a look at cipher configuration on the F5 BIG-IP products to try stay on the safe path. What is a Cipher Suite? Before we talk about how they're configured, let's define exactly what we mean by 'cipher suite', how it differs from just a 'cipher', and the components of the suite. Wikipedia had a good summary, so rather than reinvent the wheel: A cipher suite is a named combination of authentication, encryption, message authentication code (MAC) and key exchange algorithms used to negotiate the security settings for a network connection using the Transport Layer Security (TLS) / Secure Sockets Layer (SSL) network protocol. When we talk about configuring ciphers on BIG-IP we're really talking about configuring cipher suites. More specifically the configured list of cipher suites is a menu of options available to be negotiated. Each cipher suite specifies the key exchange algorithm, authentication algorithm, cipher, cipher mode, and MAC that will be used. I recommend reading K15194: Overview of the BIG-IP SSL/TLS cipher suite for more information. But as a quick overview, let's look at a couple of example cipher suites. The cipher suite is in the format: Key Exchange-Authentication-Cipher-Cipher Mode-MAC Note that not all of these components may be explicitly present in the cipher suite, but they are still implicitly part of the suite. Let's consider this cipher suite: ECDHE-RSA-AES256-GCM-SHA384 This breaks down as follows: Key Exchange Algorithm: ECDHE (Elliptic Curve Diffie-Hellman Ephemeral) Authentication Algorithm: RSA Cipher: AES256 (aka AES with a 256-bit key) Cipher Mode: GCM (Galois/Counter Mode) MAC: SHA384 (aka SHA-2 (Secure Hash Algorithm 2) with 384-bit hash) This is arguably the strongest cipher suite we have on BIG-IP at this time. Let's compare that to a simpler cipher suite: AES128-SHA Key Exchange Algorithm: RSA (Implied) – When it isn't specified, presume RSA. Authentication Algorithm: RSA (Implied) – When it isn't specified, presume RSA. Cipher: AES128 (aka AES with a 128-bit key) Cipher Mode: CBC (Cipher Block Chaining) (Implied) – When it isn't specified, presume CBC. MAC: SHA1 (Secure Hash Algorithm 1; SHA-1 always produces a 160-bit hash.) This example illustrates that the cipher suite may not always explicitly specify every parameter, but they're still there. There are 'default' values that are fairly safe to presume when not otherwise specified. If an algorithm isn't specified, it is RSA. That's a safe bet. And if a cipher mode isn't specified it is CBC. Always CBC. Note that all ciphers currently supported on BIG-IP are CBC mode except for AES-GCM and RC4. ALL. I stress this as it has been a recurring source of confusion amongst customers. It isn't only the cipher suites which explicitly state 'CBC' in their name. Let's examine each of these components. This article is primarily about cipher suite configuration and ciphers, and not the SSL/TLS protocol, so I won't dive too deeply here, but I think it helps to have a basic understanding. Forgive me if I simplify a bit. Key Exchange Algorithms As a quick review of the difference between asymmetric key (aka public key) cryptography and symmetric key cryptography: With the asymmetric key you have two keys – K public and K private –which have a mathematical relationship. Since you can openly share the public key there is no need to pre-share keys with anyone. The downside is that these algorithms are computationally expensive. Key lengths for a common algorithm such as RSA are at least 1024-bit, and 2048-bit is really the minimally acceptable these days. Symmetric key has only K private . Both ends use the same key, which poses the problem of key distribution. The advantage is higher computational performance and common key sizes are 128-bit or 256-bit. SSL/TLS, of course, uses both public and private key systems – the Key Exchange Algorithm is the public key system used to exchange the symmetric key. Examples you'll see in cipher suites include ECDHE, DHE, RSA, ECDH, and ADH. Authentication Algorithms The Authentication Algorithm is sometimes grouped in with the Key Exchange Algorithm for configuration purposes; 'ECDHE_RSA' for example. But we'll consider it as a separate component. This is the algorithm used in the SSL/TLS handshake for the server to sign (using the server's private key) elements sent to the client in the negotiation. The client can authenticate them using the server's public key. Examples include: RSA, ECDSA, DSS (aka DSA), and Anonymous. Anonymous means no authentication; this is generally bad. The most common way users run into this is by accidentally enabling an 'ADH' cipher suite. More on this later when we talk about pitfalls. Note that when RSA is used for the key exchange, authentication is inherent to the scheme so there really isn't a separate authentication step. However, most tools will list it out for completeness. Cipher To borrow once again from Wikipedia: In cryptography, a cipher (or cypher) is an algorithm for performing encryption or decryption—a series of well-defined steps that can be followed as a procedure. An alternative, less common term is encipherment. To encipher or encode is to convert information into cipher or code. In common parlance, 'cipher' is synonymous with 'code', as they are both a set of steps that encrypt a message; however, the concepts are distinct in cryptography, especially classical cryptography. This is what most of us mean when we refer to 'configuring ciphers'. We're primarily interested in controlling the cipher used to protect our information through encryption. There are many, many examples of ciphers which you may be familiar with: DES (Data Encryption Standard), 3DES (Triple DES), AES (Advanced Encryption Standard), RC4 (Rivest Cipher 4), Camellia, RC6, RC2, Blowfish, Twofish, IDEA, SEED, GOST, Rijndael, Serpent, MARS, etc. For a little cipher humor, I recommend RFC2410: The NULL Encryption Algorithm and Its Use With IPsec. Roughly speaking, ciphers come in two types – block ciphers and stream ciphers. Block Ciphers Block ciphers operate on fixed-length chunks of data, or blocks. For example, DES operates on 64-bit blocks while AES operates on 128-bit blocks. Most of the ciphers you'll encounter are block ciphers. Examples: DES, 3DES, AES, Blowfish, Twofish, etc. Stream Ciphers Stream ciphers mathematically operate on each bit in the data flow individually. The most commonly encountered stream cipher is RC4, and that's deprecated. So we're generally focused on block ciphers, not that it really changes anything for the purposes of this article. All of the secrecy in encryption comes from the key that is used, not the cipher itself. Obtain the key and you can unlock the ciphertext. The cipher itself – the algorithm, source code, etc. – not only can be, but should be, openly available. History is full of examples of private cryptosystems failing due to weaknesses missed by their creators, while the most trusted ciphers were created via open processes (AES for example). Keys are of varying lengths and, generally speaking, the longer the key the more secure the encryption. DES only had 56-bits of key data, and thus is considered insecure. We label 3DES as 168-bit, but it is really only equivalent to 112-bit strength. (More on this later.) Newer ciphers, such as AES, often offer options – 128-bits, 192-bits, or 256-bits of key. Remember, a 256-bit key is far more than twice as strong as a 128-bit key. It is 2 128 vs. 2 256 - 3.4028237e+38 vs. 1.1579209e+77 Cipher Mode Cipher mode is the mode of operation used by the cipher when encrypting plaintext into ciphertext, or decrypting ciphertext into plaintext. The most common mode is CBC – Cipher Block Chaining. In cipher block chaining the ciphertext from block n feeds into the process for block n+1 – the blocks are chained together. To steal borrow an image from Wikipedia: As I mentioned previously, all ciphers on BIG-IP are CBC mode except for RC4 (the lone stream cipher, disabled by default starting in 11.6.0) and AES-GCM. AES-GCM was first introduced in 11.5.0, and it is only available for TLSv1.2 connections. GCM stands for Galois/Counter Mode, a more advanced mode of operation than CBC. In GCM the blocks are not chained together. GCM runs in an Authenticated Encryption with Associated Data (AEAD) mode which eliminates the separate per-message hashing step, therefore it can achieve higher performance than CBC mode on a given HW platform. It is also immune to classes of attack that have harried CBC, such as the numerous padding attacks (BEAST, Lucky 13, etc.) Via Wikipedia: The main drawback to AES-GCM is that it was only added in TLSv1.2, so any older clients which don't support TLSv1.2 cannot use it. There are other cipher suites officially supported in TLS which have other modes, but F5 does not currently support those ciphers so we won't get too deep into that. Other ciphers include AES-CCM (CTR mode with a CBC MAC; CTR is Counter Mode), CAMELLIA-GCM (CAMELLIA as introduced in 12.0.0 is CBC), and GOST CNT (aka CTR). We may see these in the future. MAC aka Hash Function What did we ever do before Wikipedia? A hash function is any function that can be used to map data of arbitrary size to data of fixed size. The values returned by a hash function are called hash values, hash codes, digests, or simply hashes. One use is a data structure called a hash table, widely used in computer software for rapid data lookup. Hash functions accelerate table or database lookup by detecting duplicated records in a large file. An example is finding similar stretches in DNA sequences. They are also useful in cryptography. A cryptographic hash function allows one to easily verify that some input data maps to a given hash value, but if the input data is unknown, it is deliberately difficult to reconstruct it (or equivalent alternatives) by knowing the stored hash value. This is used for assuring integrity of transmitted data, and is the building block for HMACs, which provide message authentication. In short, the MAC provides message integrity. Hash functions include MD5, SHA-1 (aka SHA), SHA-2 (aka SHA128, SHA256, & SHA384), and AEAD (Authenticated Encryption with Associated Data). MD5 has long since been rendered completely insecure and is deprecated. SHA-1 is now being 'shamed', if not blocked, by browsers as it is falling victim to advances in cryptographic attacks. While some may need to continue to support SHA-1 cipher suites for legacy clients, it is encouraged to migrate to SHA-2 as soon as possible – especially for digital certificates. Configuring Cipher Suites on BIG-IP Now that we've covered what cipher suites are, let's look at where we use them. There are two distinct and separate areas where cipher suites are used – the host, or control plane, and TMM, or the data plane. On the host side SSL/TLS is handled by OpenSSL and the configuration follows the standard OpenSSL configuration options. Control Plane The primary use of SSL/TLS on the control plane is for httpd. To see the currently configured cipher suite, use ' tmsh list sys http ssl-ciphersuite '. The defaults may vary depending on the version of TMOS. For example, these were the defaults in 12.0.0: tmsh list sys http ssl-ciphersuite sys httpd { ssl-ciphersuite DEFAULT:!aNULL:!eNULL:!LOW:!RC4:!MD5:!EXP } As of 12.1.2 these have been updated to a more explicit list: tmsh list sys http ssl-ciphersuite sys httpd { ssl-ciphersuite ECDHE-RSA-AES128-GCM-SHA256:ECDHE-RSA-AES256-GCM-SHA384:ECDHE-RSA-AES128-SHA:ECDHE-RSA-AES256-SHA:ECDHE-RSA-AES128-SHA256:ECDHE-RSA-AES256-SHA384:ECDHE-ECDSA-AES128-GCM-SHA256:ECDHE-ECDSA-AES256-GCM-SHA384:ECDHE-ECDSA-AES128-SHA:ECDHE-ECDSA-AES256-SHA:ECDHE-ECDSA-AES128-SHA256:ECDHE-ECDSA-AES256-SHA384:AES128-GCM-SHA256:AES256-GCM-SHA384:AES128-SHA:AES256-SHA:AES128-SHA256:AES256-SHA256:ECDHE-RSA-DES-CBC3-SHA:ECDHE-ECDSA-DES-CBC3-SHA:DES-CBC3-SHA } You can change this configuration via ' tmsh modify sys http ssl-ciphersuite <value> '. One important thing to note is that the default is not just 'DEFAULT' as it is on the data plane. This is one thing that users have been caught by; thinking that setting the keyword to 'DEFAULT' will reset the configuration. As OpenSSL provides SSL/TLS support for the control plane, if you want to see which ciphers will actually be supported you can use ' openssl ciphers -v <cipherstring> '. For example: openssl ciphers -v 'ECDHE-RSA-AES128-GCM-SHA256:ECDHE-RSA-AES256-GCM-SHA384:ECDHE-RSA-AES128-SHA:ECDHE-RSA-AES256-SHA:ECDHE-RSA-AES128-SHA256:ECDHE-RSA-AES256-SHA384:ECDHE-ECDSA-AES128-GCM-SHA256:ECDHE-ECDSA-AES256-GCM-SHA384:ECDHE-ECDSA-AES128-SHA:ECDHE-ECDSA-AES256-SHA:ECDHE-ECDSA-AES128-SHA256:ECDHE-ECDSA-AES256-SHA384:AES128-GCM-SHA256:AES256-GCM-SHA384:AES128-SHA:AES256-SHA:AES128-SHA256:AES256-SHA256:ECDHE-RSA-DES-CBC3-SHA:ECDHE-ECDSA-DES-CBC3-SHA:DES-CBC3-SHA' ECDHE-RSA-AES128-GCM-SHA256 TLSv1.2 Kx=ECDH Au=RSA Enc=AESGCM(128) Mac=AEAD ECDHE-RSA-AES256-GCM-SHA384 TLSv1.2 Kx=ECDH Au=RSA Enc=AESGCM(256) Mac=AEAD ECDHE-RSA-AES128-SHA SSLv3 Kx=ECDH Au=RSA Enc=AES(128) Mac=SHA1 ECDHE-RSA-AES256-SHA SSLv3 Kx=ECDH Au=RSA Enc=AES(256) Mac=SHA1 ECDHE-RSA-AES128-SHA256 TLSv1.2 Kx=ECDH Au=RSA Enc=AES(128) Mac=SHA256 ECDHE-RSA-AES256-SHA384 TLSv1.2 Kx=ECDH Au=RSA Enc=AES(256) Mac=SHA384 ECDHE-ECDSA-AES128-GCM-SHA256 TLSv1.2 Kx=ECDH Au=ECDSA Enc=AESGCM(128) Mac=AEAD ECDHE-ECDSA-AES256-GCM-SHA384 TLSv1.2 Kx=ECDH Au=ECDSA Enc=AESGCM(256) Mac=AEAD ECDHE-ECDSA-AES128-SHA SSLv3 Kx=ECDH Au=ECDSA Enc=AES(128) Mac=SHA1 ECDHE-ECDSA-AES256-SHA SSLv3 Kx=ECDH Au=ECDSA Enc=AES(256) Mac=SHA1 ECDHE-ECDSA-AES128-SHA256 TLSv1.2 Kx=ECDH Au=ECDSA Enc=AES(128) Mac=SHA256 ECDHE-ECDSA-AES256-SHA384 TLSv1.2 Kx=ECDH Au=ECDSA Enc=AES(256) Mac=SHA384 AES128-GCM-SHA256 TLSv1.2 Kx=RSA Au=RSA Enc=AESGCM(128) Mac=AEAD AES256-GCM-SHA384 TLSv1.2 Kx=RSA Au=RSA Enc=AESGCM(256) Mac=AEAD AES128-SHA SSLv3 Kx=RSA Au=RSA Enc=AES(128) Mac=SHA1 AES256-SHA SSLv3 Kx=RSA Au=RSA Enc=AES(256) Mac=SHA1 AES128-SHA256 TLSv1.2 Kx=RSA Au=RSA Enc=AES(128) Mac=SHA256 AES256-SHA256 TLSv1.2 Kx=RSA Au=RSA Enc=AES(256) Mac=SHA256 ECDHE-RSA-DES-CBC3-SHA SSLv3 Kx=ECDH Au=RSA Enc=3DES(168) Mac=SHA1 ECDHE-ECDSA-DES-CBC3-SHA SSLv3 Kx=ECDH Au=ECDSA Enc=3DES(168) Mac=SHA1 DES-CBC3-SHA SSLv3 Kx=RSA Au=RSA Enc=3DES(168) Mac=SHA1 Now let's see what happens if you use 'DEFAULT': openssl ciphers -v 'DEFAULT' ECDHE-RSA-AES256-GCM-SHA384 TLSv1.2 Kx=ECDH Au=RSA Enc=AESGCM(256) Mac=AEAD ECDHE-ECDSA-AES256-GCM-SHA384 TLSv1.2 Kx=ECDH Au=ECDSA Enc=AESGCM(256) Mac=AEAD ECDHE-RSA-AES256-SHA384 TLSv1.2 Kx=ECDH Au=RSA Enc=AES(256) Mac=SHA384 ECDHE-ECDSA-AES256-SHA384 TLSv1.2 Kx=ECDH Au=ECDSA Enc=AES(256) Mac=SHA384 ECDHE-RSA-AES256-SHA SSLv3 Kx=ECDH Au=RSA Enc=AES(256) Mac=SHA1 ECDHE-ECDSA-AES256-SHA SSLv3 Kx=ECDH Au=ECDSA Enc=AES(256) Mac=SHA1 DHE-DSS-AES256-GCM-SHA384 TLSv1.2 Kx=DH Au=DSS Enc=AESGCM(256) Mac=AEAD DHE-RSA-AES256-GCM-SHA384 TLSv1.2 Kx=DH Au=RSA Enc=AESGCM(256) Mac=AEAD DHE-RSA-AES256-SHA256 TLSv1.2 Kx=DH Au=RSA Enc=AES(256) Mac=SHA256 DHE-DSS-AES256-SHA256 TLSv1.2 Kx=DH Au=DSS Enc=AES(256) Mac=SHA256 DHE-RSA-AES256-SHA SSLv3 Kx=DH Au=RSA Enc=AES(256) Mac=SHA1 DHE-DSS-AES256-SHA SSLv3 Kx=DH Au=DSS Enc=AES(256) Mac=SHA1 DHE-RSA-CAMELLIA256-SHA SSLv3 Kx=DH Au=RSA Enc=Camellia(256) Mac=SHA1 DHE-DSS-CAMELLIA256-SHA SSLv3 Kx=DH Au=DSS Enc=Camellia(256) Mac=SHA1 ECDH-RSA-AES256-GCM-SHA384 TLSv1.2 Kx=ECDH/RSA Au=ECDH Enc=AESGCM(256) Mac=AEAD ECDH-ECDSA-AES256-GCM-SHA384 TLSv1.2 Kx=ECDH/ECDSA Au=ECDH Enc=AESGCM(256) Mac=AEAD ECDH-RSA-AES256-SHA384 TLSv1.2 Kx=ECDH/RSA Au=ECDH Enc=AES(256) Mac=SHA384 ECDH-ECDSA-AES256-SHA384 TLSv1.2 Kx=ECDH/ECDSA Au=ECDH Enc=AES(256) Mac=SHA384 ECDH-RSA-AES256-SHA SSLv3 Kx=ECDH/RSA Au=ECDH Enc=AES(256) Mac=SHA1 ECDH-ECDSA-AES256-SHA SSLv3 Kx=ECDH/ECDSA Au=ECDH Enc=AES(256) Mac=SHA1 AES256-GCM-SHA384 TLSv1.2 Kx=RSA Au=RSA Enc=AESGCM(256) Mac=AEAD AES256-SHA256 TLSv1.2 Kx=RSA Au=RSA Enc=AES(256) Mac=SHA256 AES256-SHA SSLv3 Kx=RSA Au=RSA Enc=AES(256) Mac=SHA1 CAMELLIA256-SHA SSLv3 Kx=RSA Au=RSA Enc=Camellia(256) Mac=SHA1 PSK-AES256-CBC-SHA SSLv3 Kx=PSK Au=PSK Enc=AES(256) Mac=SHA1 ECDHE-RSA-AES128-GCM-SHA256 TLSv1.2 Kx=ECDH Au=RSA Enc=AESGCM(128) Mac=AEAD ECDHE-ECDSA-AES128-GCM-SHA256 TLSv1.2 Kx=ECDH Au=ECDSA Enc=AESGCM(128) Mac=AEAD ECDHE-RSA-AES128-SHA256 TLSv1.2 Kx=ECDH Au=RSA Enc=AES(128) Mac=SHA256 ECDHE-ECDSA-AES128-SHA256 TLSv1.2 Kx=ECDH Au=ECDSA Enc=AES(128) Mac=SHA256 ECDHE-RSA-AES128-SHA SSLv3 Kx=ECDH Au=RSA Enc=AES(128) Mac=SHA1 ECDHE-ECDSA-AES128-SHA SSLv3 Kx=ECDH Au=ECDSA Enc=AES(128) Mac=SHA1 DHE-DSS-AES128-GCM-SHA256 TLSv1.2 Kx=DH Au=DSS Enc=AESGCM(128) Mac=AEAD DHE-RSA-AES128-GCM-SHA256 TLSv1.2 Kx=DH Au=RSA Enc=AESGCM(128) Mac=AEAD DHE-RSA-AES128-SHA256 TLSv1.2 Kx=DH Au=RSA Enc=AES(128) Mac=SHA256 DHE-DSS-AES128-SHA256 TLSv1.2 Kx=DH Au=DSS Enc=AES(128) Mac=SHA256 DHE-RSA-AES128-SHA SSLv3 Kx=DH Au=RSA Enc=AES(128) Mac=SHA1 DHE-DSS-AES128-SHA SSLv3 Kx=DH Au=DSS Enc=AES(128) Mac=SHA1 DHE-RSA-SEED-SHA SSLv3 Kx=DH Au=RSA Enc=SEED(128) Mac=SHA1 DHE-DSS-SEED-SHA SSLv3 Kx=DH Au=DSS Enc=SEED(128) Mac=SHA1 DHE-RSA-CAMELLIA128-SHA SSLv3 Kx=DH Au=RSA Enc=Camellia(128) Mac=SHA1 DHE-DSS-CAMELLIA128-SHA SSLv3 Kx=DH Au=DSS Enc=Camellia(128) Mac=SHA1 ECDH-RSA-AES128-GCM-SHA256 TLSv1.2 Kx=ECDH/RSA Au=ECDH Enc=AESGCM(128) Mac=AEAD ECDH-ECDSA-AES128-GCM-SHA256 TLSv1.2 Kx=ECDH/ECDSA Au=ECDH Enc=AESGCM(128) Mac=AEAD ECDH-RSA-AES128-SHA256 TLSv1.2 Kx=ECDH/RSA Au=ECDH Enc=AES(128) Mac=SHA256 ECDH-ECDSA-AES128-SHA256 TLSv1.2 Kx=ECDH/ECDSA Au=ECDH Enc=AES(128) Mac=SHA256 ECDH-RSA-AES128-SHA SSLv3 Kx=ECDH/RSA Au=ECDH Enc=AES(128) Mac=SHA1 ECDH-ECDSA-AES128-SHA SSLv3 Kx=ECDH/ECDSA Au=ECDH Enc=AES(128) Mac=SHA1 AES128-GCM-SHA256 TLSv1.2 Kx=RSA Au=RSA Enc=AESGCM(128) Mac=AEAD AES128-SHA256 TLSv1.2 Kx=RSA Au=RSA Enc=AES(128) Mac=SHA256 AES128-SHA SSLv3 Kx=RSA Au=RSA Enc=AES(128) Mac=SHA1 SEED-SHA SSLv3 Kx=RSA Au=RSA Enc=SEED(128) Mac=SHA1 CAMELLIA128-SHA SSLv3 Kx=RSA Au=RSA Enc=Camellia(128) Mac=SHA1 PSK-AES128-CBC-SHA SSLv3 Kx=PSK Au=PSK Enc=AES(128) Mac=SHA1 ECDHE-RSA-RC4-SHA SSLv3 Kx=ECDH Au=RSA Enc=RC4(128) Mac=SHA1 ECDHE-ECDSA-RC4-SHA SSLv3 Kx=ECDH Au=ECDSA Enc=RC4(128) Mac=SHA1 ECDH-RSA-RC4-SHA SSLv3 Kx=ECDH/RSA Au=ECDH Enc=RC4(128) Mac=SHA1 ECDH-ECDSA-RC4-SHA SSLv3 Kx=ECDH/ECDSA Au=ECDH Enc=RC4(128) Mac=SHA1 RC4-SHA SSLv3 Kx=RSA Au=RSA Enc=RC4(128) Mac=SHA1 RC4-MD5 SSLv3 Kx=RSA Au=RSA Enc=RC4(128) Mac=MD5 PSK-RC4-SHA SSLv3 Kx=PSK Au=PSK Enc=RC4(128) Mac=SHA1 ECDHE-RSA-DES-CBC3-SHA SSLv3 Kx=ECDH Au=RSA Enc=3DES(168) Mac=SHA1 ECDHE-ECDSA-DES-CBC3-SHA SSLv3 Kx=ECDH Au=ECDSA Enc=3DES(168) Mac=SHA1 EDH-RSA-DES-CBC3-SHA SSLv3 Kx=DH Au=RSA Enc=3DES(168) Mac=SHA1 EDH-DSS-DES-CBC3-SHA SSLv3 Kx=DH Au=DSS Enc=3DES(168) Mac=SHA1 ECDH-RSA-DES-CBC3-SHA SSLv3 Kx=ECDH/RSA Au=ECDH Enc=3DES(168) Mac=SHA1 ECDH-ECDSA-DES-CBC3-SHA SSLv3 Kx=ECDH/ECDSA Au=ECDH Enc=3DES(168) Mac=SHA1 DES-CBC3-SHA SSLv3 Kx=RSA Au=RSA Enc=3DES(168) Mac=SHA1 PSK-3DES-EDE-CBC-SHA SSLv3 Kx=PSK Au=PSK Enc=3DES(168) Mac=SHA1 EDH-RSA-DES-CBC-SHA SSLv3 Kx=DH Au=RSA Enc=DES(56) Mac=SHA1 EDH-DSS-DES-CBC-SHA SSLv3 Kx=DH Au=DSS Enc=DES(56) Mac=SHA1 DES-CBC-SHA SSLv3 Kx=RSA Au=RSA Enc=DES(56) Mac=SHA1 EXP-EDH-RSA-DES-CBC-SHA SSLv3 Kx=DH(512) Au=RSA Enc=DES(40) Mac=SHA1 export EXP-EDH-DSS-DES-CBC-SHA SSLv3 Kx=DH(512) Au=DSS Enc=DES(40) Mac=SHA1 export EXP-DES-CBC-SHA SSLv3 Kx=RSA(512) Au=RSA Enc=DES(40) Mac=SHA1 export EXP-RC2-CBC-MD5 SSLv3 Kx=RSA(512) Au=RSA Enc=RC2(40) Mac=MD5 export EXP-RC4-MD5 SSLv3 Kx=RSA(512) Au=RSA Enc=RC4(40) Mac=MD5 export As you can see that enables far, far more ciphers, including a number of unsafe ciphers – export, MD5, DES, etc. This is a good example of why you always want to confirm your cipher settings and check exactly what is being enabled before placing new settings into production. Many security disasters could be avoided if everyone doublechecked their settings first. Let’s take a closer look at how OpenSSL represents one of the cipher suites: ECDHE-RSA-AES256-GCM-SHA384 TLSv1.2 Kx=ECDH Au=RSA Enc=AESGCM(256) Mac=AEAD The columns are: Cipher Suite: ECDHE-RSA-AES256-GCM-SHA384 Protocol: TLSv1.2 Key Exchange Algorithm (Kx): ECDH Authentication Algorithm (Au): RSA Cipher/Encryption Algorithm (Enc): AESGCM(256) MAC (Mac): AEAD Since the control plane uses OpenSSL you can use the standard OpenSSL documentation, so I won't spend a lot of time on that. Data Plane In TMM the cipher suites are configured in the Ciphers field of the Client SSL or Server SSL profiles. See K14783: Overview of the Client SSL profile (11.x - 12.x) & K14806: Overview of the Server SSL profile (11.x - 12.x), respectively for more details. It is important to keep in mind that these are two different worlds with their own requirements and quirks. As most of the configuration activity, and security concerns, occur on the public facing side of the system, we'll focus on the Client SSL Profile. Most of the things we'll cover here will also apply to the Server SSL profile. In the GUI it appears as an editable field: Presuming the profile was created with the name 'Test': tmsh list ltm profile client-ssl Test ltm profile client-ssl Test { app-service none cert default.crt cert-key-chain { default { cert default.crt key default.key } } chain none ciphers DEFAULT defaults-from clientssl inherit-certkeychain true key default.key passphrase none } Modifying the cipher configuration from the command line is simple. tmsh list ltm profile client-ssl Test ciphers ltm profile client-ssl Test { ciphers DEFAULT } tmsh modify ltm profile client-ssl Test ciphers 'DEFAULT:!3DES' tmsh list ltm profile client-ssl Test ciphers ltm profile client-ssl Test { ciphers DEFAULT:!3DES } Just remember the ' tmsh save sys config ' when you're happy with the configuration. Note here the default is just 'DEFAULT'. What that expands to will vary depending on the version of TMOS. K13156: SSL ciphers used in the default SSL profiles (11.x - 12.x) defines the default values for each version of TMOS. Or you can check it locally from the command line: tmm --clientciphers 'DEFAULT' On 12.1.2 that would be: tmm --clientciphers 'DEFAULT' ID SUITE BITS PROT METHOD CIPHER MAC KEYX 0: 159 DHE-RSA-AES256-GCM-SHA384 256 TLS1.2 Native AES-GCM SHA384 EDH/RSA 1: 158 DHE-RSA-AES128-GCM-SHA256 128 TLS1.2 Native AES-GCM SHA256 EDH/RSA 2: 107 DHE-RSA-AES256-SHA256 256 TLS1.2 Native AES SHA256 EDH/RSA 3: 57 DHE-RSA-AES256-SHA 256 TLS1 Native AES SHA EDH/RSA 4: 57 DHE-RSA-AES256-SHA 256 TLS1.1 Native AES SHA EDH/RSA 5: 57 DHE-RSA-AES256-SHA 256 TLS1.2 Native AES SHA EDH/RSA 6: 57 DHE-RSA-AES256-SHA 256 DTLS1 Native AES SHA EDH/RSA 7: 103 DHE-RSA-AES128-SHA256 128 TLS1.2 Native AES SHA256 EDH/RSA 8: 51 DHE-RSA-AES128-SHA 128 TLS1 Native AES SHA EDH/RSA 9: 51 DHE-RSA-AES128-SHA 128 TLS1.1 Native AES SHA EDH/RSA 10: 51 DHE-RSA-AES128-SHA 128 TLS1.2 Native AES SHA EDH/RSA 11: 51 DHE-RSA-AES128-SHA 128 DTLS1 Native AES SHA EDH/RSA 12: 22 DHE-RSA-DES-CBC3-SHA 168 TLS1 Native DES SHA EDH/RSA 13: 22 DHE-RSA-DES-CBC3-SHA 168 TLS1.1 Native DES SHA EDH/RSA 14: 22 DHE-RSA-DES-CBC3-SHA 168 TLS1.2 Native DES SHA EDH/RSA 15: 22 DHE-RSA-DES-CBC3-SHA 168 DTLS1 Native DES SHA EDH/RSA 16: 157 AES256-GCM-SHA384 256 TLS1.2 Native AES-GCM SHA384 RSA 17: 156 AES128-GCM-SHA256 128 TLS1.2 Native AES-GCM SHA256 RSA 18: 61 AES256-SHA256 256 TLS1.2 Native AES SHA256 RSA 19: 53 AES256-SHA 256 TLS1 Native AES SHA RSA 20: 53 AES256-SHA 256 TLS1.1 Native AES SHA RSA 21: 53 AES256-SHA 256 TLS1.2 Native AES SHA RSA 22: 53 AES256-SHA 256 DTLS1 Native AES SHA RSA 23: 60 AES128-SHA256 128 TLS1.2 Native AES SHA256 RSA 24: 47 AES128-SHA 128 TLS1 Native AES SHA RSA 25: 47 AES128-SHA 128 TLS1.1 Native AES SHA RSA 26: 47 AES128-SHA 128 TLS1.2 Native AES SHA RSA 27: 47 AES128-SHA 128 DTLS1 Native AES SHA RSA 28: 10 DES-CBC3-SHA 168 TLS1 Native DES SHA RSA 29: 10 DES-CBC3-SHA 168 TLS1.1 Native DES SHA RSA 30: 10 DES-CBC3-SHA 168 TLS1.2 Native DES SHA RSA 31: 10 DES-CBC3-SHA 168 DTLS1 Native DES SHA RSA 32: 49200 ECDHE-RSA-AES256-GCM-SHA384 256 TLS1.2 Native AES-GCM SHA384 ECDHE_RSA 33: 49199 ECDHE-RSA-AES128-GCM-SHA256 128 TLS1.2 Native AES-GCM SHA256 ECDHE_RSA 34: 49192 ECDHE-RSA-AES256-SHA384 256 TLS1.2 Native AES SHA384 ECDHE_RSA 35: 49172 ECDHE-RSA-AES256-CBC-SHA 256 TLS1 Native AES SHA ECDHE_RSA 36: 49172 ECDHE-RSA-AES256-CBC-SHA 256 TLS1.1 Native AES SHA ECDHE_RSA 37: 49172 ECDHE-RSA-AES256-CBC-SHA 256 TLS1.2 Native AES SHA ECDHE_RSA 38: 49191 ECDHE-RSA-AES128-SHA256 128 TLS1.2 Native AES SHA256 ECDHE_RSA 39: 49171 ECDHE-RSA-AES128-CBC-SHA 128 TLS1 Native AES SHA ECDHE_RSA 40: 49171 ECDHE-RSA-AES128-CBC-SHA 128 TLS1.1 Native AES SHA ECDHE_RSA 41: 49171 ECDHE-RSA-AES128-CBC-SHA 128 TLS1.2 Native AES SHA ECDHE_RSA 42: 49170 ECDHE-RSA-DES-CBC3-SHA 168 TLS1 Native DES SHA ECDHE_RSA 43: 49170 ECDHE-RSA-DES-CBC3-SHA 168 TLS1.1 Native DES SHA ECDHE_RSA 44: 49170 ECDHE-RSA-DES-CBC3-SHA 168 TLS1.2 Native DES SHA ECDHE_RSA Some differences when compared to OpenSSL are readily apparent. For starters, TMM kindly includes a column label header, and actually aligns the columns. The first column is simply a 0-ordinal numeric index, the rest are as follows: ID: The official SSL/TLS ID assigned to that cipher suite. SUITE: The cipher suite. BITS: The size of the key in bits. PROT: The protocol supported. METHOD: NATIVE (in TMM) vs. COMPAT (using OpenSSL code). CIPHER: The cipher. MAC: The hash function. KEYX: The Key Exchange and Authentication Algorithms Note that the MAC is a little misleading for AES-GCM cipher suites. There is no separate MAC as they're AEAD. But the hashing algorithm is used in the Pseudo-Random Function (PRF) and a few other handshake related places. Selecting the Cipher Suites Now we know how to look at the current configuration, modify it, and list the actual ciphers that will be enabled by the listed suites. But what do we put into the configuration? Most users won't have to touch this. The default values are carefully selected by F5 to meet the needs of the majority of our customers. That's the good news. The bad news is that some customers will need to get in there and change the configuration – be it for regulatory compliance, internal policies, legacy client support, etc. Once you begin modifying them, the configuration is truly custom for each customer. Every customer who modifies the configuration, and uses a custom cipher configuration, needs to determine what the proper list is for their needs. Let's say we have determined that we need to support only AES & AES-GCM, 128-bit or 256-bit, and only ECDHE key exchange. Any MAC or Authentication is fine. OK, let's proceed from there. On 12.1.2 there are six cipher suites that fit those criteria. We could list them all explicitly: tmm --clientciphers 'ECDHE-RSA-AES256-GCM-SHA384:ECDHE-RSA-AES128-GCM-SHA256:ECDHE-RSA-AES256-SHA384:ECDHE-RSA-AES256-CBC-SHA:ECDHE-RSA-AES128-SHA256:ECDHE-RSA-AES128-CBC-SHA' That will work, but it gets unwieldy fast. Not only that, but in versions up to 11.5.0 the ciphers configuration string was truncated at 256bytes. Starting in 11.5.0 that was increased to 768bytes, but that can still truncate long configurations. We'll revisit this when we get to the pitfalls section. Fortunately, there is an alternative – keywords! This will result in the same list of cipher suites: tmm --clientciphers 'ECDHE+AES-GCM:ECDHE+AES' That specifies the ECDHE key exchange with AES-GCM ciphers, and ECDHE with AES ciphers. Let's take a closer look to help understand what is happening here. Keywords Keywords are extremely important when working with cipher suite configuration, so we'll spend a little time on those. Most of these apply to both the control plane (OpenSSL) and the data plane (TMM), unless otherwise noted, but we're focused on the data plane as that's F5 specific. Keywords organize into different categories. F5 specific: NATIVE: cipher suites implemented natively in TMM COMPAT: cipher suites using OpenSSL code; removed as of 12.0.0 @SPEED: Re-orders the list to put 'faster' (based on TMOS implementation performance) ciphers first. Sorting: @SPEED: Re-orders the list to put 'faster' (based on TMOS implementation performance) ciphers first. (F5 Specific) @STRENGTH: Re-orders the list to put 'stronger' (larger keys) ciphers first. Protocol: TLSv1_2: cipher suites available under TLSv1.2 TLSv1_1: cipher suites available under TLSv1.1 TLSv1: cipher suites available under TLSv1.0 SSLv3: cipher suites available under SSLv3 Note the 'Protocol' keywords in the cipher configuration control the ciphers associated with that protocol, and not the protocol itself! More on this in pitfalls. Key Exchange Algorithms (sometimes with Authentication specified): ECDHE or ECDHA_RSA: Elliptic Curve Diffie-Hellman Ephemeral (with RSA) ECDHE_ECDSA: ECDHE with Elliptic Curve Digital Signature Algorithm DHE or EDH: Diffie-Hellman Ephemeral (aka Ephemeral Diffie-Hellman) (with RSA) DHE_DSS: DHE with Digital Signature Standard (aka DSA – Digital Signature Algorithm) ECDH_RSA: Elliptic Curve Diffie-Hellman with RSA ECDH_ECDSA: ECDH with ECDSA RSA: RSA, obviously ADH: Anonymous Diffie-Hellman. Note the Authentication Algorithms don't work as standalone keywords in TMM. You can't use 'ECDSA' or 'DSS' for example. And you might think ECDHE or DHE includes all such cipher suites – note that they don't if you read carefully. General cipher groupings: DEFAULT: The default cipher suite for that version; see K13156 ALL: All NATIVE cipher suites; does not include COMPAT in current versions HIGH: 'High' security cipher suites; >128-bit MEDIUM: 'Medium' security cipher suites; effectively 128-bit suites LOW: 'Low' security cipher suites; <128-bit excluding export grade ciphers EXP or EXPORT: Export grade ciphers; 40-bit or 56-bit EXPORT56: 56-bit export ciphers EXPORT40: 40-bit export ciphers Note that DEFAULT does change periodically as F5 updates the configuration to follow the latest best practices. K13156: SSL ciphers used in the default SSL profiles (11.x - 12.x) documents these changes. Cipher families: AES-GCM: AES in GCM mode; 128-bit or 256-bit AES: AES in CBC mode; 128-bit or 256-bit CAMELLIA: Camellia in CBC mode; 128-bit or 256-bit 3DES: Triple DES in CBC mode; 168-bit (well, 112-bit really) DES: Single DES in CBC mode, includes EXPORTciphers;40-bit & 56-bit. RC4: RC4 stream cipher NULL: NULL cipher; just what it sounds like, it does nothing – no encryption MAC aka Hash Function: SHA384: SHA-2 384-bit hash SHA256: SHA-2 256-bit hash SHA1 or SHA: SHA-1 160-bit hash MD5: MD5 128-bit hash Other: On older TMOS versions when using the COMPAT keyword it also enables two additional keywords: SSLv2: Ciphers supported on the SSLv2 protocol RC2: RC2 ciphers. So, let's go back to our example: tmm --clientciphers 'ECDHE+AES-GCM:ECDHE+AES' Note that you can combine keywords using '+' (plus sign). And multiple entries in the ciphers configuration line are separated with ':' (colon). You may also need to wrap the string in single quotes on the command line – I find it is a good habit to just always do so. We can also exclude suites or keywords. There are two ways to do that: '!' (exclamation point) is a hard exclusion. Anything excluded this way cannot be implicitly or explicitly re-enabled. It is disabled, period. '-' (minus sign or dash) is a soft exclusion. Anything excluded this way can be explicitly re-enabled later in the configuration string. (Note: The dash is also usedinthe names of many cipher suites, such as ECDHE-RSA-AES256-GCM-SHA384 or AES128-SHA. Do not confuse the dashes that are part of the cipher suite names with a soft exclusion, which alwaysprecedes, or prefixes,the value being excluded. 'AES128-SHA': AES128-SHA cipher suite. '-SHA': SHA is soft excluded. '-AES128-SHA': the AES128-SHA cipher suite is soft excluded. Position matters.) Let's look at the difference in hard and soft exclusions. We'll start with our base example: tmm --clientciphers 'ECDHE+AES-GCM:DHE+AES-GCM' ID SUITE BITS PROT METHOD CIPHER MAC KEYX 0: 49200 ECDHE-RSA-AES256-GCM-SHA384 256 TLS1.2 Native AES-GCM SHA384 ECDHE_RSA 1: 49199 ECDHE-RSA-AES128-GCM-SHA256 128 TLS1.2 Native AES-GCM SHA256 ECDHE_RSA 2: 159 DHE-RSA-AES256-GCM-SHA384 256 TLS1.2 Native AES-GCM SHA384 EDH/RSA 3: 158 DHE-RSA-AES128-GCM-SHA256 128 TLS1.2 Native AES-GCM SHA256 EDH/RSA Now let's look at a hard exclusion: tmm --clientciphers 'ECDHE+AES-GCM:!DHE:DHE+AES-GCM' ID SUITE BITS PROT METHOD CIPHER MAC KEYX 0: 49200 ECDHE-RSA-AES256-GCM-SHA384 256 TLS1.2 Native AES-GCM SHA384 ECDHE_RSA 1: 49199 ECDHE-RSA-AES128-GCM-SHA256 128 TLS1.2 Native AES-GCM SHA256 ECDHE_RSA And lastly a soft exclusion: tmm --clientciphers 'ECDHE+AES-GCM:-DHE:DHE+AES-GCM' ID SUITE BITS PROT METHOD CIPHER MAC KEYX 0: 49200 ECDHE-RSA-AES256-GCM-SHA384 256 TLS1.2 Native AES-GCM SHA384 ECDHE_RSA 1: 49199 ECDHE-RSA-AES128-GCM-SHA256 128 TLS1.2 Native AES-GCM SHA256 ECDHE_RSA 2: 159 DHE-RSA-AES256-GCM-SHA384 256 TLS1.2 Native AES-GCM SHA384 EDH/RSA 3: 158 DHE-RSA-AES128-GCM-SHA256 128 TLS1.2 Native AES-GCM SHA256 EDH/RSA Note that in the second example, the hard exclusion, we used '!DHE' and even though we then explicitly added 'DHE+AES-GCM' those ciphers were not enabled. This is because, once excluded with a hard exclusion, ciphers cannot be re-enabled. In the third example, the soft exclusion, we used '-DHE' and then 'DHE+AES-GCM'. This time it did enable those ciphers, which is possible with a soft exclusion. You might be wondering what soft disabling is useful for; why would you ever want to remove ciphers only to add them again? Reordering the ciphers is a common use case. As an example, DEFAULT orders ciphers differently in different versions, but mainly based on strength – bit size. Let's say we know 3DES is really 112-bit equivalent strength and not 168-bit as it is usually labeled. For some reason, maybe legacy clients, we can't disable them, but we want them to be last on the list. One way to do this is to first configure the DEFAULT list, then remove all of the 3DES ciphers. But then add the 3DES ciphers back explicitly – at the end of the list. Let's try it – compare the following: tmm --clientciphers 'DEFAULT' ID SUITE BITS PROT METHOD CIPHER MAC KEYX 0: 159 DHE-RSA-AES256-GCM-SHA384 256 TLS1.2 Native AES-GCM SHA384 EDH/RSA 1: 158 DHE-RSA-AES128-GCM-SHA256 128 TLS1.2 Native AES-GCM SHA256 EDH/RSA 2: 107 DHE-RSA-AES256-SHA256 256 TLS1.2 Native AES SHA256 EDH/RSA 3: 57 DHE-RSA-AES256-SHA 256 TLS1 Native AES SHA EDH/RSA 4: 57 DHE-RSA-AES256-SHA 256 TLS1.1 Native AES SHA EDH/RSA 5: 57 DHE-RSA-AES256-SHA 256 TLS1.2 Native AES SHA EDH/RSA 6: 57 DHE-RSA-AES256-SHA 256 DTLS1 Native AES SHA EDH/RSA 7: 103 DHE-RSA-AES128-SHA256 128 TLS1.2 Native AES SHA256 EDH/RSA 8: 51 DHE-RSA-AES128-SHA 128 TLS1 Native AES SHA EDH/RSA 9: 51 DHE-RSA-AES128-SHA 128 TLS1.1 Native AES SHA EDH/RSA 10: 51 DHE-RSA-AES128-SHA 128 TLS1.2 Native AES SHA EDH/RSA 11: 51 DHE-RSA-AES128-SHA 128 DTLS1 Native AES SHA EDH/RSA 12: 22 DHE-RSA-DES-CBC3-SHA 168 TLS1 Native DES SHA EDH/RSA 13: 22 DHE-RSA-DES-CBC3-SHA 168 TLS1.1 Native DES SHA EDH/RSA 14: 22 DHE-RSA-DES-CBC3-SHA 168 TLS1.2 Native DES SHA EDH/RSA 15: 22 DHE-RSA-DES-CBC3-SHA 168 DTLS1 Native DES SHA EDH/RSA 16: 157 AES256-GCM-SHA384 256 TLS1.2 Native AES-GCM SHA384 RSA 17: 156 AES128-GCM-SHA256 128 TLS1.2 Native AES-GCM SHA256 RSA 18: 61 AES256-SHA256 256 TLS1.2 Native AES SHA256 RSA 19: 53 AES256-SHA 256 TLS1 Native AES SHA RSA 20: 53 AES256-SHA 256 TLS1.1 Native AES SHA RSA 21: 53 AES256-SHA 256 TLS1.2 Native AES SHA RSA 22: 53 AES256-SHA 256 DTLS1 Native AES SHA RSA 23: 60 AES128-SHA256 128 TLS1.2 Native AES SHA256 RSA 24: 47 AES128-SHA 128 TLS1 Native AES SHA RSA 25: 47 AES128-SHA 128 TLS1.1 Native AES SHA RSA 26: 47 AES128-SHA 128 TLS1.2 Native AES SHA RSA 27: 47 AES128-SHA 128 DTLS1 Native AES SHA RSA 28: 10 DES-CBC3-SHA 168 TLS1 Native DES SHA RSA 29: 10 DES-CBC3-SHA 168 TLS1.1 Native DES SHA RSA 30: 10 DES-CBC3-SHA 168 TLS1.2 Native DES SHA RSA 31: 10 DES-CBC3-SHA 168 DTLS1 Native DES SHA RSA 32: 49200 ECDHE-RSA-AES256-GCM-SHA384 256 TLS1.2 Native AES-GCM SHA384 ECDHE_RSA 33: 49199 ECDHE-RSA-AES128-GCM-SHA256 128 TLS1.2 Native AES-GCM SHA256 ECDHE_RSA 34: 49192 ECDHE-RSA-AES256-SHA384 256 TLS1.2 Native AES SHA384 ECDHE_RSA 35: 49172 ECDHE-RSA-AES256-CBC-SHA 256 TLS1 Native AES SHA ECDHE_RSA 36: 49172 ECDHE-RSA-AES256-CBC-SHA 256 TLS1.1 Native AES SHA ECDHE_RSA 37: 49172 ECDHE-RSA-AES256-CBC-SHA 256 TLS1.2 Native AES SHA ECDHE_RSA 38: 49191 ECDHE-RSA-AES128-SHA256 128 TLS1.2 Native AES SHA256 ECDHE_RSA 39: 49171 ECDHE-RSA-AES128-CBC-SHA 128 TLS1 Native AES SHA ECDHE_RSA 40: 49171 ECDHE-RSA-AES128-CBC-SHA 128 TLS1.1 Native AES SHA ECDHE_RSA 41: 49171 ECDHE-RSA-AES128-CBC-SHA 128 TLS1.2 Native AES SHA ECDHE_RSA 42: 49170 ECDHE-RSA-DES-CBC3-SHA 168 TLS1 Native DES SHA ECDHE_RSA 43: 49170 ECDHE-RSA-DES-CBC3-SHA 168 TLS1.1 Native DES SHA ECDHE_RSA 44: 49170 ECDHE-RSA-DES-CBC3-SHA 168 TLS1.2 Native DES SHA ECDHE_RSA tmm --clientciphers 'DEFAULT:-3DES:!SSLv3:3DES+ECDHE:3DES+DHE:3DES+RSA' ID SUITE BITS PROT METHOD CIPHER MAC KEYX 0: 159 DHE-RSA-AES256-GCM-SHA384 256 TLS1.2 Native AES-GCM SHA384 EDH/RSA 1: 158 DHE-RSA-AES128-GCM-SHA256 128 TLS1.2 Native AES-GCM SHA256 EDH/RSA 2: 107 DHE-RSA-AES256-SHA256 256 TLS1.2 Native AES SHA256 EDH/RSA 3: 57 DHE-RSA-AES256-SHA 256 TLS1 Native AES SHA EDH/RSA 4: 57 DHE-RSA-AES256-SHA 256 TLS1.1 Native AES SHA EDH/RSA 5: 57 DHE-RSA-AES256-SHA 256 TLS1.2 Native AES SHA EDH/RSA 6: 57 DHE-RSA-AES256-SHA 256 DTLS1 Native AES SHA EDH/RSA 7: 103 DHE-RSA-AES128-SHA256 128 TLS1.2 Native AES SHA256 EDH/RSA 8: 51 DHE-RSA-AES128-SHA 128 TLS1 Native AES SHA EDH/RSA 9: 51 DHE-RSA-AES128-SHA 128 TLS1.1 Native AES SHA EDH/RSA 10: 51 DHE-RSA-AES128-SHA 128 TLS1.2 Native AES SHA EDH/RSA 11: 51 DHE-RSA-AES128-SHA 128 DTLS1 Native AES SHA EDH/RSA 12: 157 AES256-GCM-SHA384 256 TLS1.2 Native AES-GCM SHA384 RSA 13: 156 AES128-GCM-SHA256 128 TLS1.2 Native AES-GCM SHA256 RSA 14: 61 AES256-SHA256 256 TLS1.2 Native AES SHA256 RSA 15: 53 AES256-SHA 256 TLS1 Native AES SHA RSA 16: 53 AES256-SHA 256 TLS1.1 Native AES SHA RSA 17: 53 AES256-SHA 256 TLS1.2 Native AES SHA RSA 18: 53 AES256-SHA 256 DTLS1 Native AES SHA RSA 19: 60 AES128-SHA256 128 TLS1.2 Native AES SHA256 RSA 20: 47 AES128-SHA 128 TLS1 Native AES SHA RSA 21: 47 AES128-SHA 128 TLS1.1 Native AES SHA RSA 22: 47 AES128-SHA 128 TLS1.2 Native AES SHA RSA 23: 47 AES128-SHA 128 DTLS1 Native AES SHA RSA 24: 49200 ECDHE-RSA-AES256-GCM-SHA384 256 TLS1.2 Native AES-GCM SHA384 ECDHE_RSA 25: 49199 ECDHE-RSA-AES128-GCM-SHA256 128 TLS1.2 Native AES-GCM SHA256 ECDHE_RSA 26: 49192 ECDHE-RSA-AES256-SHA384 256 TLS1.2 Native AES SHA384 ECDHE_RSA 27: 49172 ECDHE-RSA-AES256-CBC-SHA 256 TLS1 Native AES SHA ECDHE_RSA 28: 49172 ECDHE-RSA-AES256-CBC-SHA 256 TLS1.1 Native AES SHA ECDHE_RSA 29: 49172 ECDHE-RSA-AES256-CBC-SHA 256 TLS1.2 Native AES SHA ECDHE_RSA 30: 49191 ECDHE-RSA-AES128-SHA256 128 TLS1.2 Native AES SHA256 ECDHE_RSA 31: 49171 ECDHE-RSA-AES128-CBC-SHA 128 TLS1 Native AES SHA ECDHE_RSA 32: 49171 ECDHE-RSA-AES128-CBC-SHA 128 TLS1.1 Native AES SHA ECDHE_RSA 33: 49171 ECDHE-RSA-AES128-CBC-SHA 128 TLS1.2 Native AES SHA ECDHE_RSA 34: 49170 ECDHE-RSA-DES-CBC3-SHA 168 TLS1 Native DES SHA ECDHE_RSA 35: 49170 ECDHE-RSA-DES-CBC3-SHA 168 TLS1.1 Native DES SHA ECDHE_RSA 36: 49170 ECDHE-RSA-DES-CBC3-SHA 168 TLS1.2 Native DES SHA ECDHE_RSA 37: 22 DHE-RSA-DES-CBC3-SHA 168 TLS1 Native DES SHA EDH/RSA 38: 22 DHE-RSA-DES-CBC3-SHA 168 TLS1.1 Native DES SHA EDH/RSA 39: 22 DHE-RSA-DES-CBC3-SHA 168 TLS1.2 Native DES SHA EDH/RSA 40: 22 DHE-RSA-DES-CBC3-SHA 168 DTLS1 Native DES SHA EDH/RSA 41: 10 DES-CBC3-SHA 168 TLS1 Native DES SHA RSA 42: 10 DES-CBC3-SHA 168 TLS1.1 Native DES SHA RSA 43: 10 DES-CBC3-SHA 168 TLS1.2 Native DES SHA RSA 44: 10 DES-CBC3-SHA 168 DTLS1 Native DES SHA RSA I added something else in there which I'll come back to later. Pitfalls As should be clear by now cipher configuration is a powerful tool, but as the song says, every tool is a weapon if you hold it right. And weapons are dangerous. With a little careless handling it is easy to lose a toe – or a leg. Whenever you are working with cipher suite configuration the old rule of 'measure twice, cut once' applies – and then double-check the work to be certain. There are several common pitfalls which await you. Misuse Perhaps the most common pitfall is simply misuse – using cipher suite configuration for that which it is not intended. And the single most common example of this comes from using cipher configuration to manipulate protocols. Given the keywords, as described above, it seems common for users to presume that if they want to disable a protocol, such as TLSv1.0, then the way to do that is to use a cipher suite keyword, such as !TLSv1. And, indeed, this may seem to work – but it isn't doing what is desired. The protocol is not disabled, only the ciphers that are supported for that protocol are. The protocol is configured on the VIP independently of the ciphers. !TLSv1 would disable all ciphers supported under the TLSv1.0 protocol, but not the protocol itself. Note that the protocol negotiation and the cipher negotiation in the SSL/TLS handshake are independent. What happens if the VIP only supports TLSv1.0/v1.1/v1.2 and the client only supports SSLv3 & TLSv1.0? Well, they'd agree on TLSv1.0 as the common protocol. The cipher list the client sends in the Client Hello is independent of the protocol that is eventually negotiated. Say the client sends AES128-SHA and the server has that in its list, so it is selected. OK, we've agreed on a protocol and a cipher suite – only the server won't do any ciphers on TLSv1.0 because of '!TLSv1' in the ciphers configuration, and the connection will fail. That may seem like splitting hairs, but it makes a difference. If a scanner is looking for protocols that are enabled, and not the full handshake, it may still flag a system which has been configured this way. The protocol is negotiated during the SSL/TLS handshake before the cipher is selected. This also means the system is doing more work, as the handshake continues further before failing, and the log messages may be misleading. Instead of logging a protocol incompatibility the logs will reflect the failure to find a viable cipher, which can be a red herring when it comes time to debug the configuration. The right way to do this is to actually disable the protocol, which doesn't involve the cipher suite configuration at all. For the control plane this is done through the ssl-protocol directive: tmsh list sys http ssl-protocol sys httpd { ssl-protocol "all -SSLv2 -SSLv3" } For example, if we wanted to disable TLSv1.0: tmsh modify sys http ssl-protocol 'all -SSLv2 -SSLv3 -TLSv1' tmsh list sys http ssl-protocol sys httpd { ssl-protocol "all -SSLv2 -SSLv3 -TLSv1" } For the data plane this can be done via the Options List in the SSL Profile GUI, via the No SSL, No TLSv1.1, etc. directives: Or via the command line: tmsh list ltm profile client-ssl Test options ltm profile client-ssl Test { options { dont-insert-empty-fragments } } tmsh modify ltm profile client-ssl Test options {dont-insert-empty-fragments no-tlsv1} tmsh list /ltm profile client-ssl Test options ltm profile client-ssl Test { options { dont-insert-empty-fragments no-tlsv1 } } The values are slightly different on the command line, use this command to see them all: tmsh modify ltm profile client-ssl <profile-name> options ? Use the right tool for the job and you'll be more likely to succeed. Truncation As I previously mentioned, in versions up to 11.5.0 the ciphers configuration string was truncated at 256 bytes. Starting in 11.5.0 that was increased to 768 bytes (see K11481: The SSL profile cipher lists have a 256 character limitation for more information), but that can still silently truncate long configurations. This is not a theoretical issue, we've seen users run into this in the real world. For example, little over a year ago I worked with a customer who was then using 11.4.1 HF8. They were trying to very precisely control which ciphers were enabled, and their order. In order to do this they'd decided to enumerate every individual cipher in their configuration – resulting in this cipher suite configuration string: TLSv1_2+ECDHE-RSA-AES256-CBC-SHA:TLSv1_1+ECDHE-RSA-AES256-CBC-SHA:TLSv1_2+ECDHE-RSA-AES128-CBC-SHA:TLSv1_1+ECDHE-RSA-AES128-CBC-SHA:TLSv1_2+DHE-RSA-AES256-SHA:TLSv1_1+DHE-RSA-AES256-SHA:TLSv1_2+DHE-RSA-AES128-SHA:TLSv1_1+DHE-RSA-AES128-SHA:TLSv1_2+AES256-SHA256:TLSv1_1+AES256-SHA:TLSv1_2+AES128-SHA256:TLSv1_1+AES128-SHA:TLSv1+ECDHE-RSA-AES256-CBC-SHA:TLSv1+ECDHE-RSA-AES128-CBC-SHA:TLSv1+DHE-RSA-AES256-SHA:TLSv1+DHE-RSA-AES128-SHA:TLSv1+AES256-SHA:TLSv1+AES128-SHA:TLSv1+DES-CBC3-SHA That string would save in the configuration and it was there if you looked at the bigip.conf file, but it was silently truncated when the configuration was loaded. Since this was 11.4.1, only the first 256 bytes were loaded successfully, which made the running configuration: TLSv1_2+ECDHE-RSA-AES256-CBC-SHA:TLSv1_1+ECDHE-RSA-AES256-CBC-SHA:TLSv1_2+ECDHE-RSA-AES128-CBC-SHA:TLSv1_1+ECDHE-RSA-AES128-CBC-SHA:TLSv1_2+DHE-RSA-AES256-SHA:TLSv1_1+DHE-RSA-AES256-SHA:TLSv1_2+DHE-RSA-AES128-SHA:TLSv1_1+DHE-RSA-AES128-SHA:TLSv1_2+AES256-S Note the last suite is truncated itself, which means it was invalid and therefore ignored. If their configuration had worked they would've had nineteen protocol+suite combinations – instead they had eight. Needless to say, this caused some problems. This customer was missing ciphers that they expected to have working. That is bad enough – but it could be worse. Let's imagine a customer who wants to specify several specific ciphers first, then generally enable a number of other TLSv1.2 & TLSv1.1 ciphers. And, of course, they are careful to disable dangerous ciphers! TLSv1_2+ECDHE-RSA-AES256-CBC-SHA:TLSv1_1+ECDHE-RSA-AES256-CBC-SHA:TLSv1_2+ECDHE-RSA-AES128-CBC-SHA:TLSv1_1+ECDHE-RSA-AES128-CBC-SHA:TLSv1_2+DHE-RSA-AES256-SHA:TLSv1_1+DHE-RSA-AES256-SHA:TLSv1_2+DHE-RSA-AES128-SHA:TLSv1_1+DHE-RSA-AES128-SHA:TLSv1_2:TLSv1_1:!RC4:!MD5:!ADH:!DES:!EXPORT OK, that looks fairly solid, right? What do you suppose the problem with this is? This is the problem; in 11.4.1 and earlier it would truncate to this: TLSv1_2+ECDHE-RSA-AES256-CBC-SHA:TLSv1_1+ECDHE-RSA-AES256-CBC-SHA:TLSv1_2+ECDHE-RSA-AES128-CBC-SHA:TLSv1_1+ECDHE-RSA-AES128-CBC-SHA:TLSv1_2+DHE-RSA-AES256-SHA:TLSv1_1+DHE-RSA-AES256-SHA:TLSv1_2+DHE-RSA-AES128-SHA:TLSv1_1+DHE-RSA-AES128-SHA:TLSv1_2:TLSv1_1: All of the exclusions were truncated off! Now we have the opposite problem – there are a number of ciphers enabled which the customer expects to be disabled! And they're BAD ciphers – ADH, DES, MD5, RC4. So this customer would be at high risk without realizing it. Be aware of this; it is very sneaky. The configuration will look fine; the truncation happens in the code when it loads the configuration. This is also one reason why I always recommend listing your exclusions first in the configuration string. Then you can never accidentally enable something. Unintended Consequences Let's say a new CVE is announced which exposes a very serious vulnerability in SSLv3 & TLSv1.0. There is no way to mitigate it, and the only solution is to limit connections to only TLSv1.1 & TLSv1.2. You want a cipher configuration to accomplish this. It seems straight-forward – just configure it to use only ciphers on TLSv1.1 & TLSv1.2: tmsh modify ltm profile client-ssl <profile> ciphers 'TLSv1_2:TLSv1_1' Congratulations, you've solved the problem. You are no longer vulnerable to this CVE. You know there is a but coming, right? What's wrong? Well, you just enabled all TLSv1.2 & TLSv1.1 ciphers. That includes such gems as RC4-MD5, RC4-SHA, DES, and a few ADH (Anonymous Diffie-Hellman) suites which have no authentication. As recently as 11.3.0 you'd even be enabling some 40-bit EXPORT ciphers. (We pulled them out of NATIVE in 11.4.0.) So you just leapt out of the frying pan and into the fire. Always, always, always check the configuration before using it. Running that through tmm --clientciphers 'TLSv1_2:TLSv1_1' would've raised red flags. Instead, this configuration would work without causing those problems: tmsh modify ltm profile client-ssl <profile> ciphers 'DEFAULT:!TLSv1:!SSLv3' Another option, and probably the better one, is to disable the SSLv3 and TLSv1.0 protocols on the VIP. As I discussed above. Of course, you can do both – belt and suspenders. And just to show you how easy it is to make such a mistake, F5 did this! In K13400: SSL 3.0/TLS 1.0 BEAST vulnerability CVE-2011-3389 and TLS protocol vulnerability CVE-2012-1870 we originally had the following in the mitigation section: Note: Alternatively, to configure an SSL profile to use only TLS 1.1-compatible, TLS 1.2-compatible, AES-GCM, or RC4-SHA ciphers using the tmsh utility, use the following syntax: tmsh create /ltm profile client-ssl <name> ciphers TLSv1_1:TLSv1_2:AES-GCM:RC4-SHA Yes, I had this fixed long ago. Remember back in the section on keywords I had this comparison example: tmm --clientciphers 'DEFAULT' tmm --clientciphers 'DEFAULT:-3DES:!SSLv3:3DES+ECDHE:3DES+DHE:3DES+RSA' Who caught the '!SSLv3' in the second line? Why do you think I added that? Did I need to? Hint: What do you think the side effect of blanket enabling all of those 3DES ciphers would be if I didn't explicitly disable SSLv3? Cipher Ordering In SSL/TLS there are two main models to the cipher suite negotiation – Server Cipher Preference or Client Cipher Preference. What does this mean? In SSL/TLS the client sends the list of cipher suites it is willing and able to support in the Client Hello. The server also has its list of cipher suites that it is willing and able to support. In Client Cipher Preference the server will select the first cipher on the client's list that is also in the server's list. Effectively this gives the client influence over which cipher is selected based on the order of the list it sends. In Server Cipher Preference the server will select the first server on its own list that is also on the client's list. So the server gives the order of its list precedence. BIG-IP always operates in Server Cipher Preference, so be very careful in how you order your cipher suites. Preferred suites should go at the top of the list. How you order your cipher suites will directly affect which ciphers are used. It doesn't matter if a stronger cipher is available if a weak cipher is matched first. HTTP/2 How is HTTP/2 a pitfall? The HTTP/2 RFC7540 includes a blacklist of ciphers that are valid in TLS, but should not be used in HTTP/2. This can cause a problem on a server where the TLS negotiation is decoupled from the ALPN exchange for the higher level protocol. The server might select a cipher which is on the blacklist, and then when the connection attempts to step up to HTTP/2 via ALPN the client may terminate the connection with extreme prejudice. It is well known enough to be called out in the RFC – Section 9.2.2. F5 added support for HTTP/2 in 12.0.0 – and we fell into this trap. Our DEFAULT ciphers list was ordered such that it was almost certain a blacklisted cipher would be selected.; This was fixed in 12.0.0 HF3 and 12.1.0, but serves as an example. On 12.0.0 FINAL through 12.0.0 HF2 a simple fix was to configure the ciphers to be 'ECDHE+AES-GCM:DEFAULT'. ECDHE+AES-GCM is guaranteed to be supported by any client compliant with RFC7540 (HTTP/2). Putting it first ensures it is selected before any blacklisted cipher. 3DES Back in the section on ciphers I mentioned that we label 3DES as being 168-bit, but that it only provides the equivalent of 112-bit strength. So, what did I mean by that? DES operates on 64-bit data blocks, using 56-bits of key. So it has a strength of 2 56 . 3DES, aka Triple DES, was a stop-gap designed to stretch the life of DES once 56-bits was too weak to be safe, until AES became available. 3DES use the exact same DES cipher, it just uses it three times – hence the name. So you might think 3x56-bits = 168-bits. 2 168 strong. Right? No, not really. The standard implementation of 3DES is known as EDE – for Encrypt, Decrypt, Encrypt. (For reasons we don't need to get into here.) You take the 64-bit data block, run it through DES once to encrypt it with K 1 , then run it through again to decrypt it using K 2 , then encrypt it once again using K 3 . Three keys, that's still 168-bits, right? Well, you'd think so. But the devil is in the (implementation) details. First of all there are three keying options for 3DES: - Keying option 1: K1, K2, K3 – 168 unique bits (but only 112-bit strength!) - Keying option 2: K1, K2, K1 – 112 unique bits (but only 80-bit strength!) - Keying option 3: K1, K1, K1 – 56 unique bits, 56-bit strength (Equivalent to DES due to EDE!) F5 uses keying option one, so we have 168-bits of unique key. However, 3DES with keying option one is subject to a meet-in-the-middle cryptographic attack which only has a cost of 2 112 . It has even been reduced as low as 2 108 , as described in this paper. So it does not provide the expected 168-bits of security, and is in fact weaker than AES128. To add some confusion, due to an old issue we used to describe 3DES as being 192-bit. See: K17296: The BIG-IP system incorrectly reports a 192-bit key length for cipher suites using 3DES (DES-CBC3) for more details. Of course, with the appearance of the Sweet32 attack last fall I would encourage everyone to disable 3DES completely whenever possible. We're also seeing a growing number of scanners and audit tools recategorizing 3DES as a 'Medium' strength cipher, down from 'High', and correspondingly lowering the grade for any site still supporting it. If you don't need it, turn it off. See K13167034: OpenSSL vulnerability CVE-2016-2183 for more information. Conclusion Believe it or not, that's the quick overview of cipher suite configuration on BIG-IP. There are many areas where we could dig in further and spend some time in the weeds, but I hope that this article helps at least one person understand cipher suite configuration better, and to avoid the pitfalls that commonly claim those who work with them. Additional Resources This article is by no means comprehensive, and for those interested I'd encourage additional reading: BIG-IP SSL Cipher History by David Holmes, here on DevCentral Cipher Rules And Groups in BIG-IP v13 by Chase Abbott, also on DevCentral OpenSSL Cipher Documentation K8802: Using SSL ciphers with BIG-IP Client SSL and Server SSL profiles K15194: Overview of the BIG-IP SSL/TLS cipher suite K13163: SSL ciphers supported on BIG-IP platforms (11.x - 12.x) K13156: SSL ciphers used in the default SSL profiles (11.x - 12.x) K17370: Configuring the cipher strength for SSL profiles (12.x) K13171: Configuring the cipher strength for SSL profiles (11.x) K14783: Overview of the Client SSL profile (11.x - 12.x) K14806: Overview of the Server SSL profile (11.x - 12.x)20KViews9likes17Comments
BIG-IP vWire Configuration
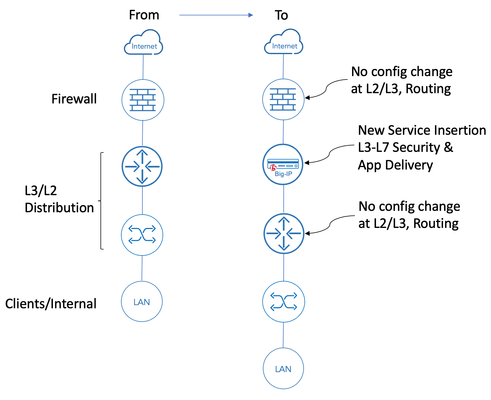
Introduction Theinsertion ofinlinesecurity and application delivery devices into anexisting network infrastructure canrequiresignificant networkre-design and architecture changes. Deploying tools that operatetransparentlyat Layer 2of the OSI model (L2)cangreatly reducethecomplexity anddisruption associated with theseimplementations. F5’s BIG-IP hardware appliances can be inserted as L2 devices in existing networks.Thiscan be achieved using either virtual Wire (vWire) or by bridging 2 Virtual LANs using aVLANGroups. This article focusses on the configuration of vWire on a standalone BIG-IP with 2 physical interface. The 2 physical interfaces are bridged together and allow traffic through the BIG-IP behaving like a wire. Note: Virtual Wire is available on BIG-IP hardware. For more informationon F5 security and other modules and their configurationplease refer towww.f5.comto access user guides, recommended practices andother deployment documentation.The configuration of BIG-IP modules, such as those providing DDoS protection/mitigation or SSL visibility, is beyond the scope of this article and is the subject of otheruser guides. Under the covers Building virtual wires leverages the underlying configuration of two separate VLAN objects that are bridged using a VLAN group.For convenience, going forward, one will be called the “ingress VLAN object” and the other one the “egress VLAN object”. This is significant because, you will be able to use these objects in your configuration to setup listeners and associate them to either VLAN object. Configuration Using the CLI Overview: Modify the 2 interfaces' mode to support virtual wire Create 2 VLAN objects using the interfaces selected above using VLAN id 4096 - this is the default "any" VLAN ID which will accept and forward all 802.1Q tagged traffic. Create 2 VLAN objects using the same interfaces above using the desired VLAN id (512 will be used as an example below) Create VLAN Groups to bridge the VLAN's created above Sample Configuration: The sample below creates a virtual wire that will work with 802.1Q VLAN id. 512. Configure interfaces to support virtual wire: root@(localhost)(cfg-sync Standalone)(Active)(/Common)(tmos)# modify net interface 1.1 port-fwd-mode virtual-wire root@(localhost)(cfg-sync Standalone)(Active)(/Common)(tmos)# modify net interface 1.2 port-fwd-mode virtual-wire Create all VLAN tag VLAN objects: root@(localhost)(cfg-sync Standalone)(Active)(/Common)(tmos)# create net vlan Direct_all_vlan_4096_1 tag 4096 interfaces add { 1.1 { tagged } } root@(localhost)(cfg-sync Standalone)(Active)(/Common)(tmos)# create net vlan Direct_all_vlan_4096_2 tag 4096 interfaces add { 1.2 { tagged } } Create specific (802.1Q tag 512) VLAN objects: root@(localhost)(cfg-sync Standalone)(Active)(/Common)(tmos)# create net vlan Direct_vlan_512_1 tag 512 interfaces add { 1.1 { tagged } } root@(localhost)(cfg-sync Standalone)(Active)(/Common)(tmos)# create net vlan Direct_vlan_512_2 tag 512 interfaces add { 1.2 { tagged } } Create VLAN Groups: root@(localhost)(cfg-sync Standalone)(Active)(/Common)(tmos)# create net vlan-group Direct_all_vlan members add { Direct_all_vlan_4096_1 Direct_all_vlan_4096_2 } mode virtual-wire root@(localhost)(cfg-sync Standalone)(Active)(/Common)(tmos)# create net vlan-group Direct_vlan_512 members add { Direct_vlan_512_1 Direct_vlan_512_2 } mode virtual-wire Don't forget to save: root@(localhost)(cfg-sync Standalone)(Active)(/Common)(tmos)# save sys config partitions all Using the WEBUI: Overview: There is a single interface to create and configure the necessary configuration objects. Create a virtual wire with the desired interfaces Associate VLANs that will be used by the BIG-IP function (e.g. SSL Orchestrator, Traffic Manager, etc.) Apply the configuration Sample Configuration: From the BIG-IP WebUI (Network>>Virtual Wire): Select Create (upper right) Enter the values for interfaces added to the virtual wire Enter VLAN information and click on Add for every VLAN object created Once the all the selections are made and you are ready to implement, click on "Commig Changes to System": The resulting screen will look like the following: The resulting VLAN configuration will look as follows: Notable Effects-Caveats Virtual Wire Created Through WebUI Configuring vWire via the WebUI will result in creating the aforementioned VLANs automatically.During the creation process, an identifier is appended to the VLAN object-name.This identifier will vary from one BIG-IP to another. When deploying a pair of BIG-IP’s in HA mode, the virtual wire configuration will create objects with different names on each BIG-IP.So for example, the creation of vwire_lab01 will result in the creation of VLAN objects vwire_lab01_1_567 and vwire_lab01_2_567 on one BIG-IP, while the other BIG-IP will have vwire_lab01_1_000 and vwire_lab01_2_000 in its configuration.For modules like SSL Orchestrator, or in cases where a Virtual Server needs to be associated with a specific VLAN, the numbering is problematic. The administrator will not be able to associate the topology or Virtual Server to one VLAN object (vwire_lab01_2_567) on the first BIG-IP and the other VLAN object (vwire_lab01_2_000) on the peer BIG-IP.(this is not possible for a number of reasons, one of which is the way configurations are synchronized between BIG-IP devices) This results in the necessary manual configuration using the procedure described above. VLAN Objects Available for Configuration After creating virtual wire objects, VLANs are available for you to configure the desired services. This includes BIG-IP LTM or SSL Orchestrator objects allowing you to take different actions when traffic comes in one or the other "side" of the virtual wire. For example, you might want connections initiated from the LAN (in the picture above) to be decrypted for security inspection purposes, while having traffic coming in from the firewall passed through transparently. Conclusion Deploying the BIG-IP in virtual wire mode provides a great way to insert services into your network without affecting the rest of the network configuration, routing and forwarding. The flexibility of the BIG-IP allows you to control the traffic traversing the BIG-IP on what ever VLAN (tagged or not). I hope this has been useful.2.9KViews6likes9Comments
COVID-19 Response: F5 Certifications Q&A
F5 knows that COVID-19 restrictions greatly affect your ability to schedule and attend exam certification appointments. No candidate will lose certification as a result of these extraordinary events. AskF5 published K25023468: COVID-19 update for F5 Certifications, which provides answers to the following questions: What is F5 going to do to solve this? I got notified that my certification is expiring/expired, but I cannot schedule an exam; what am I supposed to do? Why can’t you just extend certifications to stop the messages and prevent the certifications from reporting as expiring/expired? Will F5 implement online proctored exams like some other organizations are doing?1.2KViews5likes0CommentsLightboard Lessons: standard virtual server behavior when no pool members are available
In this episode of Lightboard Lessons, Jason answers a question from a member of the community about BIG-IP's full proxy architecture and the relationship between the clientside TCP session and its serverside counterpart when there are no pool members available. Packet Capture Details In each of the following sections, you'll find the packet captures between the client and the BIG-IP, and where appropriate, between the BIG-IP and the server. Standard HTTP Virtual Server, SSL, Pool Available In this first capture, everything is working as expected. Standard HTTP Virtual Server, SSL, Pool Unavailable Now, the pool members are all down and the virtual server state is down. Note that even though there are no back-end resources available to manage the client connection, the client-side TCP and SSL handshakes complete before the BIG-IP acknowledges and resets the connection. This makes sense, as the server-side of the connection is not initiated until the application request arrives. With SSL, that means the handshake must occur before the request can be decrypted and read. Standard HTTP Virtual Server, SSL w/ discard iRule, Pool Unavailable Even though it is expected, it might not be desirable for the BIG-IP to respond to the client at all if the back-end resources are unavailable. I had a use case for this way back in my customer days. My global load balancer (that was not an F5 device) marked its pool members up if it received any response at all, even if that response was a "successful" TCP/SSL handshake that resulted in an immediate RST. By applying this iRule that checks for the available state of the pool members and discards packets when there are none, you can prevent responses altogether. when FLOW_INIT { if { [active_members testpool] < 1 } { discard } } Standard HTTP Virtual Server, SSL w/ reject iRule, Pool Unavailable You might however need to be a good netizen for your particular clients and alert immediately that your service is not available without tying up the resources of your TCP and SSL stacks. In this case you can alter the iRule to reject instead of discard. when FLOW_INIT { if { [active_members testpool] < 1 } { reject } }1.5KViews4likes7CommentsUpgrade your BIG-IP systems for more secure apps
Keeping your BIG-IP software up to date ensures you have access to advanced capabilities and higher-quality, more secure releases. At a minimum, F5 recommends implementing BIG-IP 14.1.0 across your BIG-IP fleet.BIG-IP 15.1.0 and 16.0.0 will reward you with the most advanced BIG-IP functionality, including new protocol support and security capabilities. Walkthrough Videos For a walkthrough of three common upgrade scenarios, watch the following videos: Performing a software upgrade on a BIG-IP system (standalone) Updating BIG-IP HA systems with a point release Upgrading BIG-IP VIPRION vCMP systems Automation For information about upgrading with the assistance of automation, watch DevCentral Connects: Automating Software Updates with BIG-IQ or Ansible. Official Training F5 has temporarily, and until further notice, made the following training available for free: BIG-IP Fundamentals: Upgrading a BIG-IP System --- For more information about upgrading, refer to the F5 page on BIG-IP upgrade.347Views3likes1CommentIs TCP's Nagle Algorithm Right for Me?
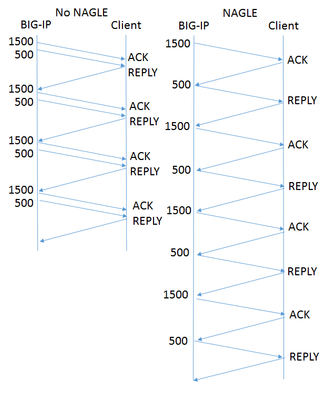
Of all the settings in the TCP profile, the Nagle algorithm may get the most questions. Designed to avoid sending small packets wherever possible, the question of whether it's right for your application rarely has an easy, standard answer. What does Nagle do? Without the Nagle algorithm, in some circumstances TCP might send tiny packets. In the case of BIG-IP®, this would usually happen because the server delivers packets that are small relative to the clientside Maximum Transmission Unit (MTU). If Nagle is disabled, BIG-IP will simply send them, even though waiting for a few milliseconds would allow TCP to aggregate data into larger packets. The result can be pernicious. Every TCP/IP packet has at least 40 bytes of header overhead, and in most cases 52 bytes. If payloads are small enough, most of the your network traffic will be overhead and reduce the effective throughput of your connection. Second, clients with battery limitations really don't appreciate turning on their radios to send and receive packets more frequently than necessary. Lastly, some routers in the field give preferential treatment to smaller packets. If your data has a series of differently-sized packets, and the misfortune to encounter one of these routers, it will experience severe packet reordering, which can trigger unnecessary retransmissions and severely degrade performance. Specified in RFC 896 all the way back in 1984, the Nagle algorithm gets around this problem by holding sub-MTU-sized data until the receiver has acked all outstanding data. In most cases, the next chunk of data is coming up right behind, and the delay is minimal. What are the Drawbacks? The benefits of aggregating data in fewer packets are pretty intuitive. But under certain circumstances, Nagle can cause problems: In a proxy like BIG-IP, rewriting arriving packets in memory into a different, larger, spot in memory taxes the CPU more than simply passing payloads through without modification. If an application is "chatty," with message traffic passing back and forth, the added delay could add up to a lot of time. For example, imagine a network has a 1500 Byte MTU and the application needs a reply from the client after each 2000 Byte message. In the figure at right, the left diagram shows the exchange without Nagle. BIG-IP sends all the data in one shot, and the reply comes in one round trip, allowing it to deliver four messages in four round trips. On the right is the same exchange with Nagle enabled. Nagle withholds the 500 byte packet until the client acks the 1500 byte packet, meaning it takes two round trips to get the reply that allows the application to proceed. Thus sending four messages takes eight round trips. This scenario is a somewhat contrived worst case, but if your application is more like this than not, then Nagle is poor choice. If the client is using delayed acks (RFC 1122), it might not send an acknowledgment until up to 500ms after receipt of the packet. That's time BIG-IP is holding your data, waiting for acknowledgment. This multiplies the effect on chatty applications described above. F5 Has Improved on Nagle The drawbacks described above sound really scary, but I don't want to talk you out of using Nagle at all. The benefits are real, particularly if your application servers deliver data in small pieces and the application isn't very chatty. More importantly, F5® has made a number of enhancements that remove a lot of the pain while keeping the gain: Nagle-aware HTTP Profiles: all TMOS HTTP profiles send a special control message to TCP when they have no more data to send. This tells TCP to send what it has without waiting for more data to fill out a packet. Autonagle:in TMOS v12.0, users can configure Nagle as "autotuned" instead of simply enabling or disabling it in their TCP profile. This mechanism starts out not executing the Nagle algorithm, but uses heuristics to test if the receiver is using delayed acknowledgments on a connection; if not, it applies Nagle for the remainder of the connection. If delayed acks are in use, TCP will not wait to send packets but will still try to concatenate small packets into MSS-size packets when all are available. [UPDATE:v13.0 substantially improves this feature.] One small packet allowed per RTT: beginning with TMOS® v12.0, when in 'auto' mode that has enabled Nagle, TCP will allow one unacknowledged undersize packet at a time, rather than zero. This speeds up sending the sub-MTU tail of any message while not allowing a continuous stream of undersized packets. This averts the nightmare scenario above completely. Given these improvements, the Nagle algorithm is suitable for a wide variety of applications and environments. It's worth looking at both your applications and the behavior of your servers to see if Nagle is right for you.1.2KViews2likes5CommentsLightboard Lessons: Device Services Clustering
In this episode of Lightboard Lessons, I cover the basics of F5’s high availability architecture called Device Services Clustering, or DSC for short. Update - step by step configuration of an example deployment shown below. So let’s take the overall theory and break make some stuff! In this article we'll add four BIG-IP devices into a peer relationship, establish 2 sync-failover device groups, establish 2 traffic groups on one of the sync failover groups, and then create some failover objects for each of the traffic groups. For each device, we’ll start by preparing them for peering. First, make sure your device certificate matches your fqdn. For each of my devices, that’s bigip_ha(n).test.local, where (n) is the device number in my lab. You can do this at System->Device Certificates->Device Certificate. I’m just using a self signed certificate for this article. Next, go to Device Management -> Devices, and click on the (Self) device as shown below In the device view, you’ll need to click Device Connectivity and set each of Config Sync, Failover Network, and Mirroring. I’m choosing my HA network for all three and foregoing a backup option, though in production you might want to consider using one. Make sure your port lockdown settings are configured to allow for your HA traffic. Allow default should be sufficient. Repeat these steps for your remaining devices. Now that the devices are all configured, let’s add some peers! For this lab, I will use device bigip_ha1 to add the other three peers. First, we supply an IP address, which I specify as the HA self IP address, and credentials. Verify the information the BIG-IP pulled in about that peer, then click finish. Repeat for the remaining devices. Now in the device list, I see all four BIG-IPs. Moving on, let’s create a a couple sync-failover groups, putting bigip_ha1/2 in the first and bigip_ha3/4 in the second. Shown below is the first, just repeat the steps for the second. After the second is created, you can see both in the device group list Next do an initial sync by selecting a device to sync to group for each failover group So at this point we have two pairs of sync-failover groups, all synced, all in the sync-only device_trust group. By default, all traffic for each sync group will now be active standby since the only floating traffic group is traffic-group-1. Let’s add a traffic group to our first sync-failover pair. Now, instead of having an active/standby pair of devices, you have an active/active pair! And if we had a third device in this failover group, and created a third traffic group, we would transition from active/active/standby to active/active/active. Cool stuff! Now if you add failover objects, you’ll notice they all add to traffic-group-1 by default. This is because the /Common partition defaults to traffic-group-1. Let’s create a specific partition for both traffic groups so we can be explicit with the traffic. Now we can add a failover object like a snatpool in each partition So now if we look at the traffic groups and select All partitions, we can see that each traffic group has two failover objects (the two snat addresses we added to the snat pools.) And if we click into one of them, we can see the actual failover objects attached to that traffic group. This is just the tip of the iceberg, there is plenty more to cover on the failover methods, which we will touch on next week. Resources Configuring BIG-IP Local Traffic Manager (LTM)641Views2likes0CommentsLightboard Lesson: What is vCMP?
F5's Virtual Clustered Multiprocessing, or vCMP for short, is virtualization technology that couples a custom hypervisor running on the BIG-IP host with a hardware-specific scalable number of guest virtual machines running TMOS. This article wraps a short series of Lightboard Lessons Jason filmed to introduce the high level vCMP concepts. What is vCMP? In this first video, Jason covers the differences between multi-tenancy and virtualization and discusses how the vCMP system works. vCMP Guest Networking and High Availability In part 2, Jason covers the great flexibility in guest provisioning, guest networking concepts, and a high availability overview for guests versus chassis. vCMP Security (coming soon!) In part 3, Jason concludes the series with a discussion on network security, guest deployment security, and secure memory management. Resources vCMP Admin (appliances) vCMP Admin (VIPRION) VIPRION Systems: Configuration K15930: Overview of vCMP configuration considerations K16947: Best practices for the HA group feature K14088: vCMP host and compatible guest matrix K14218: vCMP guest memory/CPU core allocation matrix K14727: BIG-IP vCMP hosts and guests configuration options1KViews2likes1CommentAskF5's new BIG-IP upgrade guide
AskF5 published the new BIG-IP upgrade guideto help you through the BIG-IP upgrade process.At a minimum, F5 recommends that you upgrade your BIG-IP appliances to at least version 14.1.x and your BIG-IP VE systems to at least version 15.1.x. Because F5 customers use a variety of configurations and tools, there are many upgrade scenarios. In this new Operations Guide, you'll find the following topics: Prepare to upgrade Chapter 1: Guide introduction and contents Chapter 2: Choosinga BIG-IP upgrade version Chapter 3: Preparingto upgrade the BIG-IP system BIG-IP hardware and VE platforms BIG-IP systems Chapter 4: Upgradinga standalone BIG-IPsystem Chapter 5: Upgradinga standalone BIG-IPsystem using the TMOS Shell VIPRION BIG-IP systems Chapter 6: Upgradinga VIPRION HA pair Chapter 7:UpgradingBIG-IP VIPRION vCMP systems Other BIG-IP vCMP systems Chapter 8: UpgradingBIG-IP vCMP systems (non-VIPRION) BIG-IP cloud platforms BIG-IP on AWS Chapter 9: Upgrading aBIG-IP VE instance on AWS using the f5-aws-migrate.py script BIG-IP on Microsoft Azure Chapter 10: Upgradinga BIG-IP Azure VM using the Azure portal to deploy an ARM template Chapter 11: Upgradinga BIG-IP Azure VM using Terraform to deploy an ARM template Chapter 12: Upgradinga BIG-IP Azure VM using Ansible to deploy an ARM template BIG-IP on GCP Chapter 13: Upgrading a BIG-IP GCP VM using Terraform Automation Chapter 14: UsingF5 Modules for Ansible to upgrade BIG-IP system software Send Feedback This guide is a work in progress; request the upgrade scenarios you want to see in this guide. Use the feedback or survey button at the bottom of any guide page, or email TellAskF5@f5.com. Related Content For supported paths and general considerations, refer toK13845: Overview of supported BIG-IP upgrade paths and an upgrade planning reference.727Views2likes1CommentThe Top Ten Hardcore F5 Security Features in BIG-IP 14.0
Stop! You must be this smart to read this article! Seriously, dude, put down the wireless trackball and back away from the computer. RIGHT NOW. Because this article is too hardcore for you. Yeah, yeah, you’ve read the previous Top Ten Hardcore Security Feature lists (12, 12.1, 13), and you think you’re clever, but just stahp. You’re not ready for this one. You are strongly advised to stand down and read the standard version14.0 release notesinstead, like normal people, because this Top Ten Hardcore list for version 14.0 makes all the previous Top Ten lists look like corporate marketing fluff written by a tribble! What?!? You’re going to continue reading? Well, don’t say I didn’t warn you. I bet you won’t even get past the first two features before you scroll to the end looking for a bad joke. Number 10 [ ASM ] – Name Your Own WAF Cookies In days of yore, just after Al Gore invented the Internet, F5 bought a little application security product called “TrafficShield.” That’s a super cool name for a web application firewall, but eventually the F5 marketing drones standardized on “ASM.” The spirit of TrafficShield lived on in the ASM cookies, which were always named TSCookie. So one could, in theory, fingerprint an F5 web application firewall by looking for the TSCookie. Not that anyone everdid that. Version 14 lets you create your own cookie naming patterns for the ASM cookie and the Device ID cookie. If you’re worried about fingerprinting, make up your own names (I’m going with NOTanF5Cookie). This feature can also help you conform to in-house cookie conventions. The maximum cookie size is also increased from 8 KB to 16 KB to accommodate user applications which block 8 KB cookies. I know, you’re thinking, who on God’s green earth uses 9K cookies? It’s called cookie bloat and it’s a thing because people are jamming entire web objects into cookies these days. Who designed this internet anyway? Certainly not Spock. Number 9 [FPS] – Single Page Application Support Guys, I have seen the future. The future is the Single Page Application (SPA). Many of the most popular webpages are SPA now, like Twitter, Facebook, and Gmail. In theory, SPA allows the application developers to focus on UX and not on URL management. ButSPA relies heavily on duplex technologies like isomorphic React, Websockets and AJAX. That’s the future. Or the present or whatever. In a Single Page Application, a URL can have multiple views (layouts/content sets), where views change without a full page reload. As you can imagine, the normal tricks that ourFraud Protection Service (FPS) code usesto protect the application need to change. Starting with version 14.0, you can direct the FPS to treat an application as SPA.The DataSafe component of ASM now also supports SPA. SPA views in FPScan be configured in version with Malware Detection, Automatic Transactions Detection, and Application Level Encryption; and an SPA view can be configured as a login page.You can apply application layer integrity to the whole payload between the client and server with minimal performance loss. With application layer encryption, FPS will have to encrypt the whole payload (instead of just fields), but it stills manages to extract the username for enriching the alerts! Obviously you can’t enable Integrity and Encryption at the same time, because encryption already includes integrity, duh! Even McCoy knows that! Did those first two features seem hardcore to you? Well, you’re only halfwrong! Those were the teasers. This list is just starting to get hardcore!We showed the next three features to Commander Spock, and his brain exploded. Speaking of… Here’s ahilarious musical tribute to Spock’s Brain on Spockify. I’ve listened to it like five times while drinking my Saurian brandy and it just keeps getting better. Number 8 [AFM] – NXDOMAIN Attack Detection – Water Torture, Anyone? Remember the Mirai botnet? Of course you do, because we write about him, errr, it, all the time, especially in our F5 Labs’ Hunt for IoTSeries. That's our depiction of the Mirai bot below. He's like a transformer only he doesn't transform andhe infects your internet-connectedcondiment gun.Mirai has splintered into 50 or more different botnets, and all of them contain the “DNS Water Torture” attack.DNS Water Torture is a specific form of an NXDOMAIN DNS attack, and it’s is one of my personal favorites. Anyway… a DNS Water Torture attacker sends requests fornon-existent subdomainsof your domain to different ISP resolvers.Those resolvers then inundate your domain, wiping out your cache and eventually overwhelming your authoritative name server. Goodness, who designed this internet? Our Advanced Firewall Manager (AFM) module can detect and mitigate these NXDOMAIN attacks in version 14.0. I won’t say how AFM detects them, because that might be a secret (it’s actually machine-learning your subdomains, shhhh). But AFM mitigates by auto-thresholding and rate-limiting queries for subdomains that don't actually exist. Which is pretty much what you’d want, and exactly what you’d expect from our AFM development team whose mantra, lately, is “you don’t want to deal with this stuff, so we’ll just handle it for you.” Number 7 [APM] – Inline SAML WebSSO The Access Policy Manager (APM) is how most office plebes know the F5 icon – it’s the most common client application that provides SSL/VPN, SSO and WebSSO for all their company applications. Yeah, the client is cool and all (I’m using it right now), but the real magic happens on the F5 itself of course. In version 14.0, our crack dev team has addednine (!) new featuresto APM, one for each of Frodo’s fingers. The most hardcore of these features is the Inline SAML WebSSO feature.SAML WebSSO is one of the most commonly used SAML profiles currently used on the web. In some deployments, the SAML Service Provideris not directly reachable by the users; sometimes because the admin wants to limit direct access to the Service Provider, or because the application can’t be hosted on the Internet. In those cases, where the service provider is unreachable, you canstillprovide WebSSO through APM. It works because the F5 APM moduleimpersonates the browserat key moments during the authentication. Here’s what the single application workflow looks like: Do note that I stole these diagramsfrom the developer’s actual documentation. They don’t have access to our cool marketing graphics, so they’re apparently using use MS Paint and hand-drawing the shadows behind “Red Man," as I'm going to call him now lol. After only 12 steps, Red Man has authenticated through APM and received authorization from internal SP. And it supports both single applications and multiple applications if you’re feeling randy. How cool is that? As you might have guessed, the feature is more complicated than I'm letting on, so I recommend you read the actual APM user guide by the fireplace on a quiet night. Number 6 [APM] – ADFS Proxy as a Simple checkbox I had a dream last night that St. Peter maintained an Active Directory (AD) cluster for all the souls in Heaven. When I got there, he said, “oh, I’m sorry, David, you’re not in the directory” and then I vanished in a puff of smoke and reappeared in St. Louis. Nooooo! A common problem for people like St. Peter is that they have an active directory server farm inside their perimeter, but they need to authenticate people on the outside of the perimeter. For this, you could use the Microsoft Active Directory Proxy Server, but why not just use your F5 APM instead? F5 is already sitting in front of your AD server farm, busily load-balancing requests ADFS anyway. Your F5 APM will give your users single sign-on, and if you have the firewall module, too, it’s the perfect secure setup. The coolest part is that you can configure the whole thing through one of our new “Guided Configuration” user interface. Just a couple of clicks and a checkbox! Compare that to installing, provisioning, configuring and securing the Microsoft ADFS Proxy. It makes so much sense. This is a total forehead slapper!!! Slap away! We have been advised that no one should read beyond this line due to the risks of moderate-to-severe aneurysms. Read on at your peril, because it only gets more hardcore now. Number 5 [TMOS] – Forced Password Change and Admin Password Policy As more and more instances of F5 get virtualized into single-nic public cloud environments, we’ve seen a rash of people accidentally exposing their F5 admin interface to the public Internet. Unfortunately, some of these people are also apparently a little lax about changing their passwords from the default; a practice that was vaguely understandable in test environments, but today, those test environments are often in the public cloud. In BIG-IP 14.0.0, the root and admin default passwords are marked as expired on new installations. After logging in with the default password, you are required to change the password before proceeding. Additionally, the password policy is enabled by default. The new passwords must meet the password policy requirements. Please change all your passwords to ‘admin123’ now. Just kidding, don’t do that. Use a decent password instead. I always use ‘cGFzc3dvcmQ=’. You can be even more secure by disabling both the root and admin accounts. The root account can be disabled simply by running this command. (tmos)# modify /sys db systemauth.disablerootlogin value true The admin account is more difficult to disable:https://support.f5.com/csp/article/K14943 Do note that if you roll-forward a configuration, it will retain your existing credentials (not force you to change),nor will it enforce password policy by default. We felt that too much of the Internet would simply break if we did that without warning. But we might next time. Number 4 [ TMOS ] -Local Attestation for TPM Chain of Custody Do you guys remember those confusing days when the United States Tailored Access Operations (TAO) groupwas accused of intercepting and installing surveillance softwareon those Cisco routers before they were shipped overseas? Or the Bloomberg Super Micro accusations from, oh, two days ago? People were understandably freaked out by these apocolyptic scenariosand turned to alcohol, mystics, and Trusted Platform Modules (TPM). A TPM is a hardware module implements security functions to provide the ability to determine a trusted computing environment, allowing for an increased assurance of trust that a device behaves for its intended purpose. TPMChain of Custodyprovides assurance that the software loaded on your platform at startup time has the same signature as the software that is loaded by F5 when the system is manufactured. Platform support These platforms include a Trusted Platform Module (TPM). BIG-IP i2000 Series BIG-IP i4000 Series BIG-IP i5000 Series BIG-IP i7000 Series BIG-IP i10000 Series BIG-IP i11000 Series BIG-IP i15000 Series VIPRION B4450 blade You can check the validity of the F5 TMOS platform software by running the following tmsh command. (tmsh) # run sys integrity status-v You should see a message like this “System Integrity Status: Valid."I have no idea what you’re supposed to do if it doesn’t say Valid. Have a quick drink and speed dial your swami? Oh, I know, open a ticket. And send me your passwords just in case. If you download and install an update, and you’re happy with it, the -a option will write the new checksums to the TPM. You can read more about the TPM here. https://support.f5.com/kb/en-us/products/big-ip_ltm/manuals/product/big-ip-system-essentials-14-0-0/11.html And FYI, regarding the Super Micro thing. As per our official statement, F5 doesn't use Super Micro; we designour own boards and control the manufacturing tests and processes used by our contract manufacturer. And we take multiple steps to validate and ensure the integrity of all firmware and software loaded on our systems during the manufacturing process. And of course, we have the TPM now! Alright dear reader, if you’ve gotten this far, your frontal lobes have expanded 8% from all this hardcore technical goodness you’re probably bleeding from your ears.Push your brains back into your ear canals using two pencils and take a deep breath because we’re going to push through to the top three! Number 3 [SSL Orchestrator] – TLS Forward Proxy Revocation checking “Revocation is the Achilles heel of PKI.”– Pavel Chekov, first mate, NCC-1701D If you’re not familiar with the SSL Orchestrator you should be! It’s the perfect tool for decrypting outbound (and now inbound) traffic to send to all your security inspection devices. Your favorite b-list F5 celebrity recorded a lightboarddescribing how it works and why you need it. Version 14 adds forward certificate revocation checking to the SSL Orchestrator. Suppose Red Man is at the agricultural office and he visits a website whose certificate had been revoked. Prior to version 14, Red man would be unaware of the revocation and would blithely click around and possibly expose his credentials. But now, the SSL Orchestrator can do an OCSP check and then terminate the session on revocation, protecting young Red Man (and you). Seems simple, right? Actually, to make this work we basically made the “ServerSSL” TLS profile work the same as the much more powerful ClientSSL profile. So now ServerSSL can do OCSP and CRLDP certificate checks, the latter of which is meaningless in the forward proxy case but quite powerful in the inbound federal or enterprise space. 66% of popular Internet sites (according my developer’s documentation) offer some kind of revocation checking. Now the SSL Orchestrator can take advantage of these revocation checks so that Red Man can be protected from malicious man-in-the-middle devices (as opposed to benevolent man-in-the-middle like the SSL Orchestrator). Number 2 [ LTM ] – Ultra-secure ECDSA keys in HSM Nothing saysseriouslike a FIPS 140-2 hardware security module (HSM). A good one will keep your keys secret, your beers cold and costs more than my first three cars. Guess who wrote the first F5 + FIPS implementation? Yours truly, back in 2002!“Shut up, David, you say that every top ten list!” Back then, sonny, we didn’t have these new-fangled elliptic curve digital signature algorithm (ECDSA) keys that all the millennials are using now, and even if we did we couldn’t put them into an HSM, because HSMs only supported RSA keys, like God intended. ECDSA keys and certificates are becoming more popular across the Internet. ECDSAusage grows a few percent each quarter, with some periodic larger jumps when a CDN adopts it. With version 14.0, F5 supports ECDSA keys in our own Cavium N3FIPS HSM cards. Version 14 also supports ECDSA keys in external Net-HSMs like Thales and nCipher. I, myself, grudgingly switched over to ECDSA keys last year, finally giving up my RSA and DSA keys, which I sold at a garage sale for 0.000006 bitcoin. Are you ready for the Number One Most Hardcore Security Feature in version 14.0?This one is cooler than the other side of the pillow! Number One [ LTM ] – Support for Curve25519 (X25519). Of course the most hardcore feature is going to be about cryptography. Put succinctly, Curve25519 is thefastest, coolest and soon-to-be most popular elliptic curve used in transport layer security (TLS). It was discovered by Internet super-god, Daniel J. Bernstein, and released to the public domain unencumbered by patents. You can go look at the source code for it on his site, cr.yp.to. Here’s the link:https://cr.yp.to/ecdh.html If you’re splitting hairs, Curve25519 describes the actual elliptic curve, and X25519 describes it as a Diffie-Hellman function, where it is used in the client-server TLS handshake. And if you’re wondering where the digits 25519 come from, it’s actually 2 255 -19, which, as everyone knows is a prime number, duh. Bernstein claims X25519 is provably secure (doesn’t rely on magic numbers) so is free from nation-state meddling. By design, it’s immune to timing attacks (beware, famous last words). X25519 is recommended by the IETF TLS committee, and most recently,NIST publicly stated that they are behind it, too. X25519 has 40% lower computational complexity than the standard curve, P-256 so virtual machines should prefer it to P-256. The lower complexity also means that it will be easier on low-CPU devices like the billions found in the Internet of Things (IOT). X25519 is one of three ‘DH-Groups’ in the Cipher Group configuration screen (the others are the standard NIST curves P-256 and P-384). Because it’s newer, we’ve prioritized X25519 last in the preference list, so unless a client requests it specifically, they won't get it. But you could move it to front of the preference list by using the cool new cipher rules that I introduced in the Top Ten List for version 13. # Create a Cipher rule that moves X25519 to the front ltm cipher rule Curvy { description "X25519 priority first" dh-groups X25519:P256:P384 } # Create a Cipher Group that uses it. ltm cipher group CurvyGroup { allow { Curvy { } } } # Insert it into your clientssl profile ltm profile client-ssl x25519 { ... cipher-group CurvyGroup ciphers none ... } And then, to test it, get a distro with OpenSSL1.1.0h or better, and when you run the s_client command you’ll see the X25519 function in the Server Temp Key field of the output. % openssl s_client -connect www.example.com:443 --- No client certificate CA names sent Peer signing digest: SHA256 Server Temp Key: X25519, 253 bits --- You’re welcome! Butdon’t actually use that config above – it’s just an example. You’d want to make sure your cipher group includes all the other common ciphers, too. Because X25519 is so awesome, it’s already supported by most major browsers, TLS vendors, clouds and CDNs. Spoiler: TLS 1.3 will rely heavily on X25519. If you’re wondering where TLS 1.3 support was in this Top Ten List, just wait a little longer and keep monitoring DevCentral. As Spock would say, “dang, that was a gnarly list, bro, so hardcore.” Let’s recap thisTop Ten in short list form: Top Ten Module Hardcore Security Feature 10 ASM / FPS Name Your Own WAF Cookies 9 Single Page Application support 8 AFM NXDOMAIN Attack Detection 7 APM Inline SAML WebSSO 6 ADFS Proxy as a simple Checkbox 5 TMOS Forced Password Change 4 TPM Chain of Custody 3 LTM / SSL TLS Forward Proxy Revocation Checking 2 Ultra-Secure ECDSA Keys in HSMs 1 TLS support for Curve25519 Honestly (honestly, guys) of all the Top Ten lists I’ve done, this one was the most hardcore. The most technically arcane. The least marketing-friendly. But that’s what makes it the best, and the most satisfying! Because DevCentral is where the technology (see the list) meets the people (that’s you). I’ve been running version 14 for all of two days now and I already love it more than bathing. If you'recurious what else is in version 14, check out the full list of Version 14 Release Notes. Enjoy your BIG-IP version 14.0, and boldly upgrade where no man has gone before! Stay tuned for the next edition of the Top Ten, and follow me on Twitter but not in real life please, I have run out of restraining order forms. Until next time!2.6KViews2likes4Comments