The Burden of Federated Authentication
If you’ve ever had the pleasure to hear me rant on web access management then you know I like to stress the difference between authentication and authorization. Authentication is the process of verifying a user’s identity while authorization is the process of determining the level of access the user possesses for any given application and/or resource; one does not imply the other. So why bring up a topic that has been discussed to death in many forums around the Internet? Federated authentication… In my years as a developer and sys admin it was common place to either write or include a publicly available authentication framework and based upon group membership allow or disallow access to certain application functionality. These frameworks made it easy to quickly deploy applications without the need to “recreate the wheel” over and over again. However, what we gained in deployment speed we lost in code maintenance and software patching over time. This ultimately lead to security issues, such as phishing attacks, because the end-user had: too many usernames/passwords too many application login points Ultimately the user could no longer, well didn’t care to, keep track of these and resorted to less secure mechanisms for storing passwords as well as entering their extensive list of passwords on any site that resembled one of our applications. So in early 2005 we started to use Shibboleth and Jasig Central Authentication Services (CAS) for federated authentication and single sing-on. Shibboleth and CAS addressed my issues by: reducing the number of username/password combinations as well as login entry points to 1 allowed non-employees access to our websites without the need to maintain their identity in our authentication database - commonly know as federated authentication While the paradigm of federated authentication caught on in higher education over a decade ago enterprise environments were slow to adopt until now. With the explosion of Software-as-a-Service offerings, such as Salesforce and Office 365, enterprises are quickly deploying federated authentication services with little to no understanding of what the snake oil, or IAM, vendor has sold them. Too often, I sit in meetings regarding issues a customer is having with their IAM solution because of two issues: Customer did not understand the difference between authentication and authorization IAM vendor promised that multi-factor authentication capabilities would integration easily with . So lets take a look at these issues. Federated authentication protocols, like SAML, have made it easier for users to consume and/or modify data inside web applications without the need to maintain a local persona of that user. Now from an application perspective this feature might have marginal gain but from a security perspective it allows you to eliminate a substantial amount of risk. The concern I stress to my customers is that while federated authentication reduces the risk of managing and maintaining that user's persona it does not alleviate the risk of unauthorized access. This is because authentication in a federated world does not imply authorization. So what are the challenges of this in a federated application? Lets assume we have a user Alice accessing App1. First, App1 has the responsibility of consuming Alice’s authentication assertion, sent by the SAML IdP, as well as authorizing that Alice has access to the application. From a security point of view this can be very dangerous. What if Alice's credentials were stollen and the malicious actor now has access to sensitive information. What if App1 has not been patched in several years, which never happens in the real world, and is vulnerable to authentication and/or authorization attacks. Ideally we want to remove the initial authorization functionality from the web application like we have done for authentication. This can be achieved by leveraging a web access management solution that also operates as an authentication proxy.So what is web access management (WAM)? It's a proxy that controls access to web applications based upon contextual authentication and provides a least privilege model for authorization. So back to our concern: What if Alice's credentials are compromised? The WAM can look at the full content of Alice's connection and request to App1. If the WAM notices something out of the ordinary, say Alice normally access App1 from within the USA but this request is coming from China, then the WAM could request that the IdP perform multi-factor authentication. What if App1 may have known vulnerabilities and exploits? The WAM only allows authenticated and authorized users access to App1 so we can reduce our threat vectors; typical in this use case we would combine a web authentication management and web application firewall together to fully alleviate this risk. Okay, so if your still reading then what is my point - that with the growing adoption of federated authentication in enterprises we are relying too heavily upon identity providers to secure access to our applications. Only a handful of Identity vendors on the market provide both authentication and web access management capabilities. The vendors that do not posses WAM functionality leave the authorization to the application, which in our current security landscape can be a risky bet. Now, unless you’ve been under a rock for the past 5 years you know I’m a big advocate of F5’s Access Policy Manager. APM is the tool I use over and over again to help my customers resolve their federated authentication burdens. Oh, and did I mention APM works with every major MFA vendor on the market! So you can easily add 2nd factor authentication to services such as Office 365 - even free solutions like Google Authenticator.565Views0likes6Comments
Using an F5 iApp to Install and Configure VMware Horizon with View on Nutanix
Welcome to the second post in my series about realizing the benefits of using F5 technology with hyper-converged infrastructure such as the Nutanix hyper-converged platform. Last month, I walked you through the simple process of installing BIG-IP Virtual Editions on Nutanix using the VMware ESXi hypervisor. Today, I’m going to talk about using Nutanix best practices to set up VMware Horizon with View and then configuring the BIG-IP VEs we installed earlier to proxy the PCoIP traffic — all using an easy F5 iApp. So if you’re ready, let’s get going. This is a bit of a long post, so I’ll break it up into a few sections. In the first section, I’ll discuss the components that make up the solution, then we will move on to the steps required to prep the BIG-IP device for this solution. I’ll then tackle how to download the View iApp, and how to import it to the BIG-IP. The next section takes us through the View-specific configuration steps required to use View with F5 BIG-IPs. Since SSL certificate management is an important and required part of any View environment, I’ll show you how to import the necessary SSL certificate and key. And finally, I’ll walk you through filling out the iApp wizard, showing how easy it is to configure the BIG-IPs for View. Solution Components In this screenshot of the vSphere Web Client inventory pane, you can see the environment as it exists for this solution. We also have a pair of View Connection Servers and a Composer Server, all tied to an already existing database server. A few templates have been created for the three example desktop pools: one full clone, one linked clone dedicated pool, and one linked clone floating pool. In addition, we have the Nutanix Controller Virtual Machines (CVMs) running on each of the three Nutanix hosts in this environment. We also have the vCenter 6 Server for this environment running on one of the Nutanix hosts. You might notice that there are no View Security Servers, nor are there any View Access Point servers being deployed in this scenario. Instead, we are going to be using the F5 BIG-IP VEs to handle secure access via the PCoIP and HTML5 protocols. We have an HA pair of BIG-IP VEs, version 11.6 HF6. This is the version of BIG-IP that was recently released to support Horizon with View 6.2. You can see here that the Nutanix-supplied datastores being used in this environment are VAAI (vStorage APIs for Array Integration)-enabled, and set up according to Nutanix best practices. Here is the setting in the View Admin UI, which allows for the use of the Nutanix VAAI and View Composer Array Integration features to enable fast cloning. Now this is where I was really impressed. For this pool, I chose to have five desktops cloned at the same time from an existing replica… and bang, 15 seconds later, all five desktops are cloned and ready to be powered on. Configuring the BIG-IP Before we can allow the F5 devices to proxy the PCoIP traffic for View on the Nutanix platform, we have to do a bit of BIG-IP configuration. First, I went through the initial setup process for the BIG-IPs, setting the management IP address, the hostname, DNS resolvers, NTP servers, passwords and the like. I licensed these BIG-IPs with a VE BEST set of licenses, and I also deployed an HA Active/Standby pair of BIG-IPs, configuring them with Traffic Management Interface Self and “Floating” IPs to enable them to be in a Device Service Cluster. These are standard procedures that are required anytime you configure an HA pair of BIG-IPs. It’s very well documented on our F5 Support site, which, by the way, is a great resource. · Here’s how to deploy BIG-IP VEs on ESXi. · Here’s a guide that discusses the initial setup of the BIG-IPs. · And finally, a guide that discusses the Device Service Clustering process. Now, let’s get back to it. One step that is required for this specific implementation with View is to provision the BIG-IP Access Policy Manager (APM) module, which integrates with Active Directory (AD) and the PCoIP protocol, enabling the BIG-IPs to provide secure remote access to the View desktops. You can see here that we need to put a check mark next to APM and set the provisioning to Nominal. Downloading and Installing the F5 iApp Let’s take a second and talk about F5 iApps, a user-customizable framework for deploying applications. iApps give you a powerful, flexible way to automate tasks and templatize sets of functionality on your F5 gear. Using APL (Application Presentation Language), you define a question-driven interface with which users will interact with their application and enter data. Using that data, you can then automate nearly any task on the device. For example, you can use iApps to automate the way you add virtual servers so that you don’t have to go through the same manual steps every time you add a new application. And guess what? There’s a great iApp already written for View. You can get all the iApps right here; the one we’ll be using for this solution is f5.vmware.view.v1.3.0.tmpl. Once you have logged in to the F5 Downloads site, choose the BIG-IP v12.x / Virtual Edition link to see the latest set of iApp templates. Then select the iApp-Templates download, read and accept the EULA, and download both the .zip and the .md5 files. You can use the tool of your choice to check the MD5 hash of the download to verify it has not been monkeyed with. Extracting this .zip file will create a folder with all of the latest iApp templates. We are interested in the vmware.view one in the above screenshot. Make note of this location, because we’ll reference it when we import the iApp into the BIG-IP. And it wouldn’t be a bad idea to check the MD5 hash against the .tmpl file and to read the README.txt file while you’re at it. The next major step is to import the iApp into the BIG-IP so we can utilize it with the View infrastructure we have installed. Navigate to the iApps > Templates section of the BIG-IP UI, and click Import. On the next screen, click Browse and head over to the location where you unzipped the iApp templates earlier. Choose the file. This will upload the template to the BIG-IP device, which will be synchronized with the other BIG-IP device in the cluster at the next synchronization event, whether that’s a manual sync event or an automatic sync event. Configuring the View Environment After the iApp is on the BIG-IP device, we can configure View for use with the BIG-IP PCoIP proxy — and to configure the BIG-IP via the iApp to provide PCoIP and HTML5 remote access services. Let’s start with the configuration of the View environment. From the View Administrator GUI, expand the View Configuration twisty and choose Servers, and then the Connection Servers tab. Highlight one of the Connection Servers and click the Edit button. Make sure that all three checkboxes on the General tab are unchecked, since the BIG-IPs are going to be handling the Secure Tunnel, PCoIP Secure Gateway, and Blast Secure Gateway services. Repeat these steps for all remaining Connection Servers in your environment. Uploading the SSL Certificate Since View uses SSL certificates to assist in the encryption of the View traffic, we must have the SSL certificates used by View on the BIG-IP. Navigate to System > File Management > SSL Certificate List and choose Import. Provide the type, name, source, and password for the certificate (assuming a PKCS 12) and click Import. We will reference this certificate and key via the iApp wizard. Using the iApp to Configure the BIG-IP for View The final step in the whole process is to configure the BIG-IPs via the iApp. Navigate to the iApp > Application Services section, and click on the Create button. Enter a name for the service you are creating and choose f5.vmware.view.v1.3.0 from the dropdown list of available templates. Those blue bands to the left of certain field names indicate that the field is required. Notice that in this section, I chose to change from the default to support HTML5 Clientless browser connections. This allows the BIG-IP to proxy both PCoIP and HTML5 browser–delivered virtual desktops in a secure manner. In this section, I specified the NetBIOS domain name, location of my Active directory, the DNS suffix of my AD domain, and the credentials used for accessing AD. (I’d suggest that you create a unique AD user with administrative rights so that you can easily audit these connections.) Here I chose to decrypt and re-encrypt the SSL traffic associated with View and specified the cert and key imported earlier. While it would be technically possible to only do SSL decryption and communicate between the BIG-IP and the View Connection Servers via port 80, this would require additional configuration steps to be completed on the View Connection Servers; it’s also less secure than re-encrypting. Notice that I specified BOTH an internal and an external virtual server. The external virtual server securely proxies the PCoIP and HTML5 View traffic to clients on external untrusted networks, while the internal virtual server load balances the Connection Servers and allows for direct connections to clients on trusted internal networks. This section is optional, but I created an advanced health monitor that allows for the BIG-IP to validate that not only are the Connection Servers pingable, but that they are actually able to authenticate a user and present back the list of available desktop pools to this particular user. This provides a higher level of assurance that the entirety of the View infrastructure is functioning as designed. Finally, it is time to click Finished. And to watch as the hundreds of configuration objects are created on the BIG-IP device. One of the major benefits of an iApp (beyond the speed of deployment) is that all of the configuration objects used to provide the service are grouped together in one screen where you can see their interrelatedness and notice the health of each of the components — all in one place. And that’s how easy it is. You’re ready to go. If you’re interested in the business benefits of the F5 and Nutanix partnership, check out the following posts from my colleague, Frank Strobel: · Boost Business Mobility and Application Security with Nutanix and F5 · F5 and Nutanix: Together, Powering Business Mobility449Views0likes1CommentLightboard Lessons: SAML
The Security Assertion Markup Language (SAML) allows you to simplify access control and management of your applications. Once upon a time, you would need a separate username/password database for each application you hosted. Now, with the use of SAML, you can consolidate everything into one place and reduce the management and security headache of it all. Check out this SAML video and see how the BIG-IP can provide access control for all your applications. Related Resources: SAML – Client versus Server Authentication with F5 APM Did you know that you can leverage F5 BIG-IP as SAML 2.0 Identity Provider for Office 365? APM Cookbook: SAML IdP Chaining328Views0likes0Comments
La transition vers HTTP/2, l'envisager, s'y préparer, la réaliser
HTTP/2 est désormais un standard avec son support intégré dans les browsers modernes. Les serveurs Web, proposent aussi dans leurs dernières versions, la compatiliblité avec cette évolution. Ce qu'il faut retenir est qu'HTTP/2 vient accéler le transport du contenu Web en maintenant la confidentialité à travers SSL. Un des bénéfices pour les developpeurs et fournisseurs de contenu est la capacité à se rendre compte des apports de ce protocole sans remettre en cause toute son infrastructure. Les démonstrations montrent bien les gains à travers un browser sur un ordinateur portable, choses encore plus appréciables sur les plateformes mobiles. La version 12.0 de TMOS permet de se comporter comme un serveur HTTP/2 vis à vis des clients tout en continuant à solliciter le contenu en HTTP/1.0 et HTTP/1.1 auprès des serveurs. Pour trouver des raisons de s'interesser à ce protocole, plusieurs sources d'information peuvent y aider : Making the journey to HTTP/2 HTTP/2 home253Views0likes0Comments
F5 BIG-IP Edge Client for iOS version 2.0.6 Released
F5 released its BIG-IP Edge Client for iOS, version 2.0.6 on Apple iTunes on November 17, 2015. BIG-IP Edge Client for iOS, version 2.0.6 includes minor feature updates and addresses issues associated with Apple iOS 9, including: Support for automated submission of credentials for authentication (if cached credentials are allowed by policy and already cached at runtime) Support for automated population of username (if only username is allowed to be cached by policy) Addresses issues associated with BIG-IP Edge Client crashing when logs are emailed with an established VPN session Addresses various connectivity issues seen with Apple iOS9 Additional bug fixes The BIG-IP versions that support F5 BIG-IP Edge Client for iOS, version 2.0.6 can be found in the BIG-IP Edge Client Compatibility Matrix. The F5 BIG-IP Edge Client Compatibility Matrix may be found at: https://support.f5.com/kb/en-us/products/big-ip_apm/manuals/related/edgeapps-clientcompatmatrix.html The release notes for F5 BIG-IP Edge Client for iOS, version 2.0.6, can be found at: https://support.f5.com/kb/en-us/products/big-ip_apm/releasenotes/related/relnote-edgeclientios-2-0-6.html Please feel free to contact F5 Support with any questions or related issues on/about F5 BIG-IP Edge Client for iOS, version 2.0.6.171Views0likes0CommentsLatest Version of F5 BIG-IP Edge Client for Android Released
F5 released the latest version of the F5 BIG-IP Edge Client for Android, version 2.0.8, on November 18, 2015. This version of the BIG-IP Edge Client for Android adds several features, and addresses challenges found with Android 6.0 (Marshmallow). For instance, BIG-IP Edge Client for Android, v2.0.8 supports authentication using certificates from Android Credential Storage on devices running Android 6 (Marshmallow). It also retrieves the MAC address from devices running Android 6 (Marshmallow). BIG-IP Edge Client for Android, v2.0.8 also supports the launching of third-party applications via URL scheme or Android intent filter. It also supports Server Name Indication (SNI) for devices running Android 4.2 or greater. It supports locked/enforced logon mode (native or web logon), based on client configuration on the F5 BIG-IP Access Policy Manager (APM). Also, BIG-IP Edge Client for Android, v2.0.8 also includes several additional bug fixes. The BIG-IP versions that currently support F5 BIG-IP Edge Client for Android, version 2.0.8 can be found in the BIG-IP Edge Client Compatibility Matrix. The release notes for F5 BIG-IP Edge Client for Android, version 2.0.8, may be found at https://support.f5.com/kb/en-us/products/big-ip_apm/releasenotes/related/relnote-edgeclientandroid-2-0-8.html. Should there be any additions or modifications to the features and fixes in BIG-IP Edge Client for Android, version 2.0.8, F5 will communicate those as soon as possible. Please contact F5 Support with any questions or comment regarding F5 BIG-IP Edge Client for Android, version 2.0.8.287Views0likes0Comments
Configure Toopher 2 Factor Authentication to work with APM
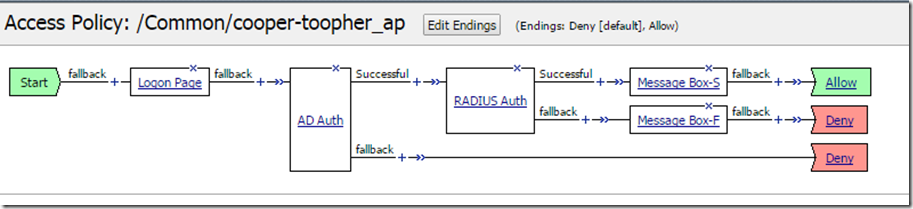
Toopher is a 2 Factor Authentication provider (https://www.toopher.com/) that can be configured to work with the F5 Access Policy Manager for authenticating users. Please visit the Toopher website to find out more information about all the products they offer and how they can possibly help you and your company. For this article I will demonstrate how to setup Toopher 2 Factor Authentication using an iPhone 6, a Ubuntu server, and an BigIP running Access Policy Manager (APM). To integrate with APM you will need to select a Toopher-RADIUS implementation strategy. Toopher-RADIUS is support on both Linux and Windows as the server. Please check the Toopher documentation for a system that best meets your needs. Things you will need before you start: - BigIP licensed for APM (I have tested with 11.5.1 and 11.6.0) - Ubuntu Server (I used Ubuntu 12.04.5 LTS) - Mobile Device (I used iPhone 6 running iOS 8.2) - Toopher iPhone App - Toopher Developers account (https://dev.toopher.com/account/signup/) Accounts are free if you have less than 10 users. Create Toopher Requestor The first step is to sign up for a Toopher Developers account and then create a new requestor. When creating a requestor you will give it a name and a description that will be used by your end users to identify your service. I named my requestor “Cooper VPN” and used the same for the description. You will want to use something meaning for your implementation. After you create your requestor you will be able to see the consumer key and consumer secret. These values will be needed in the next step as we setup or RADIUS server. Install and configure the Toopher RADIUS server To configure Toopher to work with APM we will configure Toopher-RADIUS. The Toopher download site has a package that installs FreeRADIUS and provides the configuration files needed to hook into the Toopher API. This RADIUS server is acting as a proxy between the APM and the Toopher web service that communicates with your iPhone. The code and installation instructions are posted on GitHub. (https://github.com/toopher/toopher-radius) Please download and configure according to your environment. The following step detail the process for installing and configuring on Ubuntu 12.04 LTS. We will configure the Toopher RADIUS server to run in Toopher-Only mode. - Install the package using the install script. This script will download all packages and dependencies needed to run FreeRADIUS and perl. If you have issues with the please contact Toopher Support. - Configure your clients in the clients.conf file. This will be the Self IP address of the BigIP. If running in HA then you will use your Floating Self IP. - Update the toopher_radius_config.pm file with your “key” and “secret” you received in the previous step. - Update the toopher_users file to enable Toopher-Only mode. - Start the RADIUS server Configure RADIUS AAA Server in APM Now that we have the Toopher RADIUS server and the Toopher API setups completed we need to configure the APM. Create a new RADIUS AAA Object: 1. Navigate to “Access Policy” > “AAA Servers” > “RADIUS” 2. Click “Create” 3. The following settings are what I used but you can change these to fit your needs. Mode: Authentication Server Connection: Direct Server Address: IP Address of Linux RADIUS server. Authentication Service Port: 1812 Secret: Enter secret from when you created your client. (this is the RADIUS client secret not the API secret) Confirm Secret: Enter secret again. Timeout: 35 seconds (this was increased from 5 seconds as instructed in the Toopher Install guide) 4. Click “Finished” We now have a RADIUS AAA object created and we can select it in our VPE Policy. Configure AD AAA Server in APM Toopher recommends that you use the Toopher service in an authentication chain. This means that we need to authenticate the user to our Active Directory (or any other provider) before we use Toopher to authenticate. For this example we will use AD to authentication the user first and then we will send the authentication request to Toopher. I will assume that you already have your AD server setup and you can authenticate to it from the APM. If you have problems there are a lot of resources on AskF5 and DevCentral to help you out. NOTE: If you need to have your users reset their pairing and you have AD auth in front of the RADIUS auth you will not be able to send the RADIUS server the “reset” password. You will need to have a way for users to do this or setup a way for the helpdesk to reset pairings. This is outside the scope of this document. Configure the APM VPE Now we have the AAA objects created it is time to build out our policy. I have a very basic policy here to demonstrate functionality. You will need to modify your policy to fit your needs. Here I have a Logon Page, AD Auth, RADIUS Auth, a Message Box for demo purposes and then Allow. All of these actions have the default settings except where you have to select your AAA object created above in the AD Auth and RADIUS Auth actions. I also modified the wording the message boxes to help identify if I was successful or if I failed. You will need to attach this policy to a virtual server. Test Access We are now ready to test our access. 1. Open Toopher App on your Mobile Device 2. Open your browser and navigate to the VS that is hosting the policy created earlier. 3. Enter your AD credentials 4. You will be prompted to register your device (if you have not done so already) 5. Allow Access in the Toopher App 6. You will see the successful message box. If you fail along the way you need to check the APM logs to determine where you failed. You can also enable debug logging on the Toopher RADIUS server if needed. NOTE: After you click “Logon” the APM goes to AD to authenticate and after that is successful it then send a request to RADIUS. The RADIUS request then sends a request to the Toopher API (which is out side your network) and then the user has to approve the access on their phone. The API then has to reply back to the RADIUS server and then RADIUS replies back to APM. This process will take a little bit more time than if you were using traditional authentication methods that are local to your datacenter. Customize the Logon Process The authentication process can take some time as the user has to approve the access on the mobile device. To let the user know that we are working to authenticate them using Toopher we can customize the logon process. To customize the logon process will will need to upload the spinner graphic and make modifications to three pages in the advanced customization editor. We will modify the footer.inc, logon.inc, and apm_full.css pages. Upload the spinner graphic 1. Save the image below to your PC. 2. Navigate to the Hosted Content section. Access Policy > Hosted Content 3. Click “Upload” in the upper right hand corner. 4. Select the graphic above and leave the rest of the fields on the default. Make sure to leave the Secure Level as public. 5. Click “OK” and the file will be uploaded to the Hosted Content Section 6. We need to associate the Access Policy we created with the Hosted Content so we need to click on “Manage Profile Access” flyout under Hosted Content. 7. Check the box next to the access policy created and click “OK” Modify files 1. Navigate to the advanced customization editor 11.6.0 : Access Policy > Customization > Advanced 11.5.1 : Access Policy > Customization > Advanced : Then change edit mode to “Advanced” 2. Open the “Common” folder in the policy we created. Customization Settings > Access Profiles > /Common/cooper-toopher_ap > Common 3. Click on the footer.inc file to load it into the editor window. 4. Add the following code at the bottom of the file. <div id="loading-div-background"> <div id="loading-div" class="ui-corner-all"> <br> <br> <br> <div style="background: #fff; padding:20px; line-height:136%; width: 30%; border-radius: 25px; margin: 0 auto; text-align: center;"> <h1 style="text-align: center;">Toopher Authentication</h1> <br> <p> <strong> We're now contacting your mobile device to authenticate. </strong> </p> <p> Please wait... </p> <img src="/public/share/ajax-loader2.gif" /> </div> </div> </div> 5. Click “Save Draft” in the upper right hand corner then click “Save” in the editors toolbar. 6. Click on the apm_full.css file to load it into the editor window. 7. Add the following code at the bottom of the file. div#loading-div-background{ display: none; position: fixed; top: 0; left: 0; background: #c4c2be; width: 100%; height: 100%; font: 75% sans-serif; } 8. Click “Save Draft” in the upper right hand corner then click “Save” in the editors toolbar. 9. Navigate to logon.inc file and click on it. Customization Settings > Access Profiles > /Common/cooper-toopher_ap > Access Policy > Logon Pages > Logon Page > logon.inc 10. Add the following code inside the head tags on the page. I placed this above the head close tag (</head>) which should be around line 463. <script src="//code.jquery.com/jquery-1.9.1.js"></script> <script src="//code.jquery.com/ui/1.10.4/jquery-ui.js"></script> <script type="text/javascript"> $(document).ready(function (){ $("#loading-div-background").css({ opacity: 1.0 }); }); function ShowProgressAnimation(){ $("#loading-div-background").show(); } </script> 11. The last little bit of code change we need to make is to find the submit buttons on the page and add an onclick event to them. There are two buttons on the logon page (depends on how you layout your page which one gets used) and they will be around line 620 after the code addition above. Change: <input type=submit class="credentials_input_submit" value="%[logon]"> to <input type=submit class="credentials_input_submit" value="%[logon]" onclick="ShowProgressAnimation();"> As you can see we just added an onclick event to the button. This event along with the JavaScript above, the css in the apm_full.css file and the HTML that we placed in the footer will take over the screen while the form is being submitted. When the request has been responded to the page will refresh and either show a error message or the next page in the VPE you configured. In my case it will show a message box that says successful and then click that will take you to my web page (APM+LTM) mode or could take you to a webtop. A drawback to this is that if a user fails the AD auth then they will see the popup and then get an error message on the logon page. You will need to make sure the error messages are somewhat meaningful for the users as they might think that the AD auth was successful since they see the “Toopher” popup. I hope this guide has been helpful and as always if you see any improvements or problems please comment below. Regards, Seth Cooper395Views0likes0Comments