Controlling a Pool Members Ratio and Priority Group with iControl
A Little Background A question came in through the iControl forums about controlling a pool members ratio and priority programmatically. The issue really involves how the API’s use multi-dimensional arrays but I thought it would be a good opportunity to talk about ratio and priority groups for those that don’t understand how they work. In the first part of this article, I’ll talk a little about what pool members are and how their ratio and priorities apply to how traffic is assigned to them in a load balancing setup. The details in this article were based on BIG-IP version 11.1, but the concepts can apply to other previous versions as well. Load Balancing In it’s very basic form, a load balancing setup involves a virtual ip address (referred to as a VIP) that virtualized a set of backend servers. The idea is that if your application gets very popular, you don’t want to have to rely on a single server to handle the traffic. A VIP contains an object called a “pool” which is essentially a collection of servers that it can distribute traffic to. The method of distributing traffic is referred to as a “Load Balancing Method”. You may have heard the term “Round Robin” before. In this method, connections are passed one at a time from server to server. In most cases though, this is not the best method due to characteristics of the application you are serving. Here are a list of the available load balancing methods in BIG-IP version 11.1. Load Balancing Methods in BIG-IP version 11.1 Round Robin: Specifies that the system passes each new connection request to the next server in line, eventually distributing connections evenly across the array of machines being load balanced. This method works well in most configurations, especially if the equipment that you are load balancing is roughly equal in processing speed and memory. Ratio (member): Specifies that the number of connections that each machine receives over time is proportionate to a ratio weight you define for each machine within the pool. Least Connections (member): Specifies that the system passes a new connection to the node that has the least number of current connections in the pool. This method works best in environments where the servers or other equipment you are load balancing have similar capabilities. This is a dynamic load balancing method, distributing connections based on various aspects of real-time server performance analysis, such as the current number of connections per node or the fastest node response time. Observed (member): Specifies that the system ranks nodes based on the number of connections. Nodes that have a better balance of fewest connections receive a greater proportion of the connections. This method differs from Least Connections (member), in that the Least Connections method measures connections only at the moment of load balancing, while the Observed method tracks the number of Layer 4 connections to each node over time and creates a ratio for load balancing. This dynamic load balancing method works well in any environment, but may be particularly useful in environments where node performance varies significantly. Predictive (member): Uses the ranking method used by the Observed (member) methods, except that the system analyzes the trend of the ranking over time, determining whether a node's performance is improving or declining. The nodes in the pool with better performance rankings that are currently improving, rather than declining, receive a higher proportion of the connections. This dynamic load balancing method works well in any environment. Ratio (node): Specifies that the number of connections that each machine receives over time is proportionate to a ratio weight you define for each machine across all pools of which the server is a member. Least Connections (node): Specifies that the system passes a new connection to the node that has the least number of current connections out of all pools of which a node is a member. This method works best in environments where the servers or other equipment you are load balancing have similar capabilities. This is a dynamic load balancing method, distributing connections based on various aspects of real-time server performance analysis, such as the number of current connections per node, or the fastest node response time. Fastest (node): Specifies that the system passes a new connection based on the fastest response of all pools of which a server is a member. This method might be particularly useful in environments where nodes are distributed across different logical networks. Observed (node): Specifies that the system ranks nodes based on the number of connections. Nodes that have a better balance of fewest connections receive a greater proportion of the connections. This method differs from Least Connections (node), in that the Least Connections method measures connections only at the moment of load balancing, while the Observed method tracks the number of Layer 4 connections to each node over time and creates a ratio for load balancing. This dynamic load balancing method works well in any environment, but may be particularly useful in environments where node performance varies significantly. Predictive (node): Uses the ranking method used by the Observed (member) methods, except that the system analyzes the trend of the ranking over time, determining whether a node's performance is improving or declining. The nodes in the pool with better performance rankings that are currently improving, rather than declining, receive a higher proportion of the connections. This dynamic load balancing method works well in any environment. Dynamic Ratio (node) : This method is similar to Ratio (node) mode, except that weights are based on continuous monitoring of the servers and are therefore continually changing. This is a dynamic load balancing method, distributing connections based on various aspects of real-time server performance analysis, such as the number of current connections per node or the fastest node response time. Fastest (application): Passes a new connection based on the fastest response of all currently active nodes in a pool. This method might be particularly useful in environments where nodes are distributed across different logical networks. Least Sessions: Specifies that the system passes a new connection to the node that has the least number of current sessions. This method works best in environments where the servers or other equipment you are load balancing have similar capabilities. This is a dynamic load balancing method, distributing connections based on various aspects of real-time server performance analysis, such as the number of current sessions. Dynamic Ratio (member): This method is similar to Ratio (node) mode, except that weights are based on continuous monitoring of the servers and are therefore continually changing. This is a dynamic load balancing method, distributing connections based on various aspects of real-time server performance analysis, such as the number of current connections per node or the fastest node response time. L3 Address: This method functions in the same way as the Least Connections methods. We are deprecating it, so you should not use it. Weighted Least Connections (member): Specifies that the system uses the value you specify in Connection Limit to establish a proportional algorithm for each pool member. The system bases the load balancing decision on that proportion and the number of current connections to that pool member. For example,member_a has 20 connections and its connection limit is 100, so it is at 20% of capacity. Similarly, member_b has 20 connections and its connection limit is 200, so it is at 10% of capacity. In this case, the system select selects member_b. This algorithm requires all pool members to have a non-zero connection limit specified. Weighted Least Connections (node): Specifies that the system uses the value you specify in the node's Connection Limitand the number of current connections to a node to establish a proportional algorithm. This algorithm requires all nodes used by pool members to have a non-zero connection limit specified. Ratios The ratio is used by the ratio-related load balancing methods to load balance connections. The ratio specifies the ratio weight to assign to the pool member. Valid values range from 1 through 100. The default is 1, which means that each pool member has an equal ratio proportion. So, if you have server1 a with a ratio value of “10” and server2 with a ratio value of “1”, server1 will get served 10 connections for every one that server2 receives. This can be useful when you have different classes of servers with different performance capabilities. Priority Group The priority group is a number that groups pool members together. The default is 0, meaning that the member has no priority. To specify a priority, you must activate priority group usage when you create a new pool or when adding or removing pool members. When activated, the system load balances traffic according to the priority group number assigned to the pool member. The higher the number, the higher the priority, so a member with a priority of 3 has higher priority than a member with a priority of 1. The easiest way to think of priority groups is as if you are creating mini-pools of servers within a single pool. You put members A, B, and C in to priority group 5 and members D, E, and F in priority group 1. Members A, B, and C will be served traffic according to their ratios (assuming you have ratio loadbalancing configured). If all those servers have reached their thresholds, then traffic will be distributed to servers D, E, and F in priority group 1. he default setting for priority group activation is Disabled. Once you enable this setting, you can specify pool member priority when you create a new pool or on a pool member's properties screen. The system treats same-priority pool members as a group. To enable priority group activation in the admin GUI, select Less than from the list, and in the Available Member(s) box, type a number from 0 to 65535 that represents the minimum number of members that must be available in one priority group before the system directs traffic to members in a lower priority group. When a sufficient number of members become available in the higher priority group, the system again directs traffic to the higher priority group. Implementing in Code The two methods to retrieve the priority and ratio values are very similar. They both take two parameters: a list of pools to query, and a 2-D array of members (a list for each pool member passed in). long [] [] get_member_priority( in String [] pool_names, in Common__AddressPort [] [] members ); long [] [] get_member_ratio( in String [] pool_names, in Common__AddressPort [] [] members ); The following PowerShell function (utilizing the iControl PowerShell Library), takes as input a pool and a single member. It then make a call to query the ratio and priority for the specific member and writes it to the console. function Get-PoolMemberDetails() { param( $Pool = $null, $Member = $null ); $AddrPort = Parse-AddressPort $Member; $RatioAofA = (Get-F5.iControl).LocalLBPool.get_member_ratio( @($Pool), @( @($AddrPort) ) ); $PriorityAofA = (Get-F5.iControl).LocalLBPool.get_member_priority( @($Pool), @( @($AddrPort) ) ); $ratio = $RatioAofA[0][0]; $priority = $PriorityAofA[0][0]; "Pool '$Pool' member '$Member' ratio '$ratio' priority '$priority'"; } Setting the values with the set_member_priority and set_member_ratio methods take the same first two parameters as their associated get_* methods, but add a third parameter for the priorities and ratios for the pool members. set_member_priority( in String [] pool_names, in Common::AddressPort [] [] members, in long [] [] priorities ); set_member_ratio( in String [] pool_names, in Common::AddressPort [] [] members, in long [] [] ratios ); The following Powershell function takes as input the Pool and Member with optional values for the Ratio and Priority. If either of those are set, the function will call the appropriate iControl methods to set their values. function Set-PoolMemberDetails() { param( $Pool = $null, $Member = $null, $Ratio = $null, $Priority = $null ); $AddrPort = Parse-AddressPort $Member; if ( $null -ne $Ratio ) { (Get-F5.iControl).LocalLBPool.set_member_ratio( @($Pool), @( @($AddrPort) ), @($Ratio) ); } if ( $null -ne $Priority ) { (Get-F5.iControl).LocalLBPool.set_member_priority( @($Pool), @( @($AddrPort) ), @($Priority) ); } } In case you were wondering how to create the Common::AddressPort structure for the $AddrPort variables in the above examples, here’s a helper function I wrote to allocate the object and fill in it’s properties. function Parse-AddressPort() { param($Value); $tokens = $Value.Split(":"); $r = New-Object iControl.CommonAddressPort; $r.address = $tokens[0]; $r.port = $tokens[1]; $r; } Download The Source The full source for this example can be found in the iControl CodeShare under PowerShell PoolMember Ratio and Priority.27KViews0likes3Comments
Devops Proverb: Process Practice Makes Perfect
#devops Tools for automating – and optimizing – processes are a must-have for enabling continuous delivery of application deployments Some idioms are cross-cultural and cross-temporal. They transcend cultures and time, remaining relevant no matter where or when they are spoken. These idioms are often referred to as proverbs, which carries with it a sense of enduring wisdom. One such idiom, “practice makes perfect”, can be found in just about every culture in some form. In Chinese, for example, the idiom is apparently properly read as “familiarity through doing creates high proficiency”, i.e. practice makes perfect. This is a central tenet of devops, particularly where optimization of operational processes is concerned. The more often you execute a process, the more likely you are to get better at it and discover what activities (steps) within that process may need tweaking or changes or improvements. Ergo, optimization. This tenet grows out of the agile methodology adopted by devops: application release cycles should be nearly continuous, with both developers and operations iterating over the same process – develop, test, deploy – with a high level of frequency. Eventually (one hopes) we achieve process perfection – or at least what we might call process perfection: repeatable, consistent deployment success. It is implied that in order to achieve this many processes will be automated, once we have discovered and defined them in such a way as to enable them to be automated. But how does one automate a process such as an application release cycle? Business Process Management (BPM) works well for automating business workflows; such systems include adapters and plug-ins that allow communication between systems as well as people. But these systems are not designed for operations; there are no web servers or databases or Load balancer adapters for even the most widely adopted BPM systems. One such solution can be found in Electric Cloud with its recently announced ElectricDeploy. Process Automation for Operations ElectricDeploy is built upon a more well known product from Electric Cloud (well, more well-known in developer circles, at least) known as ElectricCommander, a build-test-deploy application deployment system. Its interface presents applications in terms of tiers – but extends beyond the traditional three-tiers associated with development to include infrastructure services such as – you guessed it – load balancers (yes, including BIG-IP) and virtual infrastructure. The view enables operators to create the tiers appropriate to applications and then orchestrate deployment processes through fairly predictable phases – test, QA, pre-production and production. What’s hawesome about the tools is the ability to control the process – to rollback, to restore, and even debug. The debugging capabilities enable operators to stop at specified tasks in order to examine output from systems, check log files, etc..to ensure the process is executing properly. While it’s not able to perform “step into” debugging (stepping into the configuration of the load balancer, for example, and manually executing line by line changes) it can perform what developers know as “step over” debugging, which means you can step through a process at the highest layer and pause at break points, but you can’t yet dive into the actual task. Still, the ability to pause an executing process and examine output, as well as rollback or restore specific process versions (yes, it versions the processes as well, just as you’d expect) would certainly be a boon to operations in the quest to adopt tools and methodologies from development that can aid them in improving time and consistency of deployments. The tool also enables operations to determine what is failure during a deployment. For example, you may want to stop and rollback the deployment when a server fails to launch if your deployment only comprises 2 or 3 servers, but when it comprises 1000s it may be acceptable that a few fail to launch. Success and failure of individual tasks as well as the overall process are defined by the organization and allow for flexibility. This is more than just automation, it’s managed automation; it’s agile in action; it’s focusing on the processes, not the plumbing. MANUAL still RULES Electric Cloud recently (June 2012) conducted a survey on the “state of application deployments today” and found some not unexpected but still frustrating results including that 75% of application deployments are still performed manually or with little to no automation. While automation may not be the goal of devops, but it is a tool enabling operations to achieve its goals and thus it should be more broadly considered as standard operating procedure to automate as much of the deployment process as possible. This is particularly true when operations fully adopts not only the premise of devops but the conclusion resulting from its agile roots. Tighter, faster, more frequent release cycles necessarily puts an additional burden on operations to execute the same processes over and over again. Trying to manually accomplish this may be setting operations up for failure and leave operations focused more on simply going through the motions and getting the application into production successfully than on streamlining and optimizing the processes they are executing. Electric Cloud’s ElectricDeploy is one of the ways in which process optimization can be achieved, and justifies its purchase by operations by promising to enable better control over application deployment processes across development and infrastructure. Devops is a Verb 1024 Words: The Devops Butterfly Effect Devops is Not All About Automation Application Security is a Stack Capacity in the Cloud: Concurrency versus Connections Ecosystems are Always in Flux The Pythagorean Theorem of Operational Risk241Views0likes1CommentAutomation of F5 Distributed Cloud Platform Client-Side Defense feature - Part I
Objective: The purpose of this article is to automate F5 Distributed Cloud Platform Client-Side Defense feature (F5 XC CSD) detection of malicious 3rd party domains and integrating code in GitHub. This article shows how we can use the Github available Actions workflow to provide the flexibility of updating existing infrastructure after every change using CI/CD event triggers. In this article we showed a small use case of CI/CD deployment using GitHub Actions, Terraform and Python developed in a generic way where users can bring up the complete setup within a few clicks. For more details about this feature please refer: https://community.f5.com/t5/technical-articles/javascript-supply-chains-magecart-and-f5-xc-client-side-defense/ta-p/296612 Overview: Client-Side Defense (CSD) feature provides a web application protection solution against Magecart style and similar malicious JavaScript attacks. This solution supports below features: Detection: A continuously evolving signal set allows CSD to understand when scripts on web pages exhibit signs of exfiltration. CSD detects network requests made by malicious scripts that attempt to exfiltrate PII data. Alerting: CSD generates timely alerts on the behavior of malicious scripts, provided by a continuously improving Analysis Engine. Mitigation: CSD detects threats in real-time and provides enforcement with one-click mitigation. Automation Design: As part of this automation, we are deploying a demo application in AWS and NGINX web service which hosts a simple web login page. The demo application has a malicious 3rd party Java script which captures the provided username and passwords during the login and sends these details to a malicious control server which keeps recording these credentials. Once the demo app is deployed, we are then configuring the origin pool and load balancer in F5 XC and generating web login traffic using Selenium script. Once traffic is logged in F5 XC platform, CSD feature will detect malicious domain network and will display domain in client-Side defense dashboard. After researching the 3rd party domain details customers can either approve or mitigate these network requests. Above workflow is integrated using GitHub Actions file which ensures dynamic deployment of the demo app and F5 XC load balancer which can be exposed using public domain name. Note: Currently this repo code covers automation till CSD malicious domain detection only and will cover mitigation part in the upcoming article of this series. Code is available here. Deployment steps: Security users can simply clone repo, update variables.tf as per their infra and run workflow which will bring entire infrastructure in few mins. They can login to the F5 XC console and explore the functionality of Client-Side Defense in an interactive way. Users can use this as a plugin to demonstrate CSD feature. Conclusion: This article demonstrated how we can leverage the power of CI/CD to create or upgrade our existing infrastructure and maintain the testing scope of Client Side Defense feature. For further information check the links below: F5 Distributed Cloud Platform (Link) F5 Distributed Cloud Client-Side Defense Overview (Link) F5 Distributed Cloud Client-Side Defense Docs (Link)1.2KViews6likes0CommentsAutomation of OWASP Injection mitigation using F5 Distributed Cloud Platform
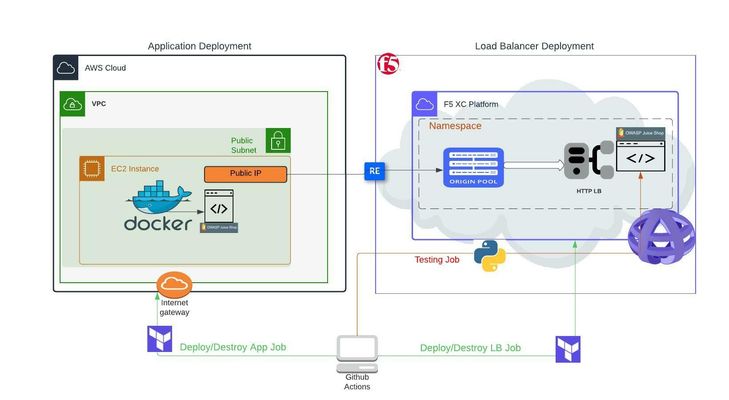
Objective: The purpose of this article is to automate F5 Distributed Cloud Platform (F5 XC) detection and mitigation of OWASP TOP 10 Injection attacks and integrating code in GitHub. This article shows how we can use Terraform, Python and Github workflow to provide the flexibility of updating existing infrastructure after every change using CI/CD event triggers. For more details about this feature please refer: Injection Attack Mitgation Article Introduction to Injection: An application is vulnerable to attack when: The data provided is not validated by the application User requested schema is not being analyzed before processing Data is used within search parameters to extract additional and sensitive records If a user tries to use Cross-site Scripting to get some unauthorized data Some of the common injections are SQL, NoSQL, OS command, Object Relational Mapping (ORM), Etc. In this automation article we are trying to bypass password validation in a demo application using SQL Injection code. Design: For the purpose of reusability, I have separated demo application and F5 XC resources deployments in 2 different flows as below. 1. First, we are deploying a demo application (Juice Shop) as a docker container in AWS EC2 machine (if customer already has their application running, they can skip this and use their application public IP directly in below flow) 2. Once the demo app is deployed, we are using application public IP to configure the origin pool, WAF and load balancer in F5 XC Once demo application and F5 XC resources are deployed successfully, python script is generating login request consisting of malicious SQL Injection. Once traffic is generated, F5 XC platform WAF will detect and block the malicious request. Finally, we are destroying the above resources using terraform Above workflow is integrated using GitHub Actions file which ensures dynamic deployment of the demo app and F5 XC load balancer which can be exposed using public domain name. Repo code URL:https://github.com/f5devcentral/owasp-injection-mitigation Conclusion: In this article we have showed how we can leverage power of CI/CD deployment to automate end to end verification of injection attacks mitigationusing GitHub Actions, Terraform and Python developed in a generic way where users can bring up the complete setup within a few clicks. For further information check the links below: F5 Distributed Cloud Platform (Link) F5 Distributed Cloud WAF Overview (Link) OWASP Injection Attacks (Link)1.9KViews2likes0CommentsF5 Automation with Ansible Tips and Tricks
Getting Started with Ansible and F5 In this article we are going to provide you with a simple set of videos that demonstrate step by step how to implement automation with Ansible. In the last video, however we will demonstrate how telemetry and automation may be used in combination to address potential performance bottlenecks and ensure application availability. To start, we will provide you with details on how to get started with Ansible automation using the Ansible Automation Platform®: Backing up your F5 device Once a user has installed and configured Ansible Automation Platform, we will now transition to a basic maintenance function – an automated backup of a BIG-IP hardware device or Virtual Edition (VE). This is always recommended before major changes are made to our BIG-IP devices Configuring a Virtual Server Next, we will use Ansible to configure a Virtual Server, a task that is most frequently performed via manual functions via the BIG-IP. When changes to a BIG-IP are infrequent, manual intervention may not be so cumbersome. However large enterprise customers may need to perform these tasks hundreds of times: Replace an SSL Certificate The next video will demonstrate how to use Ansible to replace an SSL certificate on a BIG-IP. It is important to note that this video will show the certificate being applied on a BIG-IP and then validated by browsing to the application website: Configure and Deploy an iRule The next administrative function will demonstrate how to configure and push an iRule using the Ansible Automation Platform® onto a BIG-IP device. Again this is a standard administrative task that can be simply automated via Ansible: Delete the Existing Virtual Server Ok so now we have to delete the above configuration to roll back to a steady state. This is a common administrative task when an application is retired. We again demonstrate how Ansible automation may be used to perform these simple administrative tasks: Telemetry and Automation: Using Threshold Triggers to Automate Tasks and Fix Performance Bottlenecks Now you have a clear demonstration as to how to utilize Ansible automation to perform routine tasks on a BIG-IP platform. Once you have become proficient with more routine Ansible tasks, we can explore more high-level, sophisticated automation tasks. In the below demonstration we show how BIG-IP administrators using SSL Orchestrator® (SSLO) can combine telemetry with automation to address performance bottlenecks in an application environment: Resources: So that is a short series of tutorials on how to perform routine tasks using automation plus a preview of a more sophisticated use of automation based upon telemetry and automatic thresholds. For more detail on our partnership, please visit our F5/Ansible page or visit the Red Hat Automation Hub for information on the F5 Ansible certified collections. https://www.f5.com/ansible https://www.ansible.com/products/automation-hub https://galaxy.ansible.com/f5networks/f5_modules5.2KViews2likes1Comment
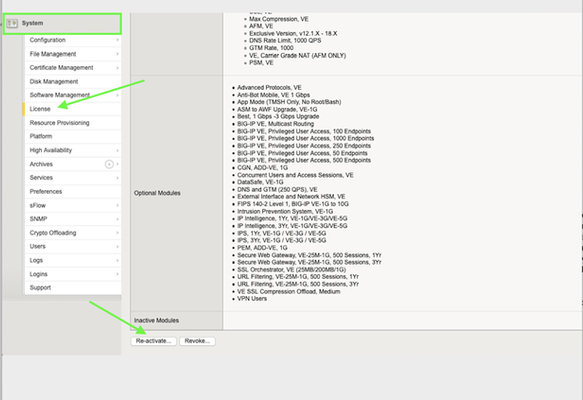
From ASM to Advanced WAF: Advancing your Application Security
TL;DR: As of April 01, 2021, F5 has officially placed Application Security Manager (ASM) into End of Sale (EoS) status, signifying the eventual retirement of the product. (F5 Support Announcement - K72212499 ) Existing ASM,or BEST bundle customers, under a valid support contract running BIG-IP version 14.1 or greater can simply reactivate their licenses to instantly upgrade to Advanced WAF (AdvWAF) completely free of charge. Introduction Protecting your applications is becoming more challenging every day; applications are getting more complex, and attackers are getting more advanced. Over the years we have heard your feedback that managing a Web Application Firewall (WAF) can be cumbersome and you needed new solutions to protect against the latest generation of attacks. Advanced Web Application Firewall, or AdvWAF, is an enhanced version of the Application Security Manager (ASM) product that introduces new attack mitigation techniques and many quality-of-life features designed to reduce operational overhead. On April 01, 2021 – F5 started providing free upgrades for existing Application Security Manager customers to the Advanced WAF license. Keep on reading for: A brief history of ASM and AdvWAF How the AdvWAF license differs from ASM (ASM vs AdvWAF How to determine if your BIG-IPs are eligible for this free upgrade Performing the license upgrade How did we get here? For many years, ASM has been the gold standard Web Application Firewall (WAF) used by thousands of organizations to help secure their most mission-critical web applications from would-be attackers. F5 acquired the technology behind ASM in 2004 and subsequently ‘baked’ it into the BIG-IP product, immediately becoming the leading WAF product on the market. In 2018, after nearly 14 years of ASM development, F5 released the new, Advanced WAF license to address the latest threats. Since that release, both ASM and AdvWAF have coexisted, granting customers the flexibility to choose between the traditional or enhanced versions of the BIG-IP WAF product.As new features were released, they were almost always unique to AdvWAF, creating further divergence as time went on, and often sparking a few common questions (all of which we will inevitably answer in this very article) such as: Is ASM going away? What is the difference between ASM and AdvWAF? Will feature X come to ASM too? I need it! How do I upgrade from ASM to AdvWAF? Is the BEST bundle no longer really the BEST? To simplify things for our customers (and us too!), we decided to announce ASM as End of Sale (EoS), starting on April 01, 2021. This milestone, for those unfamiliar, means that the ASM product can no longer be purchased after April 01 of this year – it is in the first of 4 stages of product retirement. An important note is that no new features will be added to ASM going forward. So, what’s the difference? A common question we get often is “How do I migrate my policy from ASM to AdvWAF?” The good news is that the policies are functionally identical, running on BIG-IP, with the same web interface, and have the same learning engine and underlying behavior. In fact, our base policies can be shared across ASM, AdvWAF, and NGINX App Protect (NAP). The AdvWAF license simply unlocks additional features beyond what ASM has, that is it – all the core behaviors of the two products are identical otherwise. So, if an engineer is certified in ASM and has managed ASM security policies previously, they will be delighted to find that nothing has changed except for the addition of new features. This article does not aim to provide an exhaustive list of every feature difference between ASM and AdvWAF. Instead, below is a list of the most popular features introduced in the AdvWAF license that we hope you can take advantage of. At the end of the article, we provide more details on some of these features: Secure Guided Configurations Unlimited L7 Behavioral DoS DataSafe (Client-side encryption) OWASP Compliance Dashboard Threat Campaigns (includes Bot Signature updates) Additional ADC Functionality Micro-services protection Declarative WAF Automation I’m interested, what’s the catch? There is none! F5 is a security company first and foremost, with a mission to provide the technology necessary to secure our digital world. By providing important useability enhancements like Secure Guided Config and OWASP Compliance Dashboard for free to existing ASM customers, we aim to reduce the operational overhead associated with managing a WAF and help make applications safer than they were yesterday - it’s a win-win. If you currently own a STANDALONE, ADD-ON or BEST Bundle ASM product running version 14.1 or later with an active support contract, you are eligible to take advantage of this free upgrade. This upgrade does not apply to customers running ELA licensing or standalone ASM subscription licenses at this time. If you are running a BIG-IP Virtual Edition you must be running at least a V13 license. To perform the upgrade, all you need to do is simply REACTIVATE your license, THAT IS IT! There is no time limit to perform the license reactivation and this free upgrade offer does not expire. *Please keep in mind that re-activating your license does trigger a configuration load event which will cause a brief interruption in traffic processing; thus, it is always recommended to perform this in a maintenance window. Step 1: Step 2: Choose “Automatic” if your BIG-IP can communicate outbound to the Internet and talk to the F5 Licensing Server. Choose Manual if your BIG-IP cannot reach the F5 Licensing Server directly through the Internet. Click Next and the system will re-activate your license. After you’ve completed the license reactivation, the quickest way to know if you now have AdvWAF is by looking under the Security menu. If you see "Guided Configuration”, the license upgrade was completed successfully. You can also login to the console and look for the following feature flags in the /config/bigip.license file to confirm it was completed successfully by running: grep -e waf_gc -e mod_waf -e mod_datasafe bigip.license You should see the following flags set to enabled: Waf_gc: enabled Mod_waf: enabled Mod_datasafe: enabled *Please note that the GUI will still reference ASM in certain locations such as on the resource provisioning page; this is not an indication of any failure to upgrade to the AdvWAF license. *Under Resource Provisioning you should now see that FPS is licensed. This will need to be provisioned if you plan on utilizing the new AdvWAF DataSafe feature explained in more detail in the Appendix below. For customers with a large install base, you can perform license reactivation through the CLI. Please refer to the following article for instructions: https://support.f5.com/csp/article/K2595 Conclusion F5 Advanced WAF is an enhanced WAF license now available for free to all existing ASM customers running BIG-IP version 14.1 or greater, only requiring a simple license reactivation. The AdvWAF license will provide immediate value to your organization by delivering visibility into the OWASP Top 10 compliance of your applications, configuration wizards designed to build robust security policies quickly, enhanced automation capabilities, and more. If you are running ASM with BIG-IP version 14.1 or greater, what are you waiting for? (Please DO wait for your change window though 😊) Acknowledgments Thanks to Brad Scherer , John Marecki , Michael Everett , and Peter Scheffler for contributing to this article! Appendix: More details on select AdvWAF features Guided Configurations One of the most common requests we hear is, “can you make WAF easier?” If there was such a thing as an easy button for WAF configurations, Guided Configs are that button. Guided Configurations easily take you through complex configurations for various use-cases such as Web Apps, OWASP top 10, API Protection, DoS, and Bot Protection. L7DoS – Behavioral DoS Unlimited Behavioral DoS - (BaDoS) provides automatic protection against DoS attacks by analyzing traffic behavior using machine learning and data analysis. With ASM you were limited to applying this type of DoS profile to a maximum of 2 Virtual Servers. The AdvWAF license completely unlocks this capability, removing the 2 virtual server limitation from ASM. Working together with other BIG-IP DoS protections, Behavioral DoS examines traffic flowing between clients and application servers in data centers, and automatically establishes the baseline traffic/flow profiles for Layer 7 (HTTP) and Layers 3 and 4. DataSafe *FPS must be provisioned DataSafe is best explained as real-time L7 Data Encryption. Designed to protect websites from Trojan attacks by encrypting data at the application layer on the client side. Encryption is performed on the client-side using a public key generated by the BIG-IP system and provided uniquely per session. When the encrypted information is received by the BIG-IP system, it is decrypted using a private key that is kept on the server-side. Intended to protect, passwords, pins, PII, and PHI so that if any information is compromised via MITB or MITM it is useless to the attacker. DataSafe is included with the AdvWAF license, but the Fraud Protection Service (FPS) must be provisioned by going to System > Resource Provisioning: OWASP Compliance Dashboard Think your policy is air-tight? The OWASP Compliance Dashboard details the coverage of each security policy for the top 10 most critical web application security risks as well as the changes needed to meet OWASP compliance. Using the dashboard, you can quickly improve security risk coverage and perform security policy configuration changes. Threat Campaigns (includes Bot Signature updates) Threat campaigns allow you to do more with fewer resources. This feature is unlocked with the AdvWAF license, it, however, does require an additional paid subscription above and beyond that. This paid subscription does NOT come with the free AdvWAF license upgrade. F5’s Security Research Team (SRT) discovers attacks with honeypots – performs analysis and creates attack signatures you can use with your security policies. These signatures come with an extremely low false-positive rate, as they are strictly based on REAL attacks observed in the wild. The Threat Campaign subscription also adds bot signature updates as part of the solution. Additional ADC Functionality The AdvWAF license comes with all of the Application Delivery Controller (ADC) functionality required to both deliver and protect a web application. An ASM standalone license came with only a very limited subset of ADC functionality – a limit to the number of pool members, zero persistence profiles, and very few load balancing methods, just to name a few. This meant that you almost certainly required a Local Traffic Manager (LTM) license in addition to ASM, to successfully deliver an application. The AdvWAF license removes many of those limitations; Unlimited pool members, all HTTP/web pertinent persistence profiles, and most load balancing methods, for example.12KViews8likes8CommentsBIG-IP Configuration Visualizer - iControl Style
I posted almost two years ago to the day on a cool tool called BIG-IP Config Visualizer, or BCV, that one of our field engineers put together that utilizes a BIG-IP config parser and GraphViz to create images visualizing the relationship of configuration objects for a particular virtual server. Well, I’m here to report that another community user, Russell Moore, has taken that work to the next level. Rather than trying to figure out the nuances of configuration objects amongst all the versions of BIG-IP, he converted the script to utilize iControl! In this tech tip, I’ll walk through the installation steps necessary to get this tool off the ground. The Setup Install a few libraries and GraphViz via apt-get apt-get install libssl-dev libcrypt-ssleay-perl libio-socket-ssl-perl libgraph-writer-graphviz-perl Open a CPAN shell and install SOAP::Lite and Net::Netmask perl –MCPAN –e shell install SOAP::Lite install Net::Netmask After installing those libraries and tools, grab the BCV-iControl source from the codeshare, save it as an executable (bcv.pl on my system) and set these variables (I only changed the ones in bold type): #Declare CLI $vars my $vs1; my $new_dir = 'NO_DIR'; my $extension = 'NO_EXT'; my $ltm_host = "172.16.99.5"; my $ltm_port = '443'; my $user_id = "admin"; my $req_partition; my $user_password = "admin"; my $ltm_protocol = 'https'; my $path; my $dir; Finally, some command-line options: root@ubuntu:/home/jrahm# ./bcv.pl -h Thank you for using BIG-IP Configuration Visualizer (BCV 1.16.1-revisited with soap) -v <VS_NAME> this prints the specified virtual server and requires option -c. Default is to print all -c Specify the partition/container to look in for option -v -t <iControl host LTM> specify ltm_host IP we will connect to -d specifies a directory you want the images in. Has to be in Current working Directory: /home/jrahm Default is /img) -e Define image format options: svg, png (default is jpg) -help for help but you already found it The Payoff Now that all the legwork is complete, we can play! root@ubuntu:/home/jrahm# ./bcv.pl Please wait while we build some maps of your system. Retrieving SelfIPs in Partition: ** Common ** Mapping Partition: ** Common ** routes to gateways Mapping Partition: ** Common ** selfIPs and VLANs.. Mapping Partition: ** Common ** pools and iRule references to pools............ Mapping Partition: ** Common ** virtual servers and properties... Drawing VS: dc.hashtest which is 1 of 3 in Partition: Common Drawing VS: testvip1 which is 2 of 3 in Partition: Common Drawing VS: management_vip which is 3 of 3 in Partition: Common All drawings completed! They can be found in: /home/jrahm/img Taking a look at the virtual server I used for the hashing algorithm distribution tech tip: Conclusion Visual representations of configurations are incredibly helpful in identifying issues quickly. An interesting next step would be to track state of objects from iteration of the drawings, and build a page to include all the images. That would make a nice and cheap dashboard for application owners or operating centers. Any takers? Thanks to community user Russell Moore that took a great contributed tool and made it better with iControl!1.2KViews0likes12Comments
Requiring an SSL Certificate for Parts of an Application
When building many enterprise web-based applications, security must be taken seriously. iRules provide powerful capabilities for influencing security decisions when processing for your web services and applications. This is a rule for requiring a client certificate for certain parts of an application. The example below requires a certificate when the URL path is for a certain directory. Alternatively, a rule could be written to check the host name of file extension if that is more appropriate for your requirements. Special Notes: this rule requires version 9.0.2 to operate correctly. Log statements are commented out. For testing, they can be uncommented. When the client connects, we set up variables to record two things - whether a certificate has been received and whether a certficate needs to be received. These variables start out with a value of zero, which means "false". when CLIENT_ACCEPTED { set needcert 0 set gotcert 0 } When a client does an SSL handshake, this rule event is triggered. This is the time to validate that a certificate has been received. If a certificate has not been received, but we were expecting one ($needcert == 1), then the connection is rejected. If the certificate has been received, we note that for future reference (set gotcert 1) and we release the current request (HTTP::release) if we were waiting for a certificate before releasing the request. when CLIENTSSL_HANDSHAKE { # log LOCAL0.warn "cert count=[SSL::cert count] result=[SSL::verify_result]" if { [SSL::cert count] == 0 or [SSL::verify_result] != 0 } { # log LOCAL0.warn "Bad cert!" if { $needcert == 1 } { reject } } else { # log LOCAL0.warn "Good cert! ($needcert)" set gotcert 1 if { $needcert == 1 } { HTTP::release } } } Here we process an HTTP request. If the request is for a directory that has been designated for extra security, then several things happen. We freeze the HTTP request until the client certificate is received, we tell SSL to require a certificate, we tell SSL to renegotiate now, and then we set a flag that indicates we need a certificate. when HTTP_REQUEST { if { $gotcert == 0 and [HTTP::uri] starts_with "/needcert" } { # log LOCAL0.warn "Requiring certificate..." HTTP::collect SSL::cert mode require SSL::renegotiate set needcert 1 } else { # log LOCAL0.warn "No cert needed." } } Questions about this iRule? Post them in the Technical Forum.426Views0likes0CommentsOffload Authentication with iRules
As the applications being driven by webservers become more and more complex, Applications Developers are always looking for ways to increase efficiency or do away with unneeded processing time. One of the ways that I believe that Applications can do that is by making use of an intelligent network infrastructure. Assuming the network that is delivering the applications is an intelligent, application aware one, there are many things that Developers can do to help offload some of the work their code would normally have the web server processing to the network level. One such thing that can be offloaded in many cases, is authentication. By leaving the heavy lifting of ensuring only authorized users are acessing the application(s) in question to the network, the web server is free to use its processing power to deliver the application it's hosting faster and more reliably. This is especially true in highly taxed environments. The example below shows one way in which this can be done. This example uses an HTTP cookie to store authentication information for each user, which is a common practice for many applications. It is getting the data to be stored, I.E. whether or not a user is properly authenticated, by enlisting the authentication server already in place on this hypothetical network. In this specific example, that authentication system is a Radius system, but the iRule works equally well with LDAP, tacacs, etc. If the authentication attempt is successful, a cookie will be sent to client with the appropriate data to be stored. The next time that client tries to access the application, the AUTH cookie is present and valid, so the client will be passed immediately without being re-checked for authentication. If it is not succesful, well, then you can decide what experience that user should have by altering the code in the "AUTH_FAILURE" section, or leave the standard 401 error message that stands there now. In this example, the cookie name, password, domain should be properly modified for your environment. This code comes from the DevCentral iRules CodeShare where you can find many useful iRules examples, not to mention post your own to share with the community. Just another great example of how with iRules, you can... 😉 when CLIENT_ACCEPTED { set authinsck 0 set forceauth 1 set ckname BIGXAUTH set ckpass 1xxx5678 set ckvalue [IP::client_addr] set ckdomain .y.z set asid [AUTH::start pam default_radius] } when HTTP_REQUEST { if {[HTTP::cookie exists $ckname]} { HTTP::cookie decrypt $ckname $ckpass 128 if {[HTTP::cookie value $ckname] eq $ckvalue} { set forceauth 0 } HTTP::cookie remove $ckname } if {$forceauth eq 1} { AUTH::username_credential $asid [HTTP::username] AUTH::password_credential $asid [HTTP::password] AUTH::authenticate $asid HTTP::collect } } when HTTP_RESPONSE { if {$authinsck eq 1} { HTTP::cookie insert name $ckname value $ckvalue path / domain $ckdomain HTTP::cookie secure $ckname enable HTTP::cookie encrypt $ckname $ckpass 128 } } when AUTH_SUCCESS { if {$asid eq [AUTH::last_event_session_id]} { set authinsck 1 HTTP::release } } when AUTH_FAILURE { if {$asid eq [AUTH::last_event_session_id]} { HTTP::respond 401 "WWW-Authenticate" "Basic realm=\"\"" } } when AUTH_WANTCREDENTIAL { if {$asid eq [AUTH::last_event_session_id]} { HTTP::respond 401 "WWW-Authenticate" "Basic realm=\"\"" } } when AUTH_ERROR { if {$asid eq [AUTH::last_event_session_id]} { HTTP::respond 401 } }414Views0likes0CommentsAutomation of Malicious User detection/mitigation using F5 Distributed Cloud Platform
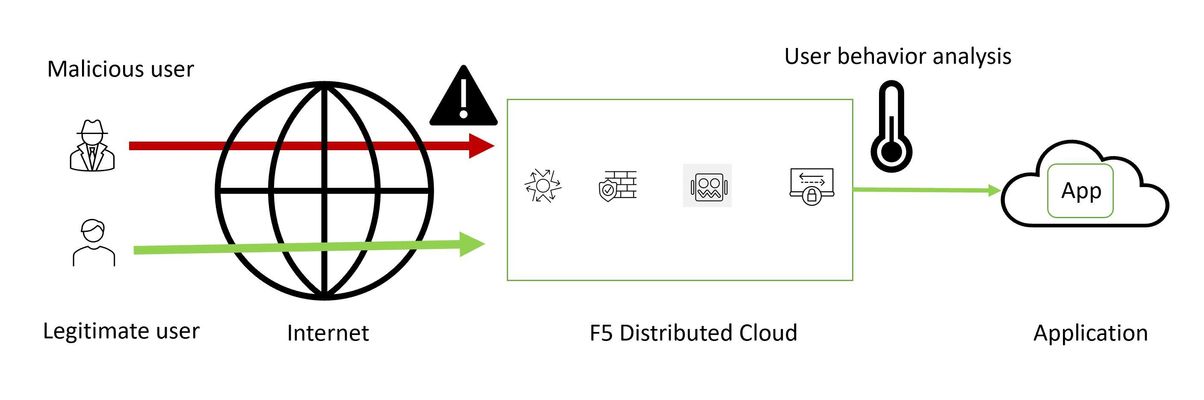
Introduction: In today’s modern world where attackers are leveraging the benefits of readily available automated attack tools it is highly recommended to go with security driven framework which helps in negating the impact of possible attack vectors used by these attackers. F5 Distributed Cloud (F5 XC) platform comes with a wide range of signature set for known attacks and has a machine learning capability to mitigate possible threats from malicious users by analyzing the user behavior. In this article, we have discussed the demo scenarios we are covering as part of the automation using GitHub Actions, Terraform and Python. For more information, please have a look at these articles: AI/ML detection of Malicious Users using F5 Distributed Cloud WAAP – Part I AI/ML detection of Malicious Users using F5 Distributed Cloud WAAP – Part II AI/ML detection of Malicious Users using F5 Distributed Cloud WAAP – Part III Demonstration: We’ve come up with automation scripts to build up the infrastructure for malicious user detection and mitigation in XC console and malicious events triggering script. You can use the github workflows to see how effectively XC WAAP can detect and mitigate malicious user events The repository consists of two workflows covering demo scenarios for malicious user detection and mitigation using XC WAAP: Single LB malicious user detection and default mitigation of high-risk IPs: In this scenario we are bringing up a HTTP load balancer and configure it to detect and mitigate malicious user events using default mitigation rule. In the second part of this demo, we will generate tor requests and fetch the logs from XC console to validate the detection and mitigation action Multi LB malicious user detection and custom mitigation of WAF security events: In this scenario we are bringing up a HTTPS load balancer with an app type enabling detection with custom app settings object, app firewall in blocking mode and custom malicious user mitigation policy. In the second part of this scenario, we are generating XSS attacks and validate the logs fetched from XC console. Repository Link: Automation demonstration for malicious user detection and mitigation feature of F5 XC Platform Conclusion: By using the repository, you will see F5 Distributed Cloud platform’s efficiency to detect users exhibiting suspicious behavior and perform mitigation actions on them safeguarding end application from possible attacks Hope you liked the demonstration. Please feel free to raise your concerns via GitHub. Thank you! For further information click the links below: F5 Distributed Cloud Platform F5 Distributed Cloud Services F5 Distributed Cloud WAAP2KViews4likes0Comments