Controlling a Pool Members Ratio and Priority Group with iControl
A Little Background A question came in through the iControl forums about controlling a pool members ratio and priority programmatically. The issue really involves how the API’s use multi-dimensional arrays but I thought it would be a good opportunity to talk about ratio and priority groups for those that don’t understand how they work. In the first part of this article, I’ll talk a little about what pool members are and how their ratio and priorities apply to how traffic is assigned to them in a load balancing setup. The details in this article were based on BIG-IP version 11.1, but the concepts can apply to other previous versions as well. Load Balancing In it’s very basic form, a load balancing setup involves a virtual ip address (referred to as a VIP) that virtualized a set of backend servers. The idea is that if your application gets very popular, you don’t want to have to rely on a single server to handle the traffic. A VIP contains an object called a “pool” which is essentially a collection of servers that it can distribute traffic to. The method of distributing traffic is referred to as a “Load Balancing Method”. You may have heard the term “Round Robin” before. In this method, connections are passed one at a time from server to server. In most cases though, this is not the best method due to characteristics of the application you are serving. Here are a list of the available load balancing methods in BIG-IP version 11.1. Load Balancing Methods in BIG-IP version 11.1 Round Robin: Specifies that the system passes each new connection request to the next server in line, eventually distributing connections evenly across the array of machines being load balanced. This method works well in most configurations, especially if the equipment that you are load balancing is roughly equal in processing speed and memory. Ratio (member): Specifies that the number of connections that each machine receives over time is proportionate to a ratio weight you define for each machine within the pool. Least Connections (member): Specifies that the system passes a new connection to the node that has the least number of current connections in the pool. This method works best in environments where the servers or other equipment you are load balancing have similar capabilities. This is a dynamic load balancing method, distributing connections based on various aspects of real-time server performance analysis, such as the current number of connections per node or the fastest node response time. Observed (member): Specifies that the system ranks nodes based on the number of connections. Nodes that have a better balance of fewest connections receive a greater proportion of the connections. This method differs from Least Connections (member), in that the Least Connections method measures connections only at the moment of load balancing, while the Observed method tracks the number of Layer 4 connections to each node over time and creates a ratio for load balancing. This dynamic load balancing method works well in any environment, but may be particularly useful in environments where node performance varies significantly. Predictive (member): Uses the ranking method used by the Observed (member) methods, except that the system analyzes the trend of the ranking over time, determining whether a node's performance is improving or declining. The nodes in the pool with better performance rankings that are currently improving, rather than declining, receive a higher proportion of the connections. This dynamic load balancing method works well in any environment. Ratio (node): Specifies that the number of connections that each machine receives over time is proportionate to a ratio weight you define for each machine across all pools of which the server is a member. Least Connections (node): Specifies that the system passes a new connection to the node that has the least number of current connections out of all pools of which a node is a member. This method works best in environments where the servers or other equipment you are load balancing have similar capabilities. This is a dynamic load balancing method, distributing connections based on various aspects of real-time server performance analysis, such as the number of current connections per node, or the fastest node response time. Fastest (node): Specifies that the system passes a new connection based on the fastest response of all pools of which a server is a member. This method might be particularly useful in environments where nodes are distributed across different logical networks. Observed (node): Specifies that the system ranks nodes based on the number of connections. Nodes that have a better balance of fewest connections receive a greater proportion of the connections. This method differs from Least Connections (node), in that the Least Connections method measures connections only at the moment of load balancing, while the Observed method tracks the number of Layer 4 connections to each node over time and creates a ratio for load balancing. This dynamic load balancing method works well in any environment, but may be particularly useful in environments where node performance varies significantly. Predictive (node): Uses the ranking method used by the Observed (member) methods, except that the system analyzes the trend of the ranking over time, determining whether a node's performance is improving or declining. The nodes in the pool with better performance rankings that are currently improving, rather than declining, receive a higher proportion of the connections. This dynamic load balancing method works well in any environment. Dynamic Ratio (node) : This method is similar to Ratio (node) mode, except that weights are based on continuous monitoring of the servers and are therefore continually changing. This is a dynamic load balancing method, distributing connections based on various aspects of real-time server performance analysis, such as the number of current connections per node or the fastest node response time. Fastest (application): Passes a new connection based on the fastest response of all currently active nodes in a pool. This method might be particularly useful in environments where nodes are distributed across different logical networks. Least Sessions: Specifies that the system passes a new connection to the node that has the least number of current sessions. This method works best in environments where the servers or other equipment you are load balancing have similar capabilities. This is a dynamic load balancing method, distributing connections based on various aspects of real-time server performance analysis, such as the number of current sessions. Dynamic Ratio (member): This method is similar to Ratio (node) mode, except that weights are based on continuous monitoring of the servers and are therefore continually changing. This is a dynamic load balancing method, distributing connections based on various aspects of real-time server performance analysis, such as the number of current connections per node or the fastest node response time. L3 Address: This method functions in the same way as the Least Connections methods. We are deprecating it, so you should not use it. Weighted Least Connections (member): Specifies that the system uses the value you specify in Connection Limit to establish a proportional algorithm for each pool member. The system bases the load balancing decision on that proportion and the number of current connections to that pool member. For example,member_a has 20 connections and its connection limit is 100, so it is at 20% of capacity. Similarly, member_b has 20 connections and its connection limit is 200, so it is at 10% of capacity. In this case, the system select selects member_b. This algorithm requires all pool members to have a non-zero connection limit specified. Weighted Least Connections (node): Specifies that the system uses the value you specify in the node's Connection Limitand the number of current connections to a node to establish a proportional algorithm. This algorithm requires all nodes used by pool members to have a non-zero connection limit specified. Ratios The ratio is used by the ratio-related load balancing methods to load balance connections. The ratio specifies the ratio weight to assign to the pool member. Valid values range from 1 through 100. The default is 1, which means that each pool member has an equal ratio proportion. So, if you have server1 a with a ratio value of “10” and server2 with a ratio value of “1”, server1 will get served 10 connections for every one that server2 receives. This can be useful when you have different classes of servers with different performance capabilities. Priority Group The priority group is a number that groups pool members together. The default is 0, meaning that the member has no priority. To specify a priority, you must activate priority group usage when you create a new pool or when adding or removing pool members. When activated, the system load balances traffic according to the priority group number assigned to the pool member. The higher the number, the higher the priority, so a member with a priority of 3 has higher priority than a member with a priority of 1. The easiest way to think of priority groups is as if you are creating mini-pools of servers within a single pool. You put members A, B, and C in to priority group 5 and members D, E, and F in priority group 1. Members A, B, and C will be served traffic according to their ratios (assuming you have ratio loadbalancing configured). If all those servers have reached their thresholds, then traffic will be distributed to servers D, E, and F in priority group 1. he default setting for priority group activation is Disabled. Once you enable this setting, you can specify pool member priority when you create a new pool or on a pool member's properties screen. The system treats same-priority pool members as a group. To enable priority group activation in the admin GUI, select Less than from the list, and in the Available Member(s) box, type a number from 0 to 65535 that represents the minimum number of members that must be available in one priority group before the system directs traffic to members in a lower priority group. When a sufficient number of members become available in the higher priority group, the system again directs traffic to the higher priority group. Implementing in Code The two methods to retrieve the priority and ratio values are very similar. They both take two parameters: a list of pools to query, and a 2-D array of members (a list for each pool member passed in). long [] [] get_member_priority( in String [] pool_names, in Common__AddressPort [] [] members ); long [] [] get_member_ratio( in String [] pool_names, in Common__AddressPort [] [] members ); The following PowerShell function (utilizing the iControl PowerShell Library), takes as input a pool and a single member. It then make a call to query the ratio and priority for the specific member and writes it to the console. function Get-PoolMemberDetails() { param( $Pool = $null, $Member = $null ); $AddrPort = Parse-AddressPort $Member; $RatioAofA = (Get-F5.iControl).LocalLBPool.get_member_ratio( @($Pool), @( @($AddrPort) ) ); $PriorityAofA = (Get-F5.iControl).LocalLBPool.get_member_priority( @($Pool), @( @($AddrPort) ) ); $ratio = $RatioAofA[0][0]; $priority = $PriorityAofA[0][0]; "Pool '$Pool' member '$Member' ratio '$ratio' priority '$priority'"; } Setting the values with the set_member_priority and set_member_ratio methods take the same first two parameters as their associated get_* methods, but add a third parameter for the priorities and ratios for the pool members. set_member_priority( in String [] pool_names, in Common::AddressPort [] [] members, in long [] [] priorities ); set_member_ratio( in String [] pool_names, in Common::AddressPort [] [] members, in long [] [] ratios ); The following Powershell function takes as input the Pool and Member with optional values for the Ratio and Priority. If either of those are set, the function will call the appropriate iControl methods to set their values. function Set-PoolMemberDetails() { param( $Pool = $null, $Member = $null, $Ratio = $null, $Priority = $null ); $AddrPort = Parse-AddressPort $Member; if ( $null -ne $Ratio ) { (Get-F5.iControl).LocalLBPool.set_member_ratio( @($Pool), @( @($AddrPort) ), @($Ratio) ); } if ( $null -ne $Priority ) { (Get-F5.iControl).LocalLBPool.set_member_priority( @($Pool), @( @($AddrPort) ), @($Priority) ); } } In case you were wondering how to create the Common::AddressPort structure for the $AddrPort variables in the above examples, here’s a helper function I wrote to allocate the object and fill in it’s properties. function Parse-AddressPort() { param($Value); $tokens = $Value.Split(":"); $r = New-Object iControl.CommonAddressPort; $r.address = $tokens[0]; $r.port = $tokens[1]; $r; } Download The Source The full source for this example can be found in the iControl CodeShare under PowerShell PoolMember Ratio and Priority.27KViews0likes3Comments
Using a default persistence profile and iRule persistence on the same VS
I have an iRule applied to a VS that sends traffic to different pools based on its uri. I have a default persistence profile defined already on the VS (smsession) but on one of the pools I would like to use a different method of persistence (cookie). If I define the persistence to that pool in my iRule as shown below, which method of persistence is used in the end? Can you use a default persistence profile AND specify a different method using an iRule? when HTTP_REQUEST { set header_uri [string tolower [HTTP::uri]] if { [matchclass $header_uri starts_with $::www_uri] } { pool WWW_Pool } elseif { [matchclass $header_uri starts_with $::oam_uri] } { HTTP::redirect "https://oam.companyname.com/oam/main/oamMain.jsp" } elseif { [matchclass $header_uri starts_with $::cp_uri] } { persist cookie insert "CP_Cookie" "0d 03:00:00" pool CP_Pool } else { pool My_Pool } }239Views1like2Comments
Wildcard SSL doesn't handle root domain?
My understanding of this may be lacking, but is there no way for a wilcard ssl certificate to handle the "root" domain? Example: I have a wildcard cert for "*.foo.com". It handles SSL requests as expected for "www.foo.com", but browsers will throw an identify verification error if the request went directly to "foo.com". Both https://www.foo.com and https://foo.com resolve to the same IP address/F5 Pool. That pool is using the wildcard cert (and works correctly with https://www.foo.com). Is this not a function of a wildcard SSL certificate? Thanks1.3KViews0likes7Commentsv11: iRules Data Group Updates
Several months ago I wrote up the v10 formatting for internal and external datagroups: iRules Data Group Formatting Rules. In v11, however, there is a change to the format of the internal data group and the data group reference to external class files (the formatting in the external class file itself is unchanged). The formatting rules in v11 for data groups more closely resembles the tmsh commands necessary to build the class at the CLI (these command attributes are masked if you are using the GUI). I’ll follow the same format as the original write-up in showing the various data group types. The format is the same among internal data group types. If there is no value associated with the key, there is a curly bracket pair trailing the key on the same line. If there is an associated value with a key, the curly bracket opens the value, followed by a newline with the keyword data and the value, then another newline with the closing curly bracket. After the records are listed, the type is specified. For external data groups, the file name and the type are specified. If the filename is in /var/class, the path is omitted from the filename reference. Address Data Groups Internal Data Group ltm data-group internal addr_testclass { records { 192.168.1.1/32 { } 192.168.1.2/32 { data "host 2" } 192.168.2.0/24 { } 192.168.3.0/24 { data "network 2" } } type ip } External Data Group ltm data-group external addr_testclass_ext { external-file-name addr_testclass.class type ip } Integer Data Groups Internal Data Group ltm data-group internal int_testclass { records { 1 { data "test 1" } 2 { data "test 2" } } type integer } External Data Group ltm data-group external int_testclass_ext { external-file-name int_testclass type integer } String Data Groups Internal Data Group ltm data-group internal str_testclass { records { str1 { data "value 1" } str2 { data "value 2" } } type string } External Data Group ltm data-group external str_testclass_ext { external-file-name str_testclass.class type string } External Datagroup File Management Beginning in v11, external datagroups are imported into a local filestore rather than simply existing someplace on the file system (/config/filestore). However, this filestore is not meant to edited manually. Please follow the steps below for creating or modifying external datagroups. Thanks to hoolio for the steps in this external datagroup section. Create a New External Datagroup from the CLI Non-Interactively 1. Create or copy over to LTM a temporary file containing the external data group contents. If copying, make sure the line terminators are \n only not \r\n. # cat /var/tmp/string_name_value_external_dg.txt "name1" := "value1", "name2" := "value2", "name3" := "value3", 2. Create the new external data group file tmsh create /sys file data-group string_name_value_external_dg_file separator ":=" source-path file:/var/tmp/string_name_value_external_dg.txt type string 3. Create the external data group referencing the file tmsh create /ltm data-group external string_name_value_external_dg external-file-name string_name_value_external_dg_file Modify the External Datagroup File for Existing Datagroup 1. Create a new temporary file containing the updated external data group contents # cat /var/tmp/string_name_value_external_v2_dg.txt "name1" := "valueA", "name2" := "valueB", "name3" := "valueC", 2. Import the new data group file tmsh create /sys file data-group string_name_value_external_v2_dg_file separator ":=" source-path file:/var/tmp/string_name_value_external_v2_dg.txt type string 3. Modify the data group definition to reference the new external data group file tmsh modify /ltm data-group external string_name_value_external_dg external-file-name string_name_value_external_v2_dg_file 4. Delete the old data group file if it’s unneeded tmsh delete sys file data-group string_name_value_external_dg_file Handling Line Terminator Discrepencies Whether imporing external datagroups in the GUI or from the CLI, the system does not accept files with \r\n line terminators, it only accepts \n. If you copy files over from windows, most likely you have the wrong terminator in your file format. To check, you can use the od command. Datagroup Contents created in vi on LTM [root@golgotha:Active] data_group_d # od -c /var/tmp/string_name_value_external_dg.txt 0000000 " n a m e 1 " : = " v a l u 0000020 e 1 " , \n " n a m e 2 " : = 0000040 " v a l u e 2 " , \n " n a m e 3 0000060 " : = " v a l u e 3 " , \n 0000077 Datagroup Contents created in Notepad on Windows [root@golgotha:Active] data_group_d # od -c /var/tmp/notepad_dg.txt 0000000 " n a m e 1 " : = " v a l u 0000020 e 1 " , \r \n " n a m e 2 " : = 0000040 " v a l u e 2 " , \r \n " n a m 0000060 e 3 " : = " v a l u e 3 " , 0000100 If your line terminators are incorrect, you can use the tr command to remove the \r's. [root@golgotha:Active] tmp # cat /var/tmp/notepad_dg.txt | tr -d '\r' > /var/tmp/notepad_dg_update.txt [root@golgotha:Active] tmp # od -c /var/tmp/notepad_dg_update.txt 0000000 " n a m e 1 " : = " v a l u 0000020 e 1 " , \n " n a m e 2 " : = 0000040 " v a l u e 2 " , \n " n a m e 3 0000060 " : = " v a l u e 3 " , 00000765.4KViews0likes18CommentsiRules Data Group Formatting Rules
BIG-IP LTM supports internal and external classes (called Data Groups in the GUI) of address, string, and integer types. An internal class is stored in the bigip.conf file, whereas external classes are split between the bigip.conf and the file system (the class itself is defined in the bigip.conf file, but the values of the class are stored in the file system in a location of your choice, though /var/class is the location defined for synchronization in the cs.dat file) Which flavor? Depends on the requirements. External classes are generally best suited for very large datasets or for datasets that require frequent updates like blacklists. Formatting is slightly different depending on whether the class is internal or external, and is also different based on the class type: address, integer, or string. Below I’ll show the formatting requirements for each scenario. If you are using the GUI to create key/value pairs in a class (and therefore deciding on an internal class), the formatting is handled for you. Note that with internal classes, the dataset is defined with the class, but with external classes, the class is defined with type, separator, and the filename where the dataset is stored. If there is no value for the type (internal or external) it is omitted with no separator. Update: The following information is for v10 only. For v11+, please reference the v11 Data Group Formatting Rules. Address Classes internal class class addr_testclass { { host 192.168.1.1 host 192.168.1.2 { "host 2" } network 192.168.2.0/24 network 192.168.3.0/24 { "network 2" } } } external class class addr_testclass_ext { type ip filename "/var/class/addr_testclass.class" separator ":=" } /var/class/addr_testclass.class host 192.168.1.1, host 192.168.1.2 := "host 2", network 192.168.2.0/24, network 192.168.3.0/24 := "network 2", Note: You can also add network entries in the address type external file like shown immediately below, but when the class is updated, it will be converted to the CIDR format. network 192.168.4.0 mask 255.255.255.0 := “network 3”, network 192.168.5.0 prefixlen 24 := "network 4", Integer Classes internal class class int_testclass { { 1 { "test 1" } 2 { "test 2" } } } external class class int_testclass_ext { type value filename "/var/class/int_testclass.class" separator ":=" } /var/class/int_testclass.class 1 := "test 1", 2 := "test 2", String Classes With string classes, quotes are necessary on the types and values: internal class class str_testclass { { "str1" { "value 1" } "str2" { "value 2" } } } external class class str_testclass_ext { type string filename "/var/class/str_testclass.class" separator ":=" } /var/class/str_class.class "str1" := "value 1", "str2" := "value 2", Working With External Files Now that the formatting of the classes themselves are complete, I’d like to point out one more issue, and that’s file formatting. If you’re editing all the external classes by hand on the BIG-IP, you have nothing to worry about. However, if you edit them on an external system and copy them over, be careful on which editor you choose. The Unix/Linux line terminator is a line feed (0x0A) whereas Windows default is a carriage return/line feed (0x0D0A) and Mac typically employs just a carriage return (0x0D). The file needs to be formatted in unix-style. I use gVim on my windows laptop. By default, it uses the dos-style, as evidenced in my hex readout in gVim below: 0000000: 6865 6c6c 6f2c 2077 6f72 6c64 0d0a 7468 hello, world..th 0000010: 6973 2069 7320 6120 6c69 6e65 2074 6572 is is a line ter 0000020: 6d69 6e61 746f 7220 7465 7374 0d0a 0d0a minator test.... 0000030: 0d0a .. Now, this is easily changed in gVim: “set fileformat=unix”. After this setting, now my linefeeds are correct: 0000000: 6865 6c6c 6f2c 2077 6f72 6c64 0a74 6869 hello, world.thi 0000010: 7320 6973 2061 206c 696e 6520 7465 726d s is a line term 0000020: 696e 6174 6f72 2074 6573 740a 0a0a inator test... The guidance here is…use a good editor (hint..Notepad and Word are not on that list!)2.4KViews0likes6Comments
Pass Client Cert to a Specific URI
I am attempting to do SSL Offloading with a MDM solution by MobileIron. Everything seems to work fine with SSL offloading except for one URL that mobile devices use to reach a WebClip (web based appstore) that requires a client cert. With a standard type Virtual server with SSL offloading, the client just hangs and eventually times out while trying to reach the link. As soon as I switch the virtual server type to Performance Layer 4 it works. LIke I said, everything else works with the exception of this single feature, but this has to work. Is there a way to either just pass the client cert on to the back end for the specific URI or for any URI? /mifs/c/api/v1/client/$DEVICE_CLIENT_ID$/appstore I have a SSL Server profile enabled with the back end servers so I am not really doing SSL Offloading, I am just trying to get log data as the application does not provide much insight into what is going on and I have need to apply iRules to restict access to specific URIs from public locations which I cannot do with out an HTTP profile. Thanks401Views0likes2CommentsComparing iRule Control Statements
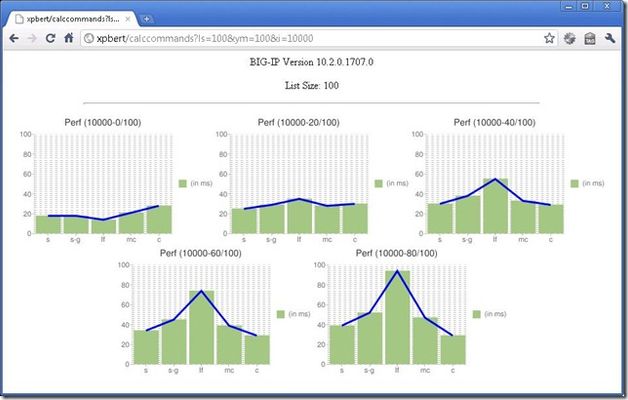
A ways back, we put up an article titled “Ten Steps to iRules Optimization - DevCentral” in which we illustrated a few simple steps to making your iRules faster. Item #3 in that article was “Understanding Control Statements”. I decided to put the findings to the test and build myself an iRule that performs built-in timing diagnostics for the various control statements and hopefully shed some more light on what command to choose in your situation of choice. The Commands The control statements that we seen used primarily in iRules are the following: switch – The switch command allows you to compare a value to a list of matching values and execute a script when a match is found. switch { “val1” { # do something } “val2” { # do something else } … } switch –glob – An extenstion to the switch command that allows for wildcard matching switch –glob { “val1” { # do something } “val2” { # do something else } … } if/elseif – A control statement that allows you to match arbitrary values together and execute a script when a match is found. if { $val equals “foo” } { # do something } elseif { $val equals “bar” } # do something else } … matchclass – Perform comparisons with the contents of a datagroup or TCL list. set match [matchclass “val” equals $::list]; class match – A datagroup-only command to perform extended comparisons on group values (LTM v10.0 and above). set match [class match “val” equals listname] The Variables Since the execution of a command is very very fast and the lowest resolution timer we can get is in milliseconds, we are required to execute the commands many times sequentially to get a meaningful number. Thus we need to allow for multiple iterations of the operations for each of the tests. The total number of comparisons we are doing also is a factor in how the command performs. For a single comparison (or a data group with one value), the commands will likely be equivalent and it will be a matter of choice. So, we will allow for multiple listsize values to determine how many comparisons will occur. Where the comparison occurs in the logic flow is also important. For a 1000 if/elseif command structure, comparing on the first match will be much faster than the last match. For this reason, I’ve used a modulus over the total listsize to generate the tests on. For a list size of 100, we will test item 1, 19, 39, 59, and 79 which should give a good sampling across various locations in the lists where a match occurs. Initialization In my attempt to test as many possible combinations as possible, as well as the pain of hard-coding a 10000 line long “if/elfeif” statement, I’ve taken some shortcuts (as illustrated in the various test snippets). In this code below, we check for query string parameters and then set default values if they are not specified. A comparison list is then generated with the matchlist variable. 1: #-------------------------------------------------------------------------- 2: # read in parameters 3: #-------------------------------------------------------------------------- 4: set listsize [URI::query [HTTP::uri] "ls"]; 5: set iterations [URI::query [HTTP::uri] "i"]; 6: set graphwidth [URI::query [HTTP::uri] "gw"]; 7: set graphheight [URI::query [HTTP::uri] "gh"]; 8: set ymax [URI::query [HTTP::uri] "ym"]; 9: 10: #-------------------------------------------------------------------------- 11: # set defaults 12: #-------------------------------------------------------------------------- 13: if { ("" == $iterations) || ($iterations > 10000) } { set iterations 500; } 14: if { "" == $listsize } { set listsize 5000; } 15: if { "" == $graphwidth } { set graphwidth 300; } 16: if { "" == $graphheight } { set graphheight 200; } 17: if { "" == $ymax } { set ymax 500; } 18: 19: set modulus [expr $listsize / 5]; 20: set autosize 0; 21: 22: #-------------------------------------------------------------------------- 23: # build lookup list 24: #-------------------------------------------------------------------------- 25: set matchlist "0"; 26: for {set i 1} {$i < $listsize} {incr i} { 27: lappend matchlist "$i"; 28: } 29: 30: set luri [string tolower [HTTP::path]] The Main iRule Logic The iRule has two main components. The first checks for the main page request of /calccommands. When that is given it will generate an HTML page that embeds all the report graphs. The graph images are passed back into the second switch condition where the specific test is performed and the a redirect is given for the Google Bar chart. 1: switch -glob $luri { 2: 3: "/calccommands" { 4: #---------------------------------------------------------------------- 5: # check for existence of class file. If it doesn't exist 6: # print out a nice error message. Otherwise, generate a page of 7: # embedded graphs that route back to this iRule for processing 8: #---------------------------------------------------------------------- 9: } 10: "/calccommands/*" { 11: #---------------------------------------------------------------------- 12: # Time various commands (switch, switch -glob, if/elseif, matchclass, 13: # class match) and generate redirect to a Google Bar Chart 14: #---------------------------------------------------------------------- 15: } 16: } Defining the Graphs The first request in to “/calccommands” will first test for the existence of the class file for the test. A class must be defined named “calc_nnn” where nnn is the listsize. Values in the list should be 0 to nnn-1. I used a simple perl script to generate class files of size 100, 1000, 5000, and 10000. The catch command is used to test for the existence of the class file. If it does not exist, then an error message is presented to the user. If the class file exists, then a HTML page is generated with 5 charts, breaking up the list index we are testing into between 1 and listsize. When the HTML response is build, it is sent back to the client with the HTTP::respond command. 1: "/calccommands/*" { 2: 3: #---------------------------------------------------------------------- 4: # Time various commands (switch, switch -glob, if/elseif, matchclass, 5: # class match) and generate redirect to a Google Bar Chart 6: #---------------------------------------------------------------------- 7: 8: set item [getfield $luri "/" 3] 9: set labels "|" 10: set values "" 11: 12: #---------------------------------------------------------------------- 13: # Switch 14: #---------------------------------------------------------------------- 15: 16: set expression "set t1 \[clock clicks -milliseconds\]; \n" 17: append expression "for { set y 0 } { \$y < $iterations } { incr y } { " 18: append expression "switch $item {" 19: foreach i $matchlist { 20: append expression "\"$i\" { } "; 21: } 22: append expression " } " 23: append expression " } \n" 24: append expression "set t2 \[clock clicks -milliseconds\]"; 25: 26: eval $expression; 27: 28: set duration [expr {$t2 - $t1}] 29: if { [expr {$duration < 0}] } { log local0. "NEGATIVE TIME ($item, matchclass: $t1 -> $t2"; } 30: append labels "s|"; 31: if { $values ne "" } { append values ","; } 32: append values "$duration"; 33: 34: if { $autosize && ($duration > $ymax) } { set ymax $duration } The Tests switch As I mentioned above, I cheated a bit with the generation of the test code. I found it too tedious to build a 10000 line iRule to test a 10000 switch statement, so I made use of the TCL eval command that allows you to execute a code block you define in a variable. The expression variable holds the section of code I am to execute for the given test. For the switch command, the first thing I do is take down the time before they start. Then a loop occurs for iterations times. This allows the clock counters to go high enough to build a useful report. Inside this look, I created a switch statement looking for the specified index item we are looking for in the list. Making the list content be strings of numbers made this very easy to do. The foreach item in the generated matchlist a switch comparison was added to the expression. Finally closing braces were added as was a final time. Then the switch expression was passed to the eval command which processed the code. Finally the duration was calculated by taking a difference in the two times and the labels and values variables were appended to with the results of the test. 1: "/calccommands/*" { 2: 3: #---------------------------------------------------------------------- 4: # Time various commands (switch, switch -glob, if/elseif, matchclass, 5: # class match) and generate redirect to a Google Bar Chart 6: #---------------------------------------------------------------------- 7: 8: set item [getfield $luri "/" 3] 9: set labels "|" 10: set values "" 11: 12: #---------------------------------------------------------------------- 13: # Switch 14: #---------------------------------------------------------------------- 15: 16: set expression "set t1 \[clock clicks -milliseconds\]; \n" 17: append expression "for { set y 0 } { \$y < $iterations } { incr y } { " 18: append expression "switch $item {" 19: foreach i $matchlist { 20: append expression "\"$i\" { } "; 21: } 22: append expression " } " 23: append expression " } \n" 24: append expression "set t2 \[clock clicks -milliseconds\]"; 25: 26: eval $expression; 27: 28: set duration [expr {$t2 - $t1}] 29: if { [expr {$duration < 0}] } { log local0. "NEGATIVE TIME ($item, matchclass: $t1 -> $t2"; } 30: append labels "s|"; 31: if { $values ne "" } { append values ","; } 32: append values "$duration"; 33: 34: if { $autosize && ($duration > $ymax) } { set ymax $duration } switch –glob Just for kicks, I wanted to see what adding “-glob” to the switch command would do. I didn’t make use of any wildcards in the comparisons. In fact, they were identical to the previous test. The only difference is the inclusion of the wildcard matching functionality. 1: #---------------------------------------------------------------------- 2: # Switch -glob 3: #---------------------------------------------------------------------- 4: 5: set expression "set t1 \[clock clicks -milliseconds\]; \n" 6: append expression "for { set y 0 } { \$y < $iterations } { incr y } { " 7: append expression "switch -glob $item {" 8: foreach i $matchlist { 9: append expression "\"$i\" { } "; 10: } 11: append expression " } " 12: append expression " } \n" 13: append expression "set t2 \[clock clicks -milliseconds\]"; 14: 15: eval $expression; 16: 17: set duration [expr {$t2 - $t1}] 18: if { [expr {$duration < 0}] } { log local0. "NEGATIVE TIME ($item, matchclass: $t1 -> $t2"; } 19: append labels "s-g|"; 20: if { $values ne "" } { append values ","; } 21: append values "$duration"; 22: 23: if { $autosize && ($duration > $ymax) } { set ymax $duration } If/elseif The if/elseif test was very similar to the switch command above. Timings were taken, but the only difference was the formation of the control statement. In this case, the first line used ‘if { $item eq \”$i\” } {}’ Subsequent entries prepended “else” to make the rest of the lines ‘elseif { $item eq \”$i\”} {}’. The evaluation of the expression was the same and the graph values were stored. 1: #---------------------------------------------------------------------- 2: # If/Elseif 3: #---------------------------------------------------------------------- 4: set z 0; 5: set y 0; 6: 7: set expression "set t1 \[clock clicks -milliseconds\]; \n" 8: append expression "for { set y 0 } { \$y < $iterations } { incr y } { " 9: foreach i $matchlist { 10: if { $z > 0 } { append expression "else"; } 11: append expression "if { $item eq \"$i\" } { } "; 12: incr z; 13: } 14: append expression " } \n"; 15: append expression "set t2 \[clock clicks -milliseconds\]"; 16: 17: eval $expression; 18: 19: set duration [expr {$t2 - $t1}] 20: if { [expr {$duration < 0}] } { log local0. "NEGATIVE TIME ($item, matchclass: $t1 -> $t2"; } 21: append labels "If|"; 22: if { $values ne "" } { append values ","; } 23: append values "$duration"; 24: 25: if { $autosize && ($duration > $ymax) } { set ymax $duration } matchclass My first attempt at this iRule, was to use matchclass against the generated matchlist variable. The results weren’t that good and we realized the matchclass’s benefits come when working with native classes, not TCL lists. I decided to keep this code the same, working on the auto-generated matchlist. The next test will illustrate the power of using native data groups (classes). 1: #---------------------------------------------------------------------- 2: # Matchclass on list 3: #---------------------------------------------------------------------- 4: 5: set expression "set t1 \[clock clicks -milliseconds\]; \n" 6: append expression "for { set y 0 } { \$y < $iterations } { incr y } { " 7: append expression "if { \[matchclass $item equals \$matchlist \] } { }" 8: append expression " } \n"; 9: append expression "set t2 \[clock clicks -milliseconds\]"; 10: 11: eval $expression; 12: 13: set duration [expr {$t2 - $t1}] 14: if { [expr {$duration < 0}] } { log local0. "NEGATIVE TIME ($item, matchclass: $t1 -> $t2"; } 15: append labels "mc|"; 16: if { $values ne "" } { append values ","; } 17: append values "$duration"; 18: 19: if { $autosize && ($duration > $ymax) } { set ymax $duration } class match In BIG-IP, version 10.0, we introduced the new “class” command that gives high-performance searches into data groups. I decided to include the pre-configured classes for this test. Data groups named “calc_nnn” must exist where nnn equls the listsize and it must contain that many elements for the test to be valid. 1: #---------------------------------------------------------------------- 2: # class match (with class) 3: #---------------------------------------------------------------------- 4: 5: set expression "set t1 \[clock clicks -milliseconds\]; \n" 6: append expression "for { set y 0 } { \$y < $iterations } { incr y } { " 7: append expression "if { \[class match $item equals calc_$listsize \] } { }" 8: append expression " } \n"; 9: append expression "set t2 \[clock clicks -milliseconds\]"; 10: 11: log local0. $expression; 12: 13: eval $expression; 14: 15: set duration [expr {$t2 - $t1}] 16: if { [expr {$duration < 0}] } { log local0. "NEGATIVE TIME ($item, matchclass: $t1 -> $t2"; } 17: append labels "c|"; 18: if { $values ne "" } { append values ","; } 19: append values "$duration"; 20: 21: if { $autosize && ($duration > $ymax) } { set ymax $duration } Chart Generation Once all of the tests have been run and the labels and values variables have all the data for the reports. The image is served up with a simple HTTP::redirect to the appropriate google chart server. I’ve made optimizations here to use the 0-9 prefix chart servers so that the browser could render the images quicker. 1: #---------------------------------------------------------------------- 2: # build redirect for the google chart and issue a redirect 3: #---------------------------------------------------------------------- 4: 5: set mod [expr $item % 10] 6: set newuri "http://${mod}.chart.apis.google.com/chart?chxl=0:${labels}&chxr=1,0,${ymax}&chxt=x,y" 7: append newuri "&chbh=a&chs=${graphwidth}x${graphheight}&cht=bvg&chco=A2C180&chds=0,${ymax}&chd=t:${values}" 8: append newuri "&chdl=(in+ms)&chtt=Perf+(${iterations}-${item}/${listsize})&chg=0,2&chm=D,0000FF,0,0,3,1" 9: 10: HTTP::redirect $newuri; The Results Several runs of the tests are shown below. In the first, the tests are run on a list of size 100 for 10000 iterations for each test. As you see for the first element in the matchlist, the if/elseif command is the winner, slightly edging out switch and then matchclass and class. But when we start searching deeper into the list for comparisons, the if/elseif takes longer and longer depending on how far down in the list you are checking. The other commands seem to grow in a linear fashion with the only exception being the class command. http://virtualserver/calccommands?ls=100&i=10000&ym=100 Next we move on to a slightly larger list with 1000 elements. For the first entry, we see that if if/elseif command takes the longest. The others are fairly equal. Again as we move deeper into the list, the other commands grow somewhat linearly in their time with the exception of class which again stays consistent regardless of where in the list it looks. http://virtualserver/calccommands?ls=1000&i=1000&ym=100 Finally, on a 5000 sized list, If is the clear loser regardless of where you are matching. switch and matchclass (on a list) are somewhat on par with eachother, but again the class command takes the lead. http://virtualserver/calccommands?ls=5000&i=500&ym=100 Observations Let’s take the first few bullets in our optimization article and see if they matched our observations here. Always think: "switch", "data group", and then "if/elseif" in that order. If you think in this order, then in most cases you will be better off. Use switch for < 100 comparisons. Switches are fastest for fewer than 100 comparisons but if you are making changes to the list frequently, then a data group might be more manageable. Use data groups for > 100 comparisons. Not only will your iRule be easier to read by externalizing the comparisons, but it will be easier to maintain and update. Order your if/elseif's with most frequent hits at the top. If/elseif's must perform the full comparison for each if and elseif. If you can move the most frequently hit match to the top, you'll have much less processing overhead. If you don't know which hits are the highest, think about creating a Statistics profile to dynamically store your hit counts and then modify you iRule accordingly. I think this list should be changed to “always use class match” but that’s not the best option for usability in some places. In situations where you are working with smaller lists of data, managing the comparisons inline will be more practical than having them in lots of little class files. Aside from that, I think based on the graphs above, all of the techniques are on target. Get The Code You can view the entire iRule for this article in the CodeShare - DevCentral under CommandPerformance. Related Articles on DevCentral Pacfiles R iRules? - DevCentral iRules Home Mitigating Slow HTTP Post DDoS Attacks With iRules... - DevCentral DevCentral Weekly Podcast 158 - Ologizing Your iRules Fun with Hash Performance and Google Charts - DevCentral iRules-O-Rama redirect and sorry server, new to irules - DevCentral 5-Minute iRules: What’s a URL? - DevCentral Network Optimization Won’t Fix Application Performance in the Cloud - DevCentral Self-Contained BIG-IP Provisioning with iRules and pyControl ... stop processing further irules on condition match - DevCentral Like a Matrushka, WAN Optimization is Nested - DevCentral iRules: Rewriting URIs for Fun and Profit2.1KViews0likes5CommentsSelf-Contained BIG-IP Provisioning with iRules and pyControl – Part 2
As I stated last week in Part 1, iRules work on the live data between client and server, and iControl works on the management plane out of band to collect information or to modify or create configuration objects. However, what if you could combine forces, wholly contained on your BIG-IP LTM? That’s the scenario I started tackling last week. In this second part, I’ll address the iRule and iControl components necessary to complete a provisioning task. Self-Contained BIG-IPProvisioning with iRules and pyControl - Part 1 The iRule code I’ll get the solution working prior to making it extensible and flashy. First thing I’ll do to enhance the test iRule from last week is to utilize the restful interface approach I used to access table information in this tech tip on Restful Access to BIG-IP Subtables - DevCentral . I want to pass an action, a pool name, and a pool member through the URL to the system. In this case, the action will be enable or disable, and the pool and pool member should be valid entries. In the event a pool or pool member is passed that is not valid, there is simple error checking in place, which will alert the client. Note also in the code below that I incorporated code from George’s basic auth tech tip. 1: when HTTP_REQUEST { 2: binary scan [md5 [HTTP::password]] H* password 3: 4: if { ([HTTP::path] starts_with "/provision") } { 5: if { [class lookup [HTTP::username] provisioners] equals $password } { 6: scan [lrange [split [URI::path [HTTP::uri]] "/"] 2 end-1] %s%s%s action pname pmem 7: if { [catch {[members $pname]} errmsg] && !($errmsg equals "")} { 8: if { [members -list $pname] contains "[getfield $pmem ":" 1] [getfield $pmem ":" 2]" } { 9: set pmstat1 [LB::status pool $pname member [getfield $pmem ":" 1] [getfield $pmem ":" 2]] 10: log local0. "#prov=$action,$pname,$pmem" 11: after 250 12: set pmstat2 [LB::status pool $pname member [getfield $pmem ":" 1] [getfield $pmem ":" 2]] 13: HTTP::respond 200 content "<html><body>Original Status<br />$pmem-$pmstat1<p>New Status<br />$pmem-$pmstat2</body></html>" 14: } else { HTTP::respond 200 content "$pmem not a valid pool member." } 15: } else { HTTP::respond 200 content "$pname not a valid pool." } 16: } else { HTTP::respond 401 WWW-Authenticate "Basic realm=\"Secured Area\"" } 17: 18: } 19: } I added the “after 250” command to give the pyControl script some time to receive the syslog event and process before checking the status again. This is strictly for display purposes back to the client. The pyControl code I already have the syslog listener in place, and now with the iRule passing real data, this is what arrives via syslog: <134>Oct 13 11:04:55 tmm tmm[4848]: Rule ltm_provisioning <HTTP_REQUEST>: #prov=enable,cacti-pool,10.10.20.200:80 Not really ready for processing, is it? So I need to manipulate the data a little to get it into manageable objects for pyControl. # Receive messages while True: data,addr = syslog_socket.recvfrom(1024) rawdata = data.split(' ')[-1] provdata = rawdata.split('=')[-1] dataset = provdata.split(',') dataset = map(string.strip, dataset) Splitting on whitespace removes all the syslog overhead, the I split again on the “=” sign to get the actual objects I need. Next, I split the data to eliminate the commons and create a list,and the finally, I strip any newline charcters (which happens to exist on the last element, the IP:port object). Now that I have the objects I need, I can go to work setting the enable/disable state on the pool members. Thankfully, the disable pool member pyControl code already exists in the iControl codeshare, I just need to do a little modification. None of the def’s need to change, so I added them as is. Because the arguments are coming from syslog and not from a command line, I have no need for the sys module, so I won’t import that. I do need to import string, though to strip the newline character in the map(string.strip, dataset) command above. The dataset object is a list and the elements are 0:action, 1:pool, 2:pool_member. pyControl expects the members to be a list, even if it’s only one member, which is true of this scenario. ### Process Pool, Pool Members, & Desired State ### POOL = dataset[1] members = [dataset[2]] sstate_seq = b.LocalLB.PoolMember.typefactory.create('LocalLB.PoolMember.MemberSessionStateSequence') sstate_seq.item = session_state_factory(b, members) session_objects = session_state_factory(b, members) if dataset[0] == 'enable': enable_member(b, session_objects) elif dataset[0] == 'disable': disable_member(b, session_objects) else: print "\nNo such action: \"dataset[0]\" " More error checking here, if the action passed was enable/disable, I call the appropriate def, otherwise, I log to console. OK. Time to test it out! Results In this video, I walk through an example of enabling/disabling a pool member Provision Through iRules The Fine Print Obviously, there is risk with such a system. Allowing provisioning of your application delivery through the data plane can be a dangerous thing, so tread carefully. Also, customizing syslog and installing and running pyControl on box will not survive hotfixes and upgrades, so processes would need to be in place to ensure functionality going forward. Finally, I didn’t cover ensuring the pyControl script is running in the background and is started on system boot, but that is a step that would be required as well. For test purposes, I just ran the script on the console. Conclusion There is an abundance of valuable and helpful information on how to utilize the BIG-IP system, iRules, and iControl. Without too much work on my own, I was able to gather snippets of code here and there to deliver a self-contained provisioning system. The system is short on functionality (toggling pool members), but could be extended with a little elbow grease and MUCH error checking. For the full setup, check out the LTM Provisioning via iRules wiki entry in Advanced Design and Configuration wiki. Related Articles HTTP Basic Access Authentication iRule Style > DevCentral > F5 ... F5 DevCentral > Community > Group Details - Python iControl Library Getting Started with pyControl v2: Installing on Windows ... Getting Started with pyControl v2: Installing on Ubuntu Desktop ... Experimenting with pyControl on LTM VE > DevCentral > F5 ... Getting Started with pyControl v2: Understanding the TypeFactory ... Getting Started with pyControl v2: Constructor Changes ... LTM 9.4.2+: Custom Syslog Configuration > DevCentral > F5 ... LTM 9.4.2+ Custom Syslog errors when bpsh used - DevCentral - F5 ... Custom syslog-ng facility - DevCentral - F5 DevCentral > Community ... Customizing syslog-ng f_local0 filter - DevCentral - F5 DevCentral ... How to write iRule log statements to a custom log file, and rotate ... Syslog locally and remote with specific facility level ... DevCentral Wiki: Syslog NG Email Configuration Technorati Tags: F5 DevCentral,pyControl,iControl,iRules,syslog-ng,provisioning286Views0likes0Comments
5 Years Later: OpenAJAX Who?
Five years ago the OpenAjax Alliance was founded with the intention of providing interoperability between what was quickly becoming a morass of AJAX-based libraries and APIs. Where is it today, and why has it failed to achieve more prominence? I stumbled recently over a nearly five year old article I wrote in 2006 for Network Computing on the OpenAjax initiative. Remember, AJAX and Web 2.0 were just coming of age then, and mentions of Web 2.0 or AJAX were much like that of “cloud” today. You couldn’t turn around without hearing someone promoting their solution by associating with Web 2.0 or AJAX. After reading the opening paragraph I remembered clearly writing the article and being skeptical, even then, of what impact such an alliance would have on the industry. Being a developer by trade I’m well aware of how impactful “standards” and “specifications” really are in the real world, but the problem – interoperability across a growing field of JavaScript libraries – seemed at the time real and imminent, so there was a need for someone to address it before it completely got out of hand. With the OpenAjax Alliance comes the possibility for a unified language, as well as a set of APIs, on which developers could easily implement dynamic Web applications. A unified toolkit would offer consistency in a market that has myriad Ajax-based technologies in play, providing the enterprise with a broader pool of developers able to offer long term support for applications and a stable base on which to build applications. As is the case with many fledgling technologies, one toolkit will become the standard—whether through a standards body or by de facto adoption—and Dojo is one of the favored entrants in the race to become that standard. -- AJAX-based Dojo Toolkit , Network Computing, Oct 2006 The goal was simple: interoperability. The way in which the alliance went about achieving that goal, however, may have something to do with its lackluster performance lo these past five years and its descent into obscurity. 5 YEAR ACCOMPLISHMENTS of the OPENAJAX ALLIANCE The OpenAjax Alliance members have not been idle. They have published several very complete and well-defined specifications including one “industry standard”: OpenAjax Metadata. OpenAjax Hub The OpenAjax Hub is a set of standard JavaScript functionality defined by the OpenAjax Alliance that addresses key interoperability and security issues that arise when multiple Ajax libraries and/or components are used within the same web page. (OpenAjax Hub 2.0 Specification) OpenAjax Metadata OpenAjax Metadata represents a set of industry-standard metadata defined by the OpenAjax Alliance that enhances interoperability across Ajax toolkits and Ajax products (OpenAjax Metadata 1.0 Specification) OpenAjax Metadata defines Ajax industry standards for an XML format that describes the JavaScript APIs and widgets found within Ajax toolkits. (OpenAjax Alliance Recent News) It is interesting to see the calling out of XML as the format of choice on the OpenAjax Metadata (OAM) specification given the recent rise to ascendancy of JSON as the preferred format for developers for APIs. Granted, when the alliance was formed XML was all the rage and it was believed it would be the dominant format for quite some time given the popularity of similar technological models such as SOA, but still – the reliance on XML while the plurality of developers race to JSON may provide some insight on why OpenAjax has received very little notice since its inception. Ignoring the XML factor (which undoubtedly is a fairly impactful one) there is still the matter of how the alliance chose to address run-time interoperability with OpenAjax Hub (OAH) – a hub. A publish-subscribe hub, to be more precise, in which OAH mediates for various toolkits on the same page. Don summed it up nicely during a discussion on the topic: it’s page-level integration. This is a very different approach to the problem than it first appeared the alliance would take. The article on the alliance and its intended purpose five years ago clearly indicate where I thought this was going – and where it should go: an industry standard model and/or set of APIs to which other toolkit developers would design and write such that the interface (the method calls) would be unified across all toolkits while the implementation would remain whatever the toolkit designers desired. I was clearly under the influence of SOA and its decouple everything premise. Come to think of it, I still am, because interoperability assumes such a model – always has, likely always will. Even in the network, at the IP layer, we have standardized interfaces with vendor implementation being decoupled and completely different at the code base. An Ethernet header is always in a specified format, and it is that standardized interface that makes the Net go over, under, around and through the various routers and switches and components that make up the Internets with alacrity. Routing problems today are caused by human error in configuration or failure – never incompatibility in form or function. Neither specification has really taken that direction. OAM – as previously noted – standardizes on XML and is primarily used to describe APIs and components - it isn’t an API or model itself. The Alliance wiki describes the specification: “The primary target consumers of OpenAjax Metadata 1.0 are software products, particularly Web page developer tools targeting Ajax developers.” Very few software products have implemented support for OAM. IBM, a key player in the Alliance, leverages the OpenAjax Hub for secure mashup development and also implements OAM in several of its products, including Rational Application Developer (RAD) and IBM Mashup Center. Eclipse also includes support for OAM, as does Adobe Dreamweaver CS4. The IDE working group has developed an open source set of tools based on OAM, but what appears to be missing is adoption of OAM by producers of favored toolkits such as jQuery, Prototype and MooTools. Doing so would certainly make development of AJAX-based applications within development environments much simpler and more consistent, but it does not appear to gaining widespread support or mindshare despite IBM’s efforts. The focus of the OpenAjax interoperability efforts appears to be on a hub / integration method of interoperability, one that is certainly not in line with reality. While certainly developers may at times combine JavaScript libraries to build the rich, interactive interfaces demanded by consumers of a Web 2.0 application, this is the exception and not the rule and the pub/sub basis of OpenAjax which implements a secondary event-driven framework seems overkill. Conflicts between libraries, performance issues with load-times dragged down by the inclusion of multiple files and simplicity tend to drive developers to a single library when possible (which is most of the time). It appears, simply, that the OpenAJAX Alliance – driven perhaps by active members for whom solutions providing integration and hub-based interoperability is typical (IBM, BEA (now Oracle), Microsoft and other enterprise heavyweights – has chosen a target in another field; one on which developers today are just not playing. It appears OpenAjax tried to bring an enterprise application integration (EAI) solution to a problem that didn’t – and likely won’t ever – exist. So it’s no surprise to discover that references to and activity from OpenAjax are nearly zero since 2009. Given the statistics showing the rise of JQuery – both as a percentage of site usage and developer usage – to the top of the JavaScript library heap, it appears that at least the prediction that “one toolkit will become the standard—whether through a standards body or by de facto adoption” was accurate. Of course, since that’s always the way it works in technology, it was kind of a sure bet, wasn’t it? WHY INFRASTRUCTURE SERVICE PROVIDERS and VENDORS CARE ABOUT DEVELOPER STANDARDS You might notice in the list of members of the OpenAJAX alliance several infrastructure vendors. Folks who produce application delivery controllers, switches and routers and security-focused solutions. This is not uncommon nor should it seem odd to the casual observer. All data flows, ultimately, through the network and thus, every component that might need to act in some way upon that data needs to be aware of and knowledgeable regarding the methods used by developers to perform such data exchanges. In the age of hyper-scalability and über security, it behooves infrastructure vendors – and increasingly cloud computing providers that offer infrastructure services – to be very aware of the methods and toolkits being used by developers to build applications. Applying security policies to JSON-encoded data, for example, requires very different techniques and skills than would be the case for XML-formatted data. AJAX-based applications, a.k.a. Web 2.0, requires different scalability patterns to achieve maximum performance and utilization of resources than is the case for traditional form-based, HTML applications. The type of content as well as the usage patterns for applications can dramatically impact the application delivery policies necessary to achieve operational and business objectives for that application. As developers standardize through selection and implementation of toolkits, vendors and providers can then begin to focus solutions specifically for those choices. Templates and policies geared toward optimizing and accelerating JQuery, for example, is possible and probable. Being able to provide pre-developed and tested security profiles specifically for JQuery, for example, reduces the time to deploy such applications in a production environment by eliminating the test and tweak cycle that occurs when applications are tossed over the wall to operations by developers. For example, the jQuery.ajax() documentation states: By default, Ajax requests are sent using the GET HTTP method. If the POST method is required, the method can be specified by setting a value for the type option. This option affects how the contents of the data option are sent to the server. POST data will always be transmitted to the server using UTF-8 charset, per the W3C XMLHTTPRequest standard. The data option can contain either a query string of the form key1=value1&key2=value2 , or a map of the form {key1: 'value1', key2: 'value2'} . If the latter form is used, the data is converted into a query string using jQuery.param() before it is sent. This processing can be circumvented by setting processData to false . The processing might be undesirable if you wish to send an XML object to the server; in this case, change the contentType option from application/x-www-form-urlencoded to a more appropriate MIME type. Web application firewalls that may be configured to detect exploitation of such data – attempts at SQL injection, for example – must be able to parse this data in order to make a determination regarding the legitimacy of the input. Similarly, application delivery controllers and load balancing services configured to perform application layer switching based on data values or submission URI will also need to be able to parse and act upon that data. That requires an understanding of how jQuery formats its data and what to expect, such that it can be parsed, interpreted and processed. By understanding jQuery – and other developer toolkits and standards used to exchange data – infrastructure service providers and vendors can more readily provide security and delivery policies tailored to those formats natively, which greatly reduces the impact of intermediate processing on performance while ensuring the secure, healthy delivery of applications. API Jabberwocky: You Say Tomay-to and I Say Potah-to OpenAjax Metadata 1.0 and the Adobe Dreamweaver Widget Browser OpenAjax Alliance AJAX-based Dojo Toolkit The Stealthy Ascendancy of JSON JSON Continues its Winning Streak Over XML JSON versus XML: Your Choice Matters More Than You Think I am in your HTTP headers, attacking your application The Web 2.0 API: From collaborating to compromised IT as a Service: A Stateless Infrastructure Architecture Model JSON Activity Streams and the Other Consumerization of IT350Views0likes0Comments
Embed images in an I-Rule with "HTTP::respond content" using only HTML
Hello everyone (this is my first post), Recently I was asked to write an I-Rule that served an HTML page when our server pool was unavailable. I thought this would be a piece of cake, until they demanded that the page include images. I did heavy forum searching and found several solutions to serve up images direclty from the F5, but they were all pretty involved/complicated for my tastes, so I came up with, what I believe is a new method. I encoded the images using the base64 algorithm. There are applications out there to do this, commands built into your OS depending on your machine, and even (my favorite) websites that will do this with the click of a button (great if your running a Microsoft OS). I've used http://www.opinionatedgeek.com/dotnet/tools/base64encode/ with great success. Keep in mind that the encoded image will make for one really long line of text. I have some up to 7,000 characters long. The following image tag will tell the browser to decode the image (or rather text at this point) on the fly: img src="data:image/gif;base64,INSERT_ENCODED_TEXT_HERE" I've attached a sample HTML (txt) file with the F5 image embeded so you can see some funtional HTML. The process is simple. Encode your image in base64 Create your I-Rule with HTTP::respond content Embed the encoded text in your HTML Image Tag Here is an example outage I-Rule Hello everyone (this is my first post), Recently I was asked to write an I-Rule that served an HTML page when our server pool was unavailable. I thought this would be a piece of cake, until they demanded that the page include images. I did heavy forum searching and found several solutions to serve up images direclty from the F5, but they were all pretty involved/complicated for my tastes, so I came up with, what I believe is a new method. I encoded the images using the base64 algorithm. There are applications out there to do this, commands built into your OS depending on your machine, and even (my favorite) websites that will do this with the click of a button (great if your running a Microsoft OS). I've used http://www.opinionatedgeek.com/dotnet/tools/base64encode/ with great success. Keep in mind that the encoded image will make for one really long line of text. I have some up to 7,000 characters long. The following image tag will tell the browser to decode the image (or rather text at this point) on the fly: img src="data:image/gif;base64,INSERT_ENCODED_TEXT_HERE" I've attached a sample HTML (txt) file with the F5 image embeded so you can see some funtional HTML. The process is simple. Encode your image in base64 Create your I-Rule with HTTP::respond content Embed the encoded text in your HTML Image Tag Here is an example outage I-Rule when HTTP_REQUEST { if {[active_members Pool_Name_Here] < 1} { HTTP::respond 503 content { html> body> center> h2>The Following Image has been embedded in this HTML file using base64 encodeing img src="data:image/gif;base64,INSERT_ENCODED_TEXT_HERE"> hr>I'm sure F5 won't mind me using their logo since this is after all, a document on how to embed images in an F5 HTTP::respond content command /center> /body> /html>325Views0likes1Comment