What Is BIG-IP?
tl;dr - BIG-IP is a collection of hardware platforms and software solutions providing services focused on security, reliability, and performance. F5's BIG-IP is a family of products covering software and hardware designed around application availability, access control, and security solutions. That's right, the BIG-IP name is interchangeable between F5's software and hardware application delivery controller and security products. This is different from BIG-IQ, a suite of management and orchestration tools, and F5 Silverline, F5's SaaS platform. When people refer to BIG-IP this can mean a single software module in BIG-IP's software family or it could mean a hardware chassis sitting in your datacenter. This can sometimes cause a lot of confusion when people say they have question about "BIG-IP" but we'll break it down here to reduce the confusion. BIG-IP Software BIG-IP software products are licensed modules that run on top of F5's Traffic Management Operation System® (TMOS). This custom operating system is an event driven operating system designed specifically to inspect network and application traffic and make real-time decisions based on the configurations you provide. The BIG-IP software can run on hardware or can run in virtualized environments. Virtualized systems provide BIG-IP software functionality where hardware implementations are unavailable, including public clouds and various managed infrastructures where rack space is a critical commodity. BIG-IP Primary Software Modules BIG-IP Local Traffic Manager (LTM) - Central to F5's full traffic proxy functionality, LTM provides the platform for creating virtual servers, performance, service, protocol, authentication, and security profiles to define and shape your application traffic. Most other modules in the BIG-IP family use LTM as a foundation for enhanced services. BIG-IP DNS - Formerly Global Traffic Manager, BIG-IP DNS provides similar security and load balancing features that LTM offers but at a global/multi-site scale. BIG-IP DNS offers services to distribute and secure DNS traffic advertising your application namespaces. BIG-IP Access Policy Manager (APM) - Provides federation, SSO, application access policies, and secure web tunneling. Allow granular access to your various applications, virtualized desktop environments, or just go full VPN tunnel. Secure Web Gateway Services (SWG) - Paired with APM, SWG enables access policy control for internet usage. You can allow, block, verify and log traffic with APM's access policies allowing flexibility around your acceptable internet and public web application use. You know.... contractors and interns shouldn't use Facebook but you're not going to be responsible why the CFO can't access their cat pics. BIG-IP Application Security Manager (ASM) - This is F5's web application firewall (WAF) solution. Traditional firewalls and layer 3 protection don't understand the complexities of many web applications. ASM allows you to tailor acceptable and expected application behavior on a per application basis . Zero day, DoS, and click fraud all rely on traditional security device's inability to protect unique application needs; ASM fills the gap between traditional firewall and tailored granular application protection. BIG-IP Advanced Firewall Manager (AFM) - AFM is designed to reduce the hardware and extra hops required when ADC's are paired with traditional firewalls. Operating at L3/L4, AFM helps protect traffic destined for your data center. Paired with ASM, you can implement protection services at L3 - L7 for a full ADC and Security solution in one box or virtual environment. BIG-IP Hardware BIG-IP hardware offers several types of purpose-built custom solutions, all designed in-house by our fantastic engineers; no white boxes here. BIG-IP hardware is offered via series releases, each offering improvements for performance and features determined by customer requirements. These may include increased port capacity, traffic throughput, CPU performance, FPGA feature functionality for hardware-based scalability, and virtualization capabilities. There are two primary variations of BIG-IP hardware, single chassis design, or VIPRION modular designs. Each offer unique advantages for internal and collocated infrastructures. Updates in processor architecture, FPGA, and interface performance gains are common so we recommend referring to F5's hardware pagefor more information.61KViews2likes3Comments
Configure the F5 BIG-IP as an Explicit Forward Web Proxy Using LTM
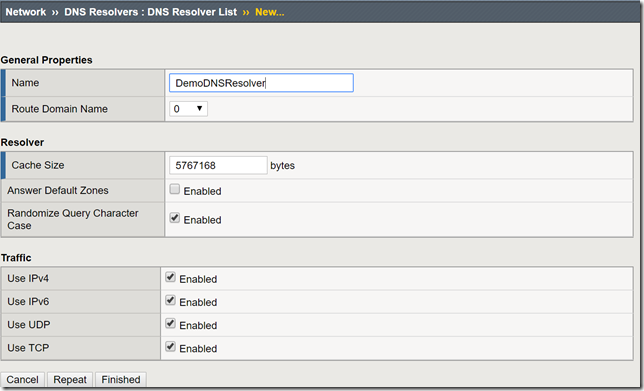
In a previous article, I provided a guide on using F5's Access Policy Manager (APM) and Secure Web Gateway (SWG) to provide forward web proxy services. While that guide was for organizations that are looking to provide secure internet access for their internal users, URL filtering as well as securing against both inbound and outbound malware, this guide will use only F5's Local Traffic Manager to allow internal clients external internet access. This week I was working with F5's very talented professional services team and we were presented with a requirement to allow workstation agents internet access to known secure sites to provide logs and analytics. Of course, this capability can be used to meet a number of other use cases, this was a real-world use case I wanted to share. So with that, let's get to it! Creating a DNS Resolver Navigate to Network > DNS Resolvers > click Create Name: DemoDNSResolver Leave all other settings at their defaults and click Finished Click the newly created DNS resolver object Click Forward Zones Click Add In this use case, we will be forwarding all requests to this DNS resolver. Name: . Address: 8.8.8.8 Note: Please use the correct DNS server for your use case. Service Port: 53 Click Add and Finished Creating a Network Tunnel Navigate to Network > Tunnels > Tunnel List > click Create Name: DemoTunnel Profile: tcp-forward Leave all other settings default and click Finished Create an http Profile Navigate to Local Traffic > Profiles > Services > HTTP > click Create Name: DemoExplicitHTTP Proxy Mode: Explicit Parent Profile: http-explict Scroll until you reach Explicit Proxy settings. DNS Resolver: DemoDNSResolver Tunnel Name: DemoTunnel Leave all other settings default and click Finish Create an Explicit Proxy Virtual Server Navigate to Local Traffic > Virtual Servers > click Create Name: explicit_proxy_vs Type: Standard Destination Address/Mask: 10.1.20.254 Note: This must be an IP address the internal clients can reach. Service Port: 8080 Protocol: TCP Note: This use case was for TCP traffic directed at known hosts on the internet. If you require other protocols or all, select the correct option for your use case from the drop-down menu. Protocol Profile (Client): f5-tcp-progressive Protocol Profile (Server): f5-tcp-wan HTTP Profile: DemoExplicitHTTP VLAN and Tunnel Traffic Enabled on: Internal Source Address Translation: Auto Map Leave all other settings at their defaults and click Finish. Create a Fast L4 Profile Navigate to Local Traffic > Profiles: Protocol: Fast L4 > click Create Name: demo_fastl4 Parent Profile: fastL4 Enable Loose Initiation and Loose Close as shown in the screenshot below. Click Finished Create a Wild Card Virtual Server In order to catch and forward all traffic to the BIG-IP's default gateway, we will create a virtual server to accept traffic from our explicit proxy virtual server created in the previous steps. Navigate to Local Traffic > Virtual Servers > Virtual Server List > click Create Name: wildcard_VS Type: Forwarding (IP) Source Address: 0.0.0.0/0 Destination Address: 0.0.0.0/0 Protocol: *All Protocols Service Port: 0 *All Ports Protocol Profile: demo_fastl4 VLAN and Tunnel Traffic: Enabled on...DemoTunnel Source Address Translation: Auto Map Leave all other settings at their defaults and click Finished. Testing and Validation Navigate to a workstation on your internal network. Launch Internet Explorer or the browser of your preference. Modify the proxy settings to reflect the explicit_proxy_VS created in previous steps. Attempt to access several sites and validate you are able to reach them. Whether successful or unsuccessful, navigate to Local Traffic > Virtual Servers > Virtual Server List > click the Statistics tab. Validate traffic is hitting both of the virtual servers created above. If it is not, for troubleshooting purposes only configure to the virtual servers to accept traffic on All VLANs and Tunnels as well as useful tools such as curl and tcpdump. You have now successfully configured your F5 BIG-IP to act as an explicit forward web proxy using LTM only. As stated above, this use case is not meant to fulfill all forward proxy use cases. If URL filtering and malware protection are required, APM and SWG integration should be considered. Until next time!33KViews6likes34Comments
ADFS Proxy Replacement on F5 BIG-IP
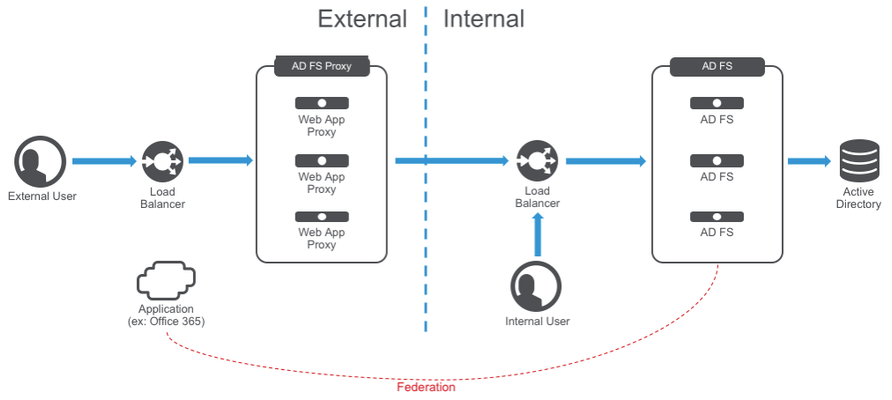
BIG-IP Access Policy Manager can now replace the need for Web Application Proxy servers providing security for your modern AD FS deployment with MS-ADFSPIP support released in BIG-IP v13.1. This article will provide a one stop shop for you to gather information on the solution and leverage it in your environment. What is an AD FS Proxy? AD FS proxies are Windows servers that provide access to external users to the AD FS farm in the internal network. This is done on a server called a Web Application Proxy (WAP). More recent versions of Active Directory Federation Services require the proxy to support MS-ADFSPIP (ADFS Proxy Integration Protocol) which involves client certificate auth between proxy and AD FS, trust establishment, header injection, and more. As noted above, BIG-IP APM v13.1 has support for MS-ADFSPIP. You can see Microsoft’s notes on this and supported third party proxies here, noting that F5 is on the list. Here’s a typical ADFS deployment: So what does BIG-IP do for me? Glad you asked! Here’s an example of the single tier deployment architecture. You can also split these roles into a two tier architecture. As you can see, BIG-IP is taking the roles of both load balancer and the web application proxies protecting AD FS. In this diagram we’re adding additional security with Advanced WAF, DDoS, and Network Firewall services. You can see the F5/Microsoft announcement at Ignite hereabout this new feature. If you want to understand more about the architecture, check out John Wagnon’s awesome lightboard lesson here. How do I deploy it? There are a few ways to do it. The simplest is with the latest iApp template to help you deploy everything, available from https://downloads.f5.com. Make sure you’re using at least v1.2.0rc6. You can also get the related deployment guide here. If you want to deploy manually, there are instructions in the deployment guide. The support article here also covers basic deployment and how the pieces work. Who doesn’t love reading support articles? For the admin the new feature comes down to this amazing simple checkbox: Checking a box and entering credentials is WAY easier than deploying multiple Windows servers, configuring them as WAPs, establishing trust, then maintaining and securing them going forward. Access Policy Manager will maintain that trust, exchanging certificates automatically before they expire with AD FS. Note that no access profile is assigned above. If you want one to add more security flexibility then the access profile is supported as well. Check the deployment guide for requirements. If you don’t use one, no access sessions are used. Here’s a quick video explaining the solution and demoing deployment using the iApp. What else can I do? You can add more security using access profiles to add preauthentication, multifactor, etc. A basic access policy (with Azure MFA optional) is included in the iApp. Also included in the iApp is network firewall policy deployment. You can add Advanced WAF features like brute force, credential stuffing, bot protection, and more if desired too.27KViews0likes49CommentsThe BIG-IP Application Security Manager Part 1: What is the ASM?
tl;dr - BIG-IP Application Security Manager (ASM) is a layer 7 web application firewall (WAF) available on F5's BIG-IP platforms. Introduction This article series was written a while back, but we are re-introducing it as a part of our Security Month on DevCentral. I hope you enjoy all the features of this very powerful module on the BIG-IP! This is the first of a 10-part series on the BIG-IP ASM. This module is a very powerful and effective tool for defending your applications and your peace of mind, but what is it really? And, how do you configure it correctly and efficiently? How can you take advantage of all the features it has to offer? Well, the purpose of this article series is to answer these fundamental questions. So, join me as we dive into this really cool technology called the BIG-IP ASM! The Basics The BIG-IP ASM is a Layer 7 ICSA-certified Web Application Firewall (WAF) that provides application security in traditional, virtual, and private cloud environments. It is built on TMOS...the universal product platform shared by all F5 BIG-IP products. It can run on any of the F5 Application Delivery Platforms...BIG-IP Virtual Edition, BIG-IP 2000 -> 11050, and all the VIPRION blades. It protects your applications from a myriad of network attacks including the OWASP Top 10 most critical web application security risks It is able to adapt to constantly-changing applications in very dynamic network environments It can run standalone or integrated with other modules like BIG-IP LTM, BIG-IP DNS, BIG-IP APM, etc Why A Layer 7 Firewall? Traditional network firewalls (Layer 3-4) do a great job preventing outsiders from accessing internal networks. But, these firewalls offer little to no support in the protection of application layer traffic. As David Holmes points out in his article series on F5 firewalls, threat vectors today are being introduced at all layers of the network. For example, the Slowloris and HTTP Flood attacks are Layer 7 attacks...a traditional network firewall would never stop these attacks. But, nonetheless, your application would still go down if/when it gets hit by one of these. So, it's important to defend your network with more than just a traditional Layer 3-4 firewall. That's where the ASM comes in... Some Key Features The ASM comes pre-loaded with over 2,200 attack signatures. These signatures form the foundation for the intelligence used to allow or block network traffic. If these 2,200+ signatures don't quite do the job for you, never fear...you can also build your own user-defined signatures. And, as we all know, network threats are always changing so the ASM is configured to download updated attack signatures on a regular basis. Also, the ASM offers several different policy building features. Policy building can be difficult and time consuming, especially for sites that have a large number of pages. For example, DevCentral has over 55,000 pages...who wants to hand-write the policy for that?!? No one has that kind of time. Instead, you can let the system automatically build your policy based on what it learns from your application traffic, you can manually build a policy based on what you know about your traffic, or you can use external security scanning tools (WhiteHat Sentinel, QualysGuard, IBM AppScan, Cenzic Hailstorm, etc) to build your policy. In addition, the ASM comes configured with pre-built policies for several popular applications (SharePoint, Exchange, Oracle Portal, Oracle Application, Lotus Domino, etc). Did you know? The BIG-IP ASM was the first WAF to integrate with a scanner. WhiteHat approached all the WAFs and asked about the concept of building a security policy around known vulnerabilities in the apps. All the other WAFs said "no"...F5 said "of course!" and thus began the first WAF-scanner integration. The ASM also utilizes Geolocation and IP address intelligence to allow for more sophisticated and targeted defense measures. You can allow/block users from specific locations around the world, and you can block IP addresses that have built a bad reputation on other sites around the Internet. If they were doing bad things on some other site, why let them access yours? The ASM is also built for Payment Card Industry Data Security Standard (PCI DSS) compliance. In fact, you can generate a real-time PCI compliance report at the click of a button! The ASM also comes loaded with the DataGuard feature that automatically blocks sensitive data (Credit Card numbers, SSN, etc) from being displayed in a browser. In addition to the PCI reports, you can generate on-demand charts and graphs that show just about every detail of traffic statistics that you need. The following screenshot is a representative sample of some real traffic that I pulled off a site that uses the ASM. Pretty powerful stuff! I could go on for days here...and I know you probably want me to, but I'll wrap it up for this first article. I hope you can see the value of the ASM both as a technical solution in the defense of your network and also a critical asset in the long-term strategic vision of your company. So, if you already have an ASM and want to know more about it or if you don't have one yet and want to see what you're missing, come on back for the next article where I will talk about the cool features of policy building. What is the BIG-IP ASM? Policy Building The Importance of File Types, Parameters, and URLs Attack Signatures XML Security IP Address Intelligence and Whitelisting Geolocation Data Guard Username and Session Awareness Tracking Event Logging26KViews4likes6CommentsSSL Profiles Part 8: Client Authentication
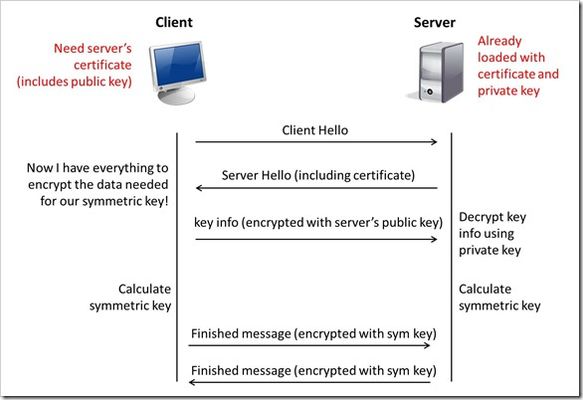
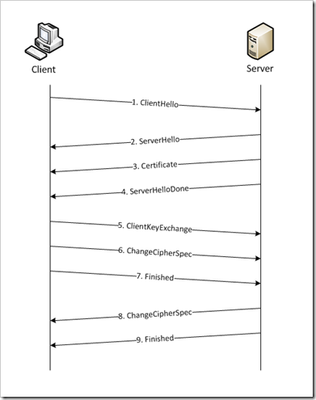
This is the eighth article in a series of Tech Tips that highlight SSL Profiles on the BIG-IP LTM. SSL Overview and Handshake SSL Certificates Certificate Chain Implementation Cipher Suites SSL Options SSL Renegotiation Server Name Indication Client Authentication Server Authentication All the "Little" Options This article will discuss the concept of Client Authentication, how it works, and how the BIG-IP system allows you to configure it for your environment. Client Authentication In a TLS handshake, the client and the server exchange several messages that ultimately result in an encrypted channel for secure communication. During this handshake, the client authenticates the server's identity by verifying the server certificate (for more on the TLS handshake, see SSL Overview and Handshake - Article 1in this series). Although the client always authenticates the server's identity, the server is not required to authenticate the client's identity. However, there are some situations that call for the server to authenticate the client. Client authentication is a feature that lets you authenticate users that are accessing a server. In client authentication, a certificate is passed from the client to the server and is verified by the server. Client authentication allow you to rest assured that the person represented by the certificate is the person you expect. Many companies want to ensure that only authorized users can gain access to the services and content they provide. As more personal and access-controlled information moves online, client authentication becomes more of a reality and a necessity. How Does Client Authentication Work? Before we jump into client authentication, let's make sure we understand server authentication. During the TLS handshake, the client authenticates the identity of the server by verifying the server's certificate and using the server's public key to encrypt data that will be used to compute the shared symmetric key. The server can only generate the symmetric key used in the TLS session if it can decrypt that data with its private key. The following diagram shows an abbreviated version of the TLS handshake that highlights some of these concepts. Ultimately, the client and server need to use a symmetric key to encrypt all communication during their TLS session. In order to calculate that key, the server shares its certificate with the client (the certificate includes the server's public key), and the client sends a random string of data to the server (encrypted with the server's public key). Now that the client and server each have the random string of data, they can each calculate (independently) the symmetric key that will be used to encrypt all remaining communication for the duration of that specific TLS session. In fact, the client and server both send a "Finished' message at the end of the handshake...and that message is encrypted with the symmetric key that they have both calculated on their own. So, if all that stuff works and they can both read each other's "Finished" message, then the server has been authenticated by the client and they proceed along with smiles on their collective faces (encrypted smiles, of course). You'll notice in the diagram above that the server sent its certificate to the client, but the client never sent its certificate to the server. When client authentication is used, the server still sends its certificate to the client, but it also sends a "Certificate Request" message to the client. This lets the client know that it needs to get its certificate ready because the next message from the client to the server (during the handshake) will need to include the client certificate. The following diagram shows the added steps needed during the TLS handshake for client authentication. So, you can see that when client authentication is enabled, the public and private keys are still used to encrypt and decrypt critical information that leads to the shared symmetric key. In addition to the public and private keys being used for authentication, the client and server both send certificates and each verifies the certificate of the other. This certificate verification is also part of the authentication process for both the client and the server. The certificate verification process includes four important checks. If any of these checks do not return a valid response, the certificate verification fails (which makes the TLS handshake fail) and the session will terminate. These checks are as follows: Check digital signature Check certificate chain Check expiration date and validity period Check certificate revocation status Here's how the client and server accomplish each of the checks for client authentication: Digital Signature: The client sends a "Certificate Verify" message that contains a digitally signed copy of the previous handshake message. This message is signed using the client certificate's private key. The server can validate the message digest of the digital signature by using the client's public key (which is found in the client certificate). Once the digital signature is validated, the server knows that public key belonging to the client matches the private key used to create the signature. Certificate Chain: The server maintains a list of trusted CAs, and this list determines which certificates the server will accept. The server will use the public key from the CA certificate (which it has in its list of trusted CAs) to validate the CA's digital signature on the certificate being presented. If the message digest has changed or if the public key doesn't correspond to the CA's private key used to sign the certificate, the verification fails and the handshake terminates. Expiration Date and Validity Period: The server compares the current date to the validity period listed in the certificate. If the expiration date has not passed and the current date is within the period, everything is good. If it's not, then the verification fails and the handshake terminates. Certificate Revocation Status: The server compares the client certificate to the list of revoked certificates on the system. If the client certificate is on the list, the verification fails and the handshake terminates. As you can see, a bunch of stuff has to happen in just the right way for the Client-Authenticated TLS handshake to finalize correctly. But, all this is in place for your own protection. After all, you want to make sure that no one else can steal your identity and impersonate you on a critically important website! BIG-IP Configuration Now that we've established the foundation for client authentication in a TLS handshake, let's figure out how the BIG-IP is set up to handle this feature. The following screenshot shows the user interface for configuring Client Authentication. To get here, navigate to Local Traffic > Profiles > SSL > Client. The Client Certificate drop down menu has three settings: Ignore (default), Require, and Request. The "Ignore" setting specifies that the system will ignore any certificate presented and will not authenticate the client before establishing the SSL session. This effectively turns off client authentication. The "Require" setting enforces client authentication. When this setting is enabled, the BIG-IP will request a client certificate and attempt to verify it. An SSL session is established only if a valid client certificate from a trusted CA is presented. Finally, the "Request" setting enables optional client authentication. When this setting is enabled, the BIG-IP will request a client certificate and attempt to verify it. However, an SSL session will be established regardless of whether or not a valid client certificate from a trusted CA is presented. The Request option is often used in conjunction with iRules in order to provide selective access depending on the certificate that is presented. For example: let's say you would like to allow clients who present a certificate from a trusted CA to gain access to the application while clients who do not provide the required certificate be redirected to a page detailing the access requirements. If you are not using iRules to enforce a different outcome based on the certificate details, there is no significant benefit to using the "Request" setting versus the default "Ignore" setting. In both cases, an SSL session will be established regardless of the certificate presented. Frequency specifies the frequency of client authentication for an SSL session. This menu offers two options: Once (default) and Always. The "Once" setting specifies that the system will authenticate the client only once for an SSL session. The "Always"setting specifies that the system will authenticate the client once when the SSL session is established as well as each time that session is reused. The Retain Certificate box is checked by default. When checked, the client certificate is retained for the SSL session. Certificate Chain Traversal Depth specifies the maximum number of certificates that can be traversed in a client certificate chain. The default for this setting is 9. Remember that "Certificate Chain" part of the verification checks? This setting is where you configure the depth that you allow the server to dig for a trusted CA. For more on certificate chains, see article 2 of this SSL series. Trusted Certificate Authorities setting is used to specify the BIG-IP's Trusted Certificate Authorities store. These are the CAs that the BIG-IP trusts when it verifies a client certificate that is presented during client authentication. The default value for the Trusted Certificate Authorities setting is None, indicating that no CAs are trusted. Don't forget...if the BIG-IP Client Certificate menu is set to Require but the Trusted Certificate Authorities is set to None, clients will not be able to establish SSL sessions with the virtual server. The drop down list in this setting includes the name of all the SSL certificates installed in the BIG-IP's /config/ssl/ssl.crt directory. A newly-installed BIG-IP system will include the following certificates: default certificate and ca-bundle certificate. The default certificate is a self-signed server certificate used when testing SSL profiles. This certificate is not appropriate for use as a Trusted Certificate Authorities certificate bundle. The ca-bundle certificate is a bundle of CA certificates from most of the well-known PKIs around the world. This certificate may be appropriate for use as a Trusted Certificate Authorities certificate bundle. However, if this bundle is specified as the Trusted Certificate Authorities certificate store, any valid client certificate that is signed by one of the popular Root CAs included in the default ca-bundle.crt will be authenticated. This provides some level of identification, but it provides very little access control since almost any valid client certificate could be authenticated. If you want to trust only certificates signed by a specific CA or set of CAs, you should create and install a bundle containing the certificates of the CAs whose certificates you trust. The bundle must also include the entire chain of CA certificates necessary to establish a chain of trust. Once you create this new certificate bundle, you can select it in the Trusted Certificate Authorities drop down menu. The Advertised Certificate Authorities setting is used to specify the CAs that the BIG-IP advertises as trusted when soliciting a client certificate for client authentication. The default value for the Advertised Certificate Authorities setting is None, indicating that no CAs are advertised. When set to None, no list of trusted CAs is sent to a client with the certificate request. If the Client Certificate menu is set to Require or Request, you can configure the Advertised Certificate Authorities setting to send clients a list of CAs that the server is likely to trust. Like the Trusted Certificate Authorities list, the Advertised Certificate Authorities drop down list includes the name of all the SSL certificates installed in the BIG-IP /config/ssl/ssl.crt directory. A newly-installed BIG-IP system includes the following certificates: default certificate and ca-bundle certificate. The default certificate is a self-signed server certificate used for testing SSL profiles. This certificate is not appropriate for use as an Advertised Certificate Authorities certificate bundle. The ca-bundle certificate is a bundle of CA certificates from most of the well-known PKIs around the world. This certificate may be appropriate for use as an Advertised Certificate Authorities certificate bundle. If you want to advertise only a specific CA or set of CAs, you should create and install a bundle containing the certificates of the CA to advertise. Once you create this new certificate bundle, you can select it in the Advertised Certificate Authorities setting drop down menu. You are allowed to configure the Advertised Certificate Authorities setting to send a different list of CAs than that specified for the Trusted Certificate Authorities. This allows greater control over the configuration information shared with unknown clients. You might not want to reveal the entire list of trusted CAs to a client that does not automatically present a valid client certificate from a trusted CA. Finally, you should avoid specifying a bundle that contains a large number of certificates when you configure the Advertised Certificate Authorities setting. This will cut down on the number of certificates exchanged during a client SSL handshake. The maximum size allowed by the BIG-IP for native SSL handshake messages is 14,304 bytes. Most handshakes don't result in large message lengths, but if the SSL handshake is negotiating a native cipher and the total length of all messages in the handshake exceeds the 14,304 byte threshold, the handshake will fail. The Certificate Revocation List (CRL) setting allows you to specify a CRL that the BIG-IP will use to check revocation status of a certificate prior to authenticating a client. If you want to use a CRL, you must upload it to the /config/ssl/ssl.crl directory on the BIG-IP. The name of the CRL file may then be entered in the CRL setting dialog box. Note that this box will offer no drop down menu options until you upload a CRL file to the BIG-IP. Since CRLs can quickly become outdated, you should use either OCSP or CRLDP profiles for more robust and current verification functionality. Conclusion Well, that wraps up our discussion on Client Authentication. I hope the information helped, and I hope you can use this to configure your BIG-IP to meet the needs of your specific network environment. Be sure to come back for our next article in the SSL series. As always, if you have any other questions, feel free to post a question here or Contact Us directly. See you next time!23KViews1like21CommentsSSL Profiles Part 7: Server Name Indication
This is the seventh article in a series of Tech Tips that highlight SSL Profiles on the BIG-IP LTM. The other articles are: SSL Overview and Handshake SSL Certificates Certificate Chain Implementation Cipher Suites SSL Options SSL Renegotiation Server Name Indication Client Authentication Server Authentication All the "Little" Options This article will discuss the concept of Server Name Indication (SNI) and how the BIG-IP system allows you to configure it for your environment. What is Server Name Indication? SNI (listed in RFC 4366) is an extension to the TLS protocol that allows the client to include the requested hostname in the first message of the SSL handshake (Client Hello). This allows the server to determine the correct named host for the request and setup the connection accordingly from the start. Prior to the introduction of SNI, the client could not establish secure connections to multiple virtual servers hosted on a single IP address. This happened because the destination server name can only be decoded from the HTTP request header after the SSL connection has been established. As you can see from the following diagram (taken from Jason Rahm's first articlein this series), the standard TLS handshake involves several messages between the client and the server. The server sends the certificate (step 3) to the client long before the handshake is complete. If a web server is used to host multiple DNS hostnames on a single IP address, the certificate passing between the server and the client could get problematic. Using the standard TLS protocol, the server might send the wrong certificate to the client because it does not yet know which certificate the client is looking for. Then, if the client receives a certificate with the wrong name, it will either abort the connection (assuming a Man-in-the-Middle attack) or at least display a warning page to the user stating that there is a problem with the certificate. This scenario is shown in the following figure. A client wants to visit https://www.securesite1.com, but the virtual web server doesn't know to pass the certificate for securesite1.com until it finishes the TLS handshake and reads the HTTP request header from the client. This is where SNI comes in really handy. With the introduction of SNI, the client can indicate the name of the server to which he is attempting to connect as part of the "Client Hello" message in the handshake process. The server then uses this information to select the appropriate certificate to return to the client when it sends back the "Server Hello" packet during the handshake. This allows a server to present multiple certificates on the same IP address and port number and thus allows multiple secure (HTTPS) sites to be served off the same IP address without requiring all the sites to use the same certificate. Having this extension available (per RFC 4366) is a great feature, but it does no good if a client is using a browser that doesn't send the correct SNI message to the server. So, to make SNI practical, the vast majority of your users must use web browsers that support it. Browsers that do not support SNI will be presented with the server's default certificate and are likely to receive a certificate warning. According to Wikipedia, the following browsers support SNI: Internet Explorer 7 or later, on Windows Vista or higher. Does not work on Windows XP, even Internet Explorer 8 (the support of this feature is not browser version dependent, it depends on SChannel system component which introduced the support of TLS SNI extension, starting from Windows Vista, not XP). Mozilla Firefox 2.0 or later Opera 8.0 (2005) or later (the TLS 1.1 protocol must be enabled) Opera Mobile at least version 10.1 beta on Android Google Chrome (Vista or higher. XP on Chrome 6 or newer. OS X 10.5.7 or higher on Chrome 5.0.342.1 or newer) Safari 3.0 or later (Mac OS X 10.5.6 or higher and Windows Vista or higher) Konqueror/KDE 4.7 or later MobileSafari in Apple iOS 4.0 or later Android default browser on Honeycomb (v3.x) or newer Windows Phone 7 MicroB on Maemo Odyssey on MorphOS Now that you know the background of SNI, let's dig into how the BIG-IP is set up for SNI configuration. BIG-IP Configuration Beginning in v11.1.0, the BIG-IP allows you to assign multiple SSL profiles to a virtual server for supporting the use of the TLS SNI feature. The TLS SNI feature is not available in previous BIG-IP versions, so you'll want to upgrade if you are not on v11.1.0 or higher! To support this feature, a virtual server must be assigned a default SSL profile for fallback as well as one SSL profile per HTTPS site. The fallback SSL profile is used when the server name does not match the client request or when the browser does not support the SNI extensions. Using the example from the figures above, suppose you need to host the three domains securesite1.com, securesite2.com, and securesite3.com on the same HTTPS virtual server. Each domain has its own server certificate to use, such as securesite1.crt, securesite2.crt, and securesite3.crt, and each has different security requirements. To ensure that the BIG-IP presents the correct certificate to the browser, you enable SNI, which sends the name of a domain as part of the TLS negotiation. To enable SNI, you configure the Server Name and other settings on an SSL profile, and then assign the profile to a virtual server. For SSL profiles (Client and Server), you type the name for the HTTPS site in the Server Name box. SNI configuration is found by navigating to Local Traffic > Profiles > SSL > Client | Server. The following screenshot shows the three settings used for SNI in the BIG-IP. Server Name specifies the fully qualified DNS hostname of the server that is used in SNI communications. Using the server name, the Local Traffic Manager can choose from multiple SSL profiles prior to the SSL Handshake. If no value is specified, the system uses the Common Name value from the default certificate. The default for this setting leaves the name blank. Default SSL Profile for SNI indicates that the system uses this profile as the default SSL profile when there is no match to the server name, or when the client provides no SNI extension support. Note that when assigning multiple SSL profiles to a single virtual server, you can enable this setting on one Client SSL profile only and on one Server SSL profile only. The default for this setting is unchecked. Require Peer SNI support requires that all network peers provide SNI support as well. If you enable both "Default SSL Profile for SNI" and "Require Peer SNI Support," the system terminates the connection when the client provides no SNI extension. The default for this setting is unchecked. Conclusion I hope this helps with setting up this great feature in your environment. SNI is a powerful tool, and it could go a long way in saving you precious IP addresses for your secure sites! As we noted before, this feature is only supported in BIG-IP version 11.1.0 and later. If you are using a version prior to 11.1.0, you can read this articleon DevCentral that shows how you can use an iRule to take advantage of SNI on previous versions. Finally, you can read more on our DevCentral Wiki about using iRules for SNI. Well, thanks for reading about SNI. Be sure to come back for the next article in the SSL series where I will talk about SSL Forward Proxy. See you then!22KViews1like10CommentsWhat is Load Balancing?
tl;dr - Load Balancing is the process of distributing data across disparate services to provide redundancy, reliability, and improve performance. The entire intent of load balancing is to create a system that virtualizes the "service" from the physical servers that actually run that service. A more basic definition is to balance the load across a bunch of physical servers and make those servers look like one great big server to the outside world. There are many reasons to do this, but the primary drivers can be summarized as "scalability," "high availability," and "predictability." Scalability is the capability of dynamically, or easily, adapting to increased load without impacting existing performance. Service virtualization presented an interesting opportunity for scalability; if the service, or the point of user contact, was separated from the actual servers, scaling of the application would simply mean adding more servers or cloud resources which would not be visible to the end user. High Availability (HA) is the capability of a site to remain available and accessible even during the failure of one or more systems. Service virtualization also presented an opportunity for HA; if the point of user contact was separated from the actual servers, the failure of an individual server would not render the entire application unavailable. Predictability is a little less clear as it represents pieces of HA as well as some lessons learned along the way. However, predictability can best be described as the capability of having confidence and control in how the services are being delivered and when they are being delivered in regards to availability, performance, and so on. A Little Background Back in the early days of the commercial Internet, many would-be dot-com millionaires discovered a serious problem in their plans. Mainframes didn't have web server software (not until the AS/400e, anyway) and even if they did, they couldn't afford them on their start-up budgets. What they could afford was standard, off-the-shelf server hardware from one of the ubiquitous PC manufacturers. The problem for most of them? There was no way that a single PC-based server was ever going to handle the amount of traffic their idea would generate and if it went down, they were offline and out of business. Fortunately, some of those folks actually had plans to make their millions by solving that particular problem; thus was born the load balancing market. In the Beginning, There Was DNS Before there were any commercially available, purpose-built load balancing devices, there were many attempts to utilize existing technology to achieve the goals of scalability and HA. The most prevalent, and still used, technology was DNS round-robin. Domain name system (DNS) is the service that translates human-readable names (www.example.com) into machine recognized IP addresses. DNS also provided a way in which each request for name resolution could be answered with multiple IP addresses in different order. Figure 1: Basic DNS response for redundancy The first time a user requested resolution for www.example.com, the DNS server would hand back multiple addresses (one for each server that hosted the application) in order, say 1, 2, and 3. The next time, the DNS server would give back the same addresses, but this time as 2, 3, and 1. This solution was simple and provided the basic characteristics of what customer were looking for by distributing users sequentially across multiple physical machines using the name as the virtualization point. From a scalability standpoint, this solution worked remarkable well; probably the reason why derivatives of this method are still in use today particularly in regards to global load balancing or the distribution of load to different service points around the world. As the service needed to grow, all the business owner needed to do was add a new server, include its IP address in the DNS records, and voila, increased capacity. One note, however, is that DNS responses do have a maximum length that is typically allowed, so there is a potential to outgrow or scale beyond this solution. This solution did little to improve HA. First off, DNS has no capability of knowing if the servers listed are actually working or not, so if a server became unavailable and a user tried to access it before the DNS administrators knew of the failure and removed it from the DNS list, they might get an IP address for a server that didn't work. Proprietary Load Balancing in Software One of the first purpose-built solutions to the load balancing problem was the development of load balancing capabilities built directly into the application software or the operating system (OS) of the application server. While there were as many different implementations as there were companies who developed them, most of the solutions revolved around basic network trickery. For example, one such solution had all of the servers in a cluster listen to a "cluster IP" in addition to their own physical IP address. Figure 2: Proprietary cluster IP load balancing When the user attempted to connect to the service, they connected to the cluster IP instead of to the physical IP of the server. Whichever server in the cluster responded to the connection request first would redirect them to a physical IP address (either their own or another system in the cluster) and the service session would start. One of the key benefits of this solution is that the application developers could use a variety of information to determine which physical IP address the client should connect to. For instance, they could have each server in the cluster maintain a count of how many sessions each clustered member was already servicing and have any new requests directed to the least utilized server. Initially, the scalability of this solution was readily apparent. All you had to do was build a new server, add it to the cluster, and you grew the capacity of your application. Over time, however, the scalability of application-based load balancing came into question. Because the clustered members needed to stay in constant contact with each other concerning who the next connection should go to, the network traffic between the clustered members increased exponentially with each new server added to the cluster. The scalability was great as long as you didn't need to exceed a small number of servers. HA was dramatically increased with these solutions. However, since each iteration of intelligence-enabling HA characteristics had a corresponding server and network utilization impact, this also limited scalability. The other negative HA impact was in the realm of reliability. Network-Based Load balancing Hardware The second iteration of purpose-built load balancing came about as network-based appliances. These are the true founding fathers of today's Application Delivery Controllers. Because these boxes were application-neutral and resided outside of the application servers themselves, they could achieve their load balancing using much more straight-forward network techniques. In essence, these devices would present a virtual server address to the outside world and when users attempted to connect, it would forward the connection on the most appropriate real server doing bi-directional network address translation (NAT). Figure 3: Load balancing with network-based hardware The load balancer could control exactly which server received which connection and employed "health monitors" of increasing complexity to ensure that the application server (a real, physical server) was responding as needed; if not, it would automatically stop sending traffic to that server until it produced the desired response (indicating that the server was functioning properly). Although the health monitors were rarely as comprehensive as the ones built by the application developers themselves, the network-based hardware approach could provide at least basic load balancing services to nearly every application in a uniform, consistent manner—finally creating a truly virtualized service entry point unique to the application servers serving it. Scalability with this solution was only limited by the throughput of the load balancing equipment and the networks attached to it. It was not uncommon for organization replacing software-based load balancing with a hardware-based solution to see a dramatic drop in the utilization of their servers. HA was also dramatically reinforced with a hardware-based solution. Predictability was a core component added by the network-based load balancing hardware since it was much easier to predict where a new connection would be directed and much easier to manipulate. The advent of the network-based load balancer ushered in a whole new era in the architecture of applications. HA discussions that once revolved around "uptime" quickly became arguments about the meaning of "available" (if a user has to wait 30 seconds for a response, is it available? What about one minute?). This is the basis from which Application Delivery Controllers (ADCs) originated. The ADC Simply put, ADCs are what all good load balancers grew up to be. While most ADC conversations rarely mention load balancing, without the capabilities of the network-based hardware load balancer, they would be unable to affect application delivery at all. Today, we talk about security, availability, and performance, but the underlying load balancing technology is critical to the execution of all. Next Steps Ready to plunge into the next level of Load Balancing? Take a peek at these resources: Go Beyond POLB (Plain Old Load Balancing) The Cloud-Ready ADC BIG-IP Virtual Edition Products, The Virtual ADCs Your Application Delivery Network Has Been Missing Cloud Balancing: The Evolution of Global Server Load Balancing22KViews0likes1Comment
Understanding IPSec IKEv1 negotiation on Wireshark
Related Articles: Understanding IPSec IKEv2 negotiation on Wireshark 1. The Big Picture First 6 Identity Protection (Main Mode) messages negotiate security parameters to protect the next 3 messages (Quick Mode) and whatever is negotiated in Phase 2 is used to protect production traffic (ESP or AH, normally ESP for site-site VPN). We call first 6 messages Phase 1 and last 3 messages as Phase 2. Sample pcap:IPSEC-tunnel-capture-1.pcap(for instructions on how to decrypt it just go to website where I got this sample capture:http://ruwanindikaprasanna.blogspot.com/2017/04/ipsec-capture-with-decryption.html) 2. Phase 1 2.1 Policy Negotiation Both peers add a unique SPI just to uniquely identify each side's Security Association (SA): Inframe #1, the Initiator (.70) sends a set of Proposals containing a set of security parameters (Transforms) that Responder (.71) can pick if it matches its local policies: Fair enough, in frame #2 the Responder (.71) picks one of theTransforms: 2.2 DH Key Exchange Then, next 2 Identity Protection packets both peers exchange Diffie-Hellman public key values and nonces (random numbers) which will then allow both peers to agree on a shared secret key: With DH public key value and the nonce both peers will generate a seed key called SKEYID. A further 3 session keys will be generated using this seed key for different purposes: SKEYID_d(d for derivative): not used by Phase 1. It is used as seed key for Phase2 keys, i.e. seed key for production traffic keys in Plain English. SKEYID_a(a for authentication): this key is used to protect message integrity in every subsequent packets as soon as both peers are authenticated (peers will authenticate each other in next 2 packets). Yes, I know, we verify the integrity by using a hash but throwing a key into a hash adds stronger security to hash and it's called HMAC. SKEYID_e(e for encryption): you'll see that the next 2 packets are also encrypted. As selected encryption algorithm for this phase was AES-CBC (128-bits) then we use AES with this key to symmetrically encrypt further data. Nonceis just to protect against replay attacks by adding some randomness to key generation 2.3 Authentication The purpose of this exchange is to confirm each other's identity. If we said we're going to do this using pre-shared keys then verification consists of checking whether both sides has the same pre-shared key. If it is RSA certificate then peers exchange RSA certificates and assuming the CA that signed each side is trusted then verification complete successfully. In our case, this is done via pre-shared keys: In packet #5 the Initiator sends a hash generated using pre-shared key set as key material so that only those who possess pre-master key can do it: The responder performs the same calculation and confirms the hash is correct. Responder also sends a similar packet back to Initiator in frame #6 but I skipped for brevity. Now we're ready for Phase 2. 3. Phase 2 The purpose of this phase is to establish the security parameters that will be used for production traffic (IPSec SA): Now, Initiator sends its proposals to negotiate the security parameters for production traffic as mentioned (the highlighted yellow proposal is just a sample as the rest is collapsed -this is frame #7): Note:Identification payload carries source and destination tunnel IP addresses and if this doesn't match what is configured on both peers then IPSec negotiation will not proceed. Then, in frame #8 we see that Responder picked one of the Proposals: Frame #9 is just an ACK to the picked proposal confirming that Initiator accepted it: I just highlighted the Hash here to reinforce the fact that since both peers were authenticated in Phase 1, all subsequent messages are authenticated and a new hash (HMAC) is generated for each packet.21KViews1like0Comments
SNI Routing with BIG-IP
In the previous article, The Three HTTP Routing Patterns, Lori MacVittie covers 3 methods of routing. Today we will look at Server Name Indication (SNI) routing as an additional method of routing HTTPS or any protocol that uses TLS and SNI. Using SNI we can route traffic to a destination without having to terminate the SSL connection. This enables several benefits including: Reduced number of Public IPs Simplified configuration More intelligent routing of TLS traffic Terminating SSL Connections When you havea SSL certificate and key you can perform the cryptographic actions required to encrypt traffic using TLS. This is what I refer to as “terminating the SSL connection” throughout this article. When you want to route traffic this is a chickenand an egg problem, becausefor TLS traffic you want to be able to route the traffic by being able to inspect the contents, but this normally requires being able to “terminate the SSL connection”. The goal of this article is to layer in traffic routing for TLS traffic without having to require having/knowing the original SSL certificate and key. Server Name Indication (SNI) SNI is a TLS extension that makes it possible to "share" certificates on a single IP address. This is possible due to a client using a TLS extension that requests a specific name before the server responds with a SSL certificate. Prior to SNI, the other options would be a wildcard certificate or Subject Alternative Name (SAN) that allows you to specify multiple names with a single certificate. SNI with Virtual Servers It has been possible to use SNI on F5 BIG-IP since TMOS 11.3.0. The following KB13452 outlines how it can be configured. In this scenario (from the KB article) the BIG-IP is terminating the SSL connection. Not all clients support SNI and you will always need to specify a “fallback” profile that will be used if a SNI name is not used or matched. The next example will look at how to use SNI without terminating the SSL connection. SNI Routing Occasionally you may have the need to have a hybrid configuration of terminating SSL connections on the BIG-IP and sending connections without terminating SSL. One method is to create two separate virtual servers, one for SSL connections that the BIG-IP will handle (using clientssl profile) and one that it will not handle SSL (just TCP). This works OK for a small number of backends, but does not scale well if you have many backends (run out of Public IP addresses). Using SNI Routing we can handle everything on a single virtual server / Public IP address. There are 3 methods for performing SNI Routing with BIG-IP iRule with binary scan a. Article by Colin Walker code attribute to Joel Moses b. Code Share by Stanislas Piron iRule with SSL::extensions Local Traffic Policy Option #1 is for folks that prefer complete control of the TLS protocol. It only requires the use of a TCP profile. Options #2 and #3 only require the use of a SSL persistence profile and TCP profile. SNI Routing with Local Traffic Policy We will skip option #1 and #2 in this article and look at using a Local Traffic Policy for SNI Routing. For a review of Local Traffic Policies check out the following DevCentral articles: LTM Policy Jan 2015 Simplifying Local Traffic Policies in BIG-IP 12.1 June 2016 In previous articles about Local Traffic Policiesthe focus was on routing HTTP traffic, but today we will use it to route SSL connections using SNI. In the following example, using a Local Traffic Policy named “sni_routing”, we are setting a condition on the SSL Extension “servername” and sending the traffic to a pool without terminating the SSL connection. The pool member could be another server or another BIG-IP device. The next example will forward the traffic to another virtual server that is configured with a clientssl profile. This uses VIP targeting to send traffic to another virtual server on the same device. In both examples it is important to note that the “condition”/“action” has been changed from occurring on “request” (that maps to a HTTP L7 request) to “ssl client hello”. By performing the action prior to any L7 functions occurring, we can forward the traffic without terminating the SSL connection. The previous example policy, “sni_routing”, can be attached to a Virtual Server that only has a TCP profile and SSL persistence profile. No HTTP or clientssl profile is required! This method can also be used to solve the issue of how to consolidate multiple SSL virtual servers behind a single virtual server that have different APM and/or ASM policies. This is similar to the architecture that is used by the Container Connector for Cloud Foundry; in creating a two-tier load balancing solution on a single device. Routed Correctly? TLS 1.3 has interesting proposals on how to obscure the servername (TLS in TLS?), but for now this is a useful and practical method of handling multiple SSL certs on a single IP. In the future this may still be possible as well with TLS 1.3. For example the use of a HTTP Fronting service could be a tier 1 virtual server (this is just my personal speculation, I have not tried, at the time of publishing this was still a draft proposal). In other news it has been demonstrated that a combination of using SNI and a different host header can be used for “domain fronting”. A method to enforce consistent policy (prevent domain fronting) would be to layer in additional conditions that match requested SNI servername (TLS extension) with requested HOST header (L7 HTTP header). This would help enforce that a tenant is using a certificate that is associated with their application and not “borrowing” the name and certificate that is being used by an adjacent service. We don’t think of a TLS extension as an attribute that can be used to route application traffic, but it is useful and possible on BIG-IP.21KViews0likes16CommentsCipher Suite Practices and Pitfalls
Cipher Suite Practices and Pitfalls It seems like every time you turn around there is a new vulnerability to deal with, and some of them, such as Sweet32, have required altering cipher configurations for mitigation. Still other users may tweak their cipher suite settings to meet requirements for PCI compliance, regulatory issues, local compatibility needs, etc. However, once you start modifying your cipher suite settings you must take great care, as it is very easy to shoot yourself in the foot. Many misconfigurations will silently fail – seeming to achieve the intended result while opening up new, even worse, vulnerabilities. Let's take a look at cipher configuration on the F5 BIG-IP products to try stay on the safe path. What is a Cipher Suite? Before we talk about how they're configured, let's define exactly what we mean by 'cipher suite', how it differs from just a 'cipher', and the components of the suite. Wikipedia had a good summary, so rather than reinvent the wheel: A cipher suite is a named combination of authentication, encryption, message authentication code (MAC) and key exchange algorithms used to negotiate the security settings for a network connection using the Transport Layer Security (TLS) / Secure Sockets Layer (SSL) network protocol. When we talk about configuring ciphers on BIG-IP we're really talking about configuring cipher suites. More specifically the configured list of cipher suites is a menu of options available to be negotiated. Each cipher suite specifies the key exchange algorithm, authentication algorithm, cipher, cipher mode, and MAC that will be used. I recommend reading K15194: Overview of the BIG-IP SSL/TLS cipher suite for more information. But as a quick overview, let's look at a couple of example cipher suites. The cipher suite is in the format: Key Exchange-Authentication-Cipher-Cipher Mode-MAC Note that not all of these components may be explicitly present in the cipher suite, but they are still implicitly part of the suite. Let's consider this cipher suite: ECDHE-RSA-AES256-GCM-SHA384 This breaks down as follows: Key Exchange Algorithm: ECDHE (Elliptic Curve Diffie-Hellman Ephemeral) Authentication Algorithm: RSA Cipher: AES256 (aka AES with a 256-bit key) Cipher Mode: GCM (Galois/Counter Mode) MAC: SHA384 (aka SHA-2 (Secure Hash Algorithm 2) with 384-bit hash) This is arguably the strongest cipher suite we have on BIG-IP at this time. Let's compare that to a simpler cipher suite: AES128-SHA Key Exchange Algorithm: RSA (Implied) – When it isn't specified, presume RSA. Authentication Algorithm: RSA (Implied) – When it isn't specified, presume RSA. Cipher: AES128 (aka AES with a 128-bit key) Cipher Mode: CBC (Cipher Block Chaining) (Implied) – When it isn't specified, presume CBC. MAC: SHA1 (Secure Hash Algorithm 1; SHA-1 always produces a 160-bit hash.) This example illustrates that the cipher suite may not always explicitly specify every parameter, but they're still there. There are 'default' values that are fairly safe to presume when not otherwise specified. If an algorithm isn't specified, it is RSA. That's a safe bet. And if a cipher mode isn't specified it is CBC. Always CBC. Note that all ciphers currently supported on BIG-IP are CBC mode except for AES-GCM and RC4. ALL. I stress this as it has been a recurring source of confusion amongst customers. It isn't only the cipher suites which explicitly state 'CBC' in their name. Let's examine each of these components. This article is primarily about cipher suite configuration and ciphers, and not the SSL/TLS protocol, so I won't dive too deeply here, but I think it helps to have a basic understanding. Forgive me if I simplify a bit. Key Exchange Algorithms As a quick review of the difference between asymmetric key (aka public key) cryptography and symmetric key cryptography: With the asymmetric key you have two keys – K public and K private –which have a mathematical relationship. Since you can openly share the public key there is no need to pre-share keys with anyone. The downside is that these algorithms are computationally expensive. Key lengths for a common algorithm such as RSA are at least 1024-bit, and 2048-bit is really the minimally acceptable these days. Symmetric key has only K private . Both ends use the same key, which poses the problem of key distribution. The advantage is higher computational performance and common key sizes are 128-bit or 256-bit. SSL/TLS, of course, uses both public and private key systems – the Key Exchange Algorithm is the public key system used to exchange the symmetric key. Examples you'll see in cipher suites include ECDHE, DHE, RSA, ECDH, and ADH. Authentication Algorithms The Authentication Algorithm is sometimes grouped in with the Key Exchange Algorithm for configuration purposes; 'ECDHE_RSA' for example. But we'll consider it as a separate component. This is the algorithm used in the SSL/TLS handshake for the server to sign (using the server's private key) elements sent to the client in the negotiation. The client can authenticate them using the server's public key. Examples include: RSA, ECDSA, DSS (aka DSA), and Anonymous. Anonymous means no authentication; this is generally bad. The most common way users run into this is by accidentally enabling an 'ADH' cipher suite. More on this later when we talk about pitfalls. Note that when RSA is used for the key exchange, authentication is inherent to the scheme so there really isn't a separate authentication step. However, most tools will list it out for completeness. Cipher To borrow once again from Wikipedia: In cryptography, a cipher (or cypher) is an algorithm for performing encryption or decryption—a series of well-defined steps that can be followed as a procedure. An alternative, less common term is encipherment. To encipher or encode is to convert information into cipher or code. In common parlance, 'cipher' is synonymous with 'code', as they are both a set of steps that encrypt a message; however, the concepts are distinct in cryptography, especially classical cryptography. This is what most of us mean when we refer to 'configuring ciphers'. We're primarily interested in controlling the cipher used to protect our information through encryption. There are many, many examples of ciphers which you may be familiar with: DES (Data Encryption Standard), 3DES (Triple DES), AES (Advanced Encryption Standard), RC4 (Rivest Cipher 4), Camellia, RC6, RC2, Blowfish, Twofish, IDEA, SEED, GOST, Rijndael, Serpent, MARS, etc. For a little cipher humor, I recommend RFC2410: The NULL Encryption Algorithm and Its Use With IPsec. Roughly speaking, ciphers come in two types – block ciphers and stream ciphers. Block Ciphers Block ciphers operate on fixed-length chunks of data, or blocks. For example, DES operates on 64-bit blocks while AES operates on 128-bit blocks. Most of the ciphers you'll encounter are block ciphers. Examples: DES, 3DES, AES, Blowfish, Twofish, etc. Stream Ciphers Stream ciphers mathematically operate on each bit in the data flow individually. The most commonly encountered stream cipher is RC4, and that's deprecated. So we're generally focused on block ciphers, not that it really changes anything for the purposes of this article. All of the secrecy in encryption comes from the key that is used, not the cipher itself. Obtain the key and you can unlock the ciphertext. The cipher itself – the algorithm, source code, etc. – not only can be, but should be, openly available. History is full of examples of private cryptosystems failing due to weaknesses missed by their creators, while the most trusted ciphers were created via open processes (AES for example). Keys are of varying lengths and, generally speaking, the longer the key the more secure the encryption. DES only had 56-bits of key data, and thus is considered insecure. We label 3DES as 168-bit, but it is really only equivalent to 112-bit strength. (More on this later.) Newer ciphers, such as AES, often offer options – 128-bits, 192-bits, or 256-bits of key. Remember, a 256-bit key is far more than twice as strong as a 128-bit key. It is 2 128 vs. 2 256 - 3.4028237e+38 vs. 1.1579209e+77 Cipher Mode Cipher mode is the mode of operation used by the cipher when encrypting plaintext into ciphertext, or decrypting ciphertext into plaintext. The most common mode is CBC – Cipher Block Chaining. In cipher block chaining the ciphertext from block n feeds into the process for block n+1 – the blocks are chained together. To steal borrow an image from Wikipedia: As I mentioned previously, all ciphers on BIG-IP are CBC mode except for RC4 (the lone stream cipher, disabled by default starting in 11.6.0) and AES-GCM. AES-GCM was first introduced in 11.5.0, and it is only available for TLSv1.2 connections. GCM stands for Galois/Counter Mode, a more advanced mode of operation than CBC. In GCM the blocks are not chained together. GCM runs in an Authenticated Encryption with Associated Data (AEAD) mode which eliminates the separate per-message hashing step, therefore it can achieve higher performance than CBC mode on a given HW platform. It is also immune to classes of attack that have harried CBC, such as the numerous padding attacks (BEAST, Lucky 13, etc.) Via Wikipedia: The main drawback to AES-GCM is that it was only added in TLSv1.2, so any older clients which don't support TLSv1.2 cannot use it. There are other cipher suites officially supported in TLS which have other modes, but F5 does not currently support those ciphers so we won't get too deep into that. Other ciphers include AES-CCM (CTR mode with a CBC MAC; CTR is Counter Mode), CAMELLIA-GCM (CAMELLIA as introduced in 12.0.0 is CBC), and GOST CNT (aka CTR). We may see these in the future. MAC aka Hash Function What did we ever do before Wikipedia? A hash function is any function that can be used to map data of arbitrary size to data of fixed size. The values returned by a hash function are called hash values, hash codes, digests, or simply hashes. One use is a data structure called a hash table, widely used in computer software for rapid data lookup. Hash functions accelerate table or database lookup by detecting duplicated records in a large file. An example is finding similar stretches in DNA sequences. They are also useful in cryptography. A cryptographic hash function allows one to easily verify that some input data maps to a given hash value, but if the input data is unknown, it is deliberately difficult to reconstruct it (or equivalent alternatives) by knowing the stored hash value. This is used for assuring integrity of transmitted data, and is the building block for HMACs, which provide message authentication. In short, the MAC provides message integrity. Hash functions include MD5, SHA-1 (aka SHA), SHA-2 (aka SHA128, SHA256, & SHA384), and AEAD (Authenticated Encryption with Associated Data). MD5 has long since been rendered completely insecure and is deprecated. SHA-1 is now being 'shamed', if not blocked, by browsers as it is falling victim to advances in cryptographic attacks. While some may need to continue to support SHA-1 cipher suites for legacy clients, it is encouraged to migrate to SHA-2 as soon as possible – especially for digital certificates. Configuring Cipher Suites on BIG-IP Now that we've covered what cipher suites are, let's look at where we use them. There are two distinct and separate areas where cipher suites are used – the host, or control plane, and TMM, or the data plane. On the host side SSL/TLS is handled by OpenSSL and the configuration follows the standard OpenSSL configuration options. Control Plane The primary use of SSL/TLS on the control plane is for httpd. To see the currently configured cipher suite, use ' tmsh list sys http ssl-ciphersuite '. The defaults may vary depending on the version of TMOS. For example, these were the defaults in 12.0.0: tmsh list sys http ssl-ciphersuite sys httpd { ssl-ciphersuite DEFAULT:!aNULL:!eNULL:!LOW:!RC4:!MD5:!EXP } As of 12.1.2 these have been updated to a more explicit list: tmsh list sys http ssl-ciphersuite sys httpd { ssl-ciphersuite ECDHE-RSA-AES128-GCM-SHA256:ECDHE-RSA-AES256-GCM-SHA384:ECDHE-RSA-AES128-SHA:ECDHE-RSA-AES256-SHA:ECDHE-RSA-AES128-SHA256:ECDHE-RSA-AES256-SHA384:ECDHE-ECDSA-AES128-GCM-SHA256:ECDHE-ECDSA-AES256-GCM-SHA384:ECDHE-ECDSA-AES128-SHA:ECDHE-ECDSA-AES256-SHA:ECDHE-ECDSA-AES128-SHA256:ECDHE-ECDSA-AES256-SHA384:AES128-GCM-SHA256:AES256-GCM-SHA384:AES128-SHA:AES256-SHA:AES128-SHA256:AES256-SHA256:ECDHE-RSA-DES-CBC3-SHA:ECDHE-ECDSA-DES-CBC3-SHA:DES-CBC3-SHA } You can change this configuration via ' tmsh modify sys http ssl-ciphersuite <value> '. One important thing to note is that the default is not just 'DEFAULT' as it is on the data plane. This is one thing that users have been caught by; thinking that setting the keyword to 'DEFAULT' will reset the configuration. As OpenSSL provides SSL/TLS support for the control plane, if you want to see which ciphers will actually be supported you can use ' openssl ciphers -v <cipherstring> '. For example: openssl ciphers -v 'ECDHE-RSA-AES128-GCM-SHA256:ECDHE-RSA-AES256-GCM-SHA384:ECDHE-RSA-AES128-SHA:ECDHE-RSA-AES256-SHA:ECDHE-RSA-AES128-SHA256:ECDHE-RSA-AES256-SHA384:ECDHE-ECDSA-AES128-GCM-SHA256:ECDHE-ECDSA-AES256-GCM-SHA384:ECDHE-ECDSA-AES128-SHA:ECDHE-ECDSA-AES256-SHA:ECDHE-ECDSA-AES128-SHA256:ECDHE-ECDSA-AES256-SHA384:AES128-GCM-SHA256:AES256-GCM-SHA384:AES128-SHA:AES256-SHA:AES128-SHA256:AES256-SHA256:ECDHE-RSA-DES-CBC3-SHA:ECDHE-ECDSA-DES-CBC3-SHA:DES-CBC3-SHA' ECDHE-RSA-AES128-GCM-SHA256 TLSv1.2 Kx=ECDH Au=RSA Enc=AESGCM(128) Mac=AEAD ECDHE-RSA-AES256-GCM-SHA384 TLSv1.2 Kx=ECDH Au=RSA Enc=AESGCM(256) Mac=AEAD ECDHE-RSA-AES128-SHA SSLv3 Kx=ECDH Au=RSA Enc=AES(128) Mac=SHA1 ECDHE-RSA-AES256-SHA SSLv3 Kx=ECDH Au=RSA Enc=AES(256) Mac=SHA1 ECDHE-RSA-AES128-SHA256 TLSv1.2 Kx=ECDH Au=RSA Enc=AES(128) Mac=SHA256 ECDHE-RSA-AES256-SHA384 TLSv1.2 Kx=ECDH Au=RSA Enc=AES(256) Mac=SHA384 ECDHE-ECDSA-AES128-GCM-SHA256 TLSv1.2 Kx=ECDH Au=ECDSA Enc=AESGCM(128) Mac=AEAD ECDHE-ECDSA-AES256-GCM-SHA384 TLSv1.2 Kx=ECDH Au=ECDSA Enc=AESGCM(256) Mac=AEAD ECDHE-ECDSA-AES128-SHA SSLv3 Kx=ECDH Au=ECDSA Enc=AES(128) Mac=SHA1 ECDHE-ECDSA-AES256-SHA SSLv3 Kx=ECDH Au=ECDSA Enc=AES(256) Mac=SHA1 ECDHE-ECDSA-AES128-SHA256 TLSv1.2 Kx=ECDH Au=ECDSA Enc=AES(128) Mac=SHA256 ECDHE-ECDSA-AES256-SHA384 TLSv1.2 Kx=ECDH Au=ECDSA Enc=AES(256) Mac=SHA384 AES128-GCM-SHA256 TLSv1.2 Kx=RSA Au=RSA Enc=AESGCM(128) Mac=AEAD AES256-GCM-SHA384 TLSv1.2 Kx=RSA Au=RSA Enc=AESGCM(256) Mac=AEAD AES128-SHA SSLv3 Kx=RSA Au=RSA Enc=AES(128) Mac=SHA1 AES256-SHA SSLv3 Kx=RSA Au=RSA Enc=AES(256) Mac=SHA1 AES128-SHA256 TLSv1.2 Kx=RSA Au=RSA Enc=AES(128) Mac=SHA256 AES256-SHA256 TLSv1.2 Kx=RSA Au=RSA Enc=AES(256) Mac=SHA256 ECDHE-RSA-DES-CBC3-SHA SSLv3 Kx=ECDH Au=RSA Enc=3DES(168) Mac=SHA1 ECDHE-ECDSA-DES-CBC3-SHA SSLv3 Kx=ECDH Au=ECDSA Enc=3DES(168) Mac=SHA1 DES-CBC3-SHA SSLv3 Kx=RSA Au=RSA Enc=3DES(168) Mac=SHA1 Now let's see what happens if you use 'DEFAULT': openssl ciphers -v 'DEFAULT' ECDHE-RSA-AES256-GCM-SHA384 TLSv1.2 Kx=ECDH Au=RSA Enc=AESGCM(256) Mac=AEAD ECDHE-ECDSA-AES256-GCM-SHA384 TLSv1.2 Kx=ECDH Au=ECDSA Enc=AESGCM(256) Mac=AEAD ECDHE-RSA-AES256-SHA384 TLSv1.2 Kx=ECDH Au=RSA Enc=AES(256) Mac=SHA384 ECDHE-ECDSA-AES256-SHA384 TLSv1.2 Kx=ECDH Au=ECDSA Enc=AES(256) Mac=SHA384 ECDHE-RSA-AES256-SHA SSLv3 Kx=ECDH Au=RSA Enc=AES(256) Mac=SHA1 ECDHE-ECDSA-AES256-SHA SSLv3 Kx=ECDH Au=ECDSA Enc=AES(256) Mac=SHA1 DHE-DSS-AES256-GCM-SHA384 TLSv1.2 Kx=DH Au=DSS Enc=AESGCM(256) Mac=AEAD DHE-RSA-AES256-GCM-SHA384 TLSv1.2 Kx=DH Au=RSA Enc=AESGCM(256) Mac=AEAD DHE-RSA-AES256-SHA256 TLSv1.2 Kx=DH Au=RSA Enc=AES(256) Mac=SHA256 DHE-DSS-AES256-SHA256 TLSv1.2 Kx=DH Au=DSS Enc=AES(256) Mac=SHA256 DHE-RSA-AES256-SHA SSLv3 Kx=DH Au=RSA Enc=AES(256) Mac=SHA1 DHE-DSS-AES256-SHA SSLv3 Kx=DH Au=DSS Enc=AES(256) Mac=SHA1 DHE-RSA-CAMELLIA256-SHA SSLv3 Kx=DH Au=RSA Enc=Camellia(256) Mac=SHA1 DHE-DSS-CAMELLIA256-SHA SSLv3 Kx=DH Au=DSS Enc=Camellia(256) Mac=SHA1 ECDH-RSA-AES256-GCM-SHA384 TLSv1.2 Kx=ECDH/RSA Au=ECDH Enc=AESGCM(256) Mac=AEAD ECDH-ECDSA-AES256-GCM-SHA384 TLSv1.2 Kx=ECDH/ECDSA Au=ECDH Enc=AESGCM(256) Mac=AEAD ECDH-RSA-AES256-SHA384 TLSv1.2 Kx=ECDH/RSA Au=ECDH Enc=AES(256) Mac=SHA384 ECDH-ECDSA-AES256-SHA384 TLSv1.2 Kx=ECDH/ECDSA Au=ECDH Enc=AES(256) Mac=SHA384 ECDH-RSA-AES256-SHA SSLv3 Kx=ECDH/RSA Au=ECDH Enc=AES(256) Mac=SHA1 ECDH-ECDSA-AES256-SHA SSLv3 Kx=ECDH/ECDSA Au=ECDH Enc=AES(256) Mac=SHA1 AES256-GCM-SHA384 TLSv1.2 Kx=RSA Au=RSA Enc=AESGCM(256) Mac=AEAD AES256-SHA256 TLSv1.2 Kx=RSA Au=RSA Enc=AES(256) Mac=SHA256 AES256-SHA SSLv3 Kx=RSA Au=RSA Enc=AES(256) Mac=SHA1 CAMELLIA256-SHA SSLv3 Kx=RSA Au=RSA Enc=Camellia(256) Mac=SHA1 PSK-AES256-CBC-SHA SSLv3 Kx=PSK Au=PSK Enc=AES(256) Mac=SHA1 ECDHE-RSA-AES128-GCM-SHA256 TLSv1.2 Kx=ECDH Au=RSA Enc=AESGCM(128) Mac=AEAD ECDHE-ECDSA-AES128-GCM-SHA256 TLSv1.2 Kx=ECDH Au=ECDSA Enc=AESGCM(128) Mac=AEAD ECDHE-RSA-AES128-SHA256 TLSv1.2 Kx=ECDH Au=RSA Enc=AES(128) Mac=SHA256 ECDHE-ECDSA-AES128-SHA256 TLSv1.2 Kx=ECDH Au=ECDSA Enc=AES(128) Mac=SHA256 ECDHE-RSA-AES128-SHA SSLv3 Kx=ECDH Au=RSA Enc=AES(128) Mac=SHA1 ECDHE-ECDSA-AES128-SHA SSLv3 Kx=ECDH Au=ECDSA Enc=AES(128) Mac=SHA1 DHE-DSS-AES128-GCM-SHA256 TLSv1.2 Kx=DH Au=DSS Enc=AESGCM(128) Mac=AEAD DHE-RSA-AES128-GCM-SHA256 TLSv1.2 Kx=DH Au=RSA Enc=AESGCM(128) Mac=AEAD DHE-RSA-AES128-SHA256 TLSv1.2 Kx=DH Au=RSA Enc=AES(128) Mac=SHA256 DHE-DSS-AES128-SHA256 TLSv1.2 Kx=DH Au=DSS Enc=AES(128) Mac=SHA256 DHE-RSA-AES128-SHA SSLv3 Kx=DH Au=RSA Enc=AES(128) Mac=SHA1 DHE-DSS-AES128-SHA SSLv3 Kx=DH Au=DSS Enc=AES(128) Mac=SHA1 DHE-RSA-SEED-SHA SSLv3 Kx=DH Au=RSA Enc=SEED(128) Mac=SHA1 DHE-DSS-SEED-SHA SSLv3 Kx=DH Au=DSS Enc=SEED(128) Mac=SHA1 DHE-RSA-CAMELLIA128-SHA SSLv3 Kx=DH Au=RSA Enc=Camellia(128) Mac=SHA1 DHE-DSS-CAMELLIA128-SHA SSLv3 Kx=DH Au=DSS Enc=Camellia(128) Mac=SHA1 ECDH-RSA-AES128-GCM-SHA256 TLSv1.2 Kx=ECDH/RSA Au=ECDH Enc=AESGCM(128) Mac=AEAD ECDH-ECDSA-AES128-GCM-SHA256 TLSv1.2 Kx=ECDH/ECDSA Au=ECDH Enc=AESGCM(128) Mac=AEAD ECDH-RSA-AES128-SHA256 TLSv1.2 Kx=ECDH/RSA Au=ECDH Enc=AES(128) Mac=SHA256 ECDH-ECDSA-AES128-SHA256 TLSv1.2 Kx=ECDH/ECDSA Au=ECDH Enc=AES(128) Mac=SHA256 ECDH-RSA-AES128-SHA SSLv3 Kx=ECDH/RSA Au=ECDH Enc=AES(128) Mac=SHA1 ECDH-ECDSA-AES128-SHA SSLv3 Kx=ECDH/ECDSA Au=ECDH Enc=AES(128) Mac=SHA1 AES128-GCM-SHA256 TLSv1.2 Kx=RSA Au=RSA Enc=AESGCM(128) Mac=AEAD AES128-SHA256 TLSv1.2 Kx=RSA Au=RSA Enc=AES(128) Mac=SHA256 AES128-SHA SSLv3 Kx=RSA Au=RSA Enc=AES(128) Mac=SHA1 SEED-SHA SSLv3 Kx=RSA Au=RSA Enc=SEED(128) Mac=SHA1 CAMELLIA128-SHA SSLv3 Kx=RSA Au=RSA Enc=Camellia(128) Mac=SHA1 PSK-AES128-CBC-SHA SSLv3 Kx=PSK Au=PSK Enc=AES(128) Mac=SHA1 ECDHE-RSA-RC4-SHA SSLv3 Kx=ECDH Au=RSA Enc=RC4(128) Mac=SHA1 ECDHE-ECDSA-RC4-SHA SSLv3 Kx=ECDH Au=ECDSA Enc=RC4(128) Mac=SHA1 ECDH-RSA-RC4-SHA SSLv3 Kx=ECDH/RSA Au=ECDH Enc=RC4(128) Mac=SHA1 ECDH-ECDSA-RC4-SHA SSLv3 Kx=ECDH/ECDSA Au=ECDH Enc=RC4(128) Mac=SHA1 RC4-SHA SSLv3 Kx=RSA Au=RSA Enc=RC4(128) Mac=SHA1 RC4-MD5 SSLv3 Kx=RSA Au=RSA Enc=RC4(128) Mac=MD5 PSK-RC4-SHA SSLv3 Kx=PSK Au=PSK Enc=RC4(128) Mac=SHA1 ECDHE-RSA-DES-CBC3-SHA SSLv3 Kx=ECDH Au=RSA Enc=3DES(168) Mac=SHA1 ECDHE-ECDSA-DES-CBC3-SHA SSLv3 Kx=ECDH Au=ECDSA Enc=3DES(168) Mac=SHA1 EDH-RSA-DES-CBC3-SHA SSLv3 Kx=DH Au=RSA Enc=3DES(168) Mac=SHA1 EDH-DSS-DES-CBC3-SHA SSLv3 Kx=DH Au=DSS Enc=3DES(168) Mac=SHA1 ECDH-RSA-DES-CBC3-SHA SSLv3 Kx=ECDH/RSA Au=ECDH Enc=3DES(168) Mac=SHA1 ECDH-ECDSA-DES-CBC3-SHA SSLv3 Kx=ECDH/ECDSA Au=ECDH Enc=3DES(168) Mac=SHA1 DES-CBC3-SHA SSLv3 Kx=RSA Au=RSA Enc=3DES(168) Mac=SHA1 PSK-3DES-EDE-CBC-SHA SSLv3 Kx=PSK Au=PSK Enc=3DES(168) Mac=SHA1 EDH-RSA-DES-CBC-SHA SSLv3 Kx=DH Au=RSA Enc=DES(56) Mac=SHA1 EDH-DSS-DES-CBC-SHA SSLv3 Kx=DH Au=DSS Enc=DES(56) Mac=SHA1 DES-CBC-SHA SSLv3 Kx=RSA Au=RSA Enc=DES(56) Mac=SHA1 EXP-EDH-RSA-DES-CBC-SHA SSLv3 Kx=DH(512) Au=RSA Enc=DES(40) Mac=SHA1 export EXP-EDH-DSS-DES-CBC-SHA SSLv3 Kx=DH(512) Au=DSS Enc=DES(40) Mac=SHA1 export EXP-DES-CBC-SHA SSLv3 Kx=RSA(512) Au=RSA Enc=DES(40) Mac=SHA1 export EXP-RC2-CBC-MD5 SSLv3 Kx=RSA(512) Au=RSA Enc=RC2(40) Mac=MD5 export EXP-RC4-MD5 SSLv3 Kx=RSA(512) Au=RSA Enc=RC4(40) Mac=MD5 export As you can see that enables far, far more ciphers, including a number of unsafe ciphers – export, MD5, DES, etc. This is a good example of why you always want to confirm your cipher settings and check exactly what is being enabled before placing new settings into production. Many security disasters could be avoided if everyone doublechecked their settings first. Let’s take a closer look at how OpenSSL represents one of the cipher suites: ECDHE-RSA-AES256-GCM-SHA384 TLSv1.2 Kx=ECDH Au=RSA Enc=AESGCM(256) Mac=AEAD The columns are: Cipher Suite: ECDHE-RSA-AES256-GCM-SHA384 Protocol: TLSv1.2 Key Exchange Algorithm (Kx): ECDH Authentication Algorithm (Au): RSA Cipher/Encryption Algorithm (Enc): AESGCM(256) MAC (Mac): AEAD Since the control plane uses OpenSSL you can use the standard OpenSSL documentation, so I won't spend a lot of time on that. Data Plane In TMM the cipher suites are configured in the Ciphers field of the Client SSL or Server SSL profiles. See K14783: Overview of the Client SSL profile (11.x - 12.x) & K14806: Overview of the Server SSL profile (11.x - 12.x), respectively for more details. It is important to keep in mind that these are two different worlds with their own requirements and quirks. As most of the configuration activity, and security concerns, occur on the public facing side of the system, we'll focus on the Client SSL Profile. Most of the things we'll cover here will also apply to the Server SSL profile. In the GUI it appears as an editable field: Presuming the profile was created with the name 'Test': tmsh list ltm profile client-ssl Test ltm profile client-ssl Test { app-service none cert default.crt cert-key-chain { default { cert default.crt key default.key } } chain none ciphers DEFAULT defaults-from clientssl inherit-certkeychain true key default.key passphrase none } Modifying the cipher configuration from the command line is simple. tmsh list ltm profile client-ssl Test ciphers ltm profile client-ssl Test { ciphers DEFAULT } tmsh modify ltm profile client-ssl Test ciphers 'DEFAULT:!3DES' tmsh list ltm profile client-ssl Test ciphers ltm profile client-ssl Test { ciphers DEFAULT:!3DES } Just remember the ' tmsh save sys config ' when you're happy with the configuration. Note here the default is just 'DEFAULT'. What that expands to will vary depending on the version of TMOS. K13156: SSL ciphers used in the default SSL profiles (11.x - 12.x) defines the default values for each version of TMOS. Or you can check it locally from the command line: tmm --clientciphers 'DEFAULT' On 12.1.2 that would be: tmm --clientciphers 'DEFAULT' ID SUITE BITS PROT METHOD CIPHER MAC KEYX 0: 159 DHE-RSA-AES256-GCM-SHA384 256 TLS1.2 Native AES-GCM SHA384 EDH/RSA 1: 158 DHE-RSA-AES128-GCM-SHA256 128 TLS1.2 Native AES-GCM SHA256 EDH/RSA 2: 107 DHE-RSA-AES256-SHA256 256 TLS1.2 Native AES SHA256 EDH/RSA 3: 57 DHE-RSA-AES256-SHA 256 TLS1 Native AES SHA EDH/RSA 4: 57 DHE-RSA-AES256-SHA 256 TLS1.1 Native AES SHA EDH/RSA 5: 57 DHE-RSA-AES256-SHA 256 TLS1.2 Native AES SHA EDH/RSA 6: 57 DHE-RSA-AES256-SHA 256 DTLS1 Native AES SHA EDH/RSA 7: 103 DHE-RSA-AES128-SHA256 128 TLS1.2 Native AES SHA256 EDH/RSA 8: 51 DHE-RSA-AES128-SHA 128 TLS1 Native AES SHA EDH/RSA 9: 51 DHE-RSA-AES128-SHA 128 TLS1.1 Native AES SHA EDH/RSA 10: 51 DHE-RSA-AES128-SHA 128 TLS1.2 Native AES SHA EDH/RSA 11: 51 DHE-RSA-AES128-SHA 128 DTLS1 Native AES SHA EDH/RSA 12: 22 DHE-RSA-DES-CBC3-SHA 168 TLS1 Native DES SHA EDH/RSA 13: 22 DHE-RSA-DES-CBC3-SHA 168 TLS1.1 Native DES SHA EDH/RSA 14: 22 DHE-RSA-DES-CBC3-SHA 168 TLS1.2 Native DES SHA EDH/RSA 15: 22 DHE-RSA-DES-CBC3-SHA 168 DTLS1 Native DES SHA EDH/RSA 16: 157 AES256-GCM-SHA384 256 TLS1.2 Native AES-GCM SHA384 RSA 17: 156 AES128-GCM-SHA256 128 TLS1.2 Native AES-GCM SHA256 RSA 18: 61 AES256-SHA256 256 TLS1.2 Native AES SHA256 RSA 19: 53 AES256-SHA 256 TLS1 Native AES SHA RSA 20: 53 AES256-SHA 256 TLS1.1 Native AES SHA RSA 21: 53 AES256-SHA 256 TLS1.2 Native AES SHA RSA 22: 53 AES256-SHA 256 DTLS1 Native AES SHA RSA 23: 60 AES128-SHA256 128 TLS1.2 Native AES SHA256 RSA 24: 47 AES128-SHA 128 TLS1 Native AES SHA RSA 25: 47 AES128-SHA 128 TLS1.1 Native AES SHA RSA 26: 47 AES128-SHA 128 TLS1.2 Native AES SHA RSA 27: 47 AES128-SHA 128 DTLS1 Native AES SHA RSA 28: 10 DES-CBC3-SHA 168 TLS1 Native DES SHA RSA 29: 10 DES-CBC3-SHA 168 TLS1.1 Native DES SHA RSA 30: 10 DES-CBC3-SHA 168 TLS1.2 Native DES SHA RSA 31: 10 DES-CBC3-SHA 168 DTLS1 Native DES SHA RSA 32: 49200 ECDHE-RSA-AES256-GCM-SHA384 256 TLS1.2 Native AES-GCM SHA384 ECDHE_RSA 33: 49199 ECDHE-RSA-AES128-GCM-SHA256 128 TLS1.2 Native AES-GCM SHA256 ECDHE_RSA 34: 49192 ECDHE-RSA-AES256-SHA384 256 TLS1.2 Native AES SHA384 ECDHE_RSA 35: 49172 ECDHE-RSA-AES256-CBC-SHA 256 TLS1 Native AES SHA ECDHE_RSA 36: 49172 ECDHE-RSA-AES256-CBC-SHA 256 TLS1.1 Native AES SHA ECDHE_RSA 37: 49172 ECDHE-RSA-AES256-CBC-SHA 256 TLS1.2 Native AES SHA ECDHE_RSA 38: 49191 ECDHE-RSA-AES128-SHA256 128 TLS1.2 Native AES SHA256 ECDHE_RSA 39: 49171 ECDHE-RSA-AES128-CBC-SHA 128 TLS1 Native AES SHA ECDHE_RSA 40: 49171 ECDHE-RSA-AES128-CBC-SHA 128 TLS1.1 Native AES SHA ECDHE_RSA 41: 49171 ECDHE-RSA-AES128-CBC-SHA 128 TLS1.2 Native AES SHA ECDHE_RSA 42: 49170 ECDHE-RSA-DES-CBC3-SHA 168 TLS1 Native DES SHA ECDHE_RSA 43: 49170 ECDHE-RSA-DES-CBC3-SHA 168 TLS1.1 Native DES SHA ECDHE_RSA 44: 49170 ECDHE-RSA-DES-CBC3-SHA 168 TLS1.2 Native DES SHA ECDHE_RSA Some differences when compared to OpenSSL are readily apparent. For starters, TMM kindly includes a column label header, and actually aligns the columns. The first column is simply a 0-ordinal numeric index, the rest are as follows: ID: The official SSL/TLS ID assigned to that cipher suite. SUITE: The cipher suite. BITS: The size of the key in bits. PROT: The protocol supported. METHOD: NATIVE (in TMM) vs. COMPAT (using OpenSSL code). CIPHER: The cipher. MAC: The hash function. KEYX: The Key Exchange and Authentication Algorithms Note that the MAC is a little misleading for AES-GCM cipher suites. There is no separate MAC as they're AEAD. But the hashing algorithm is used in the Pseudo-Random Function (PRF) and a few other handshake related places. Selecting the Cipher Suites Now we know how to look at the current configuration, modify it, and list the actual ciphers that will be enabled by the listed suites. But what do we put into the configuration? Most users won't have to touch this. The default values are carefully selected by F5 to meet the needs of the majority of our customers. That's the good news. The bad news is that some customers will need to get in there and change the configuration – be it for regulatory compliance, internal policies, legacy client support, etc. Once you begin modifying them, the configuration is truly custom for each customer. Every customer who modifies the configuration, and uses a custom cipher configuration, needs to determine what the proper list is for their needs. Let's say we have determined that we need to support only AES & AES-GCM, 128-bit or 256-bit, and only ECDHE key exchange. Any MAC or Authentication is fine. OK, let's proceed from there. On 12.1.2 there are six cipher suites that fit those criteria. We could list them all explicitly: tmm --clientciphers 'ECDHE-RSA-AES256-GCM-SHA384:ECDHE-RSA-AES128-GCM-SHA256:ECDHE-RSA-AES256-SHA384:ECDHE-RSA-AES256-CBC-SHA:ECDHE-RSA-AES128-SHA256:ECDHE-RSA-AES128-CBC-SHA' That will work, but it gets unwieldy fast. Not only that, but in versions up to 11.5.0 the ciphers configuration string was truncated at 256bytes. Starting in 11.5.0 that was increased to 768bytes, but that can still truncate long configurations. We'll revisit this when we get to the pitfalls section. Fortunately, there is an alternative – keywords! This will result in the same list of cipher suites: tmm --clientciphers 'ECDHE+AES-GCM:ECDHE+AES' That specifies the ECDHE key exchange with AES-GCM ciphers, and ECDHE with AES ciphers. Let's take a closer look to help understand what is happening here. Keywords Keywords are extremely important when working with cipher suite configuration, so we'll spend a little time on those. Most of these apply to both the control plane (OpenSSL) and the data plane (TMM), unless otherwise noted, but we're focused on the data plane as that's F5 specific. Keywords organize into different categories. F5 specific: NATIVE: cipher suites implemented natively in TMM COMPAT: cipher suites using OpenSSL code; removed as of 12.0.0 @SPEED: Re-orders the list to put 'faster' (based on TMOS implementation performance) ciphers first. Sorting: @SPEED: Re-orders the list to put 'faster' (based on TMOS implementation performance) ciphers first. (F5 Specific) @STRENGTH: Re-orders the list to put 'stronger' (larger keys) ciphers first. Protocol: TLSv1_2: cipher suites available under TLSv1.2 TLSv1_1: cipher suites available under TLSv1.1 TLSv1: cipher suites available under TLSv1.0 SSLv3: cipher suites available under SSLv3 Note the 'Protocol' keywords in the cipher configuration control the ciphers associated with that protocol, and not the protocol itself! More on this in pitfalls. Key Exchange Algorithms (sometimes with Authentication specified): ECDHE or ECDHA_RSA: Elliptic Curve Diffie-Hellman Ephemeral (with RSA) ECDHE_ECDSA: ECDHE with Elliptic Curve Digital Signature Algorithm DHE or EDH: Diffie-Hellman Ephemeral (aka Ephemeral Diffie-Hellman) (with RSA) DHE_DSS: DHE with Digital Signature Standard (aka DSA – Digital Signature Algorithm) ECDH_RSA: Elliptic Curve Diffie-Hellman with RSA ECDH_ECDSA: ECDH with ECDSA RSA: RSA, obviously ADH: Anonymous Diffie-Hellman. Note the Authentication Algorithms don't work as standalone keywords in TMM. You can't use 'ECDSA' or 'DSS' for example. And you might think ECDHE or DHE includes all such cipher suites – note that they don't if you read carefully. General cipher groupings: DEFAULT: The default cipher suite for that version; see K13156 ALL: All NATIVE cipher suites; does not include COMPAT in current versions HIGH: 'High' security cipher suites; >128-bit MEDIUM: 'Medium' security cipher suites; effectively 128-bit suites LOW: 'Low' security cipher suites; <128-bit excluding export grade ciphers EXP or EXPORT: Export grade ciphers; 40-bit or 56-bit EXPORT56: 56-bit export ciphers EXPORT40: 40-bit export ciphers Note that DEFAULT does change periodically as F5 updates the configuration to follow the latest best practices. K13156: SSL ciphers used in the default SSL profiles (11.x - 12.x) documents these changes. Cipher families: AES-GCM: AES in GCM mode; 128-bit or 256-bit AES: AES in CBC mode; 128-bit or 256-bit CAMELLIA: Camellia in CBC mode; 128-bit or 256-bit 3DES: Triple DES in CBC mode; 168-bit (well, 112-bit really) DES: Single DES in CBC mode, includes EXPORTciphers;40-bit & 56-bit. RC4: RC4 stream cipher NULL: NULL cipher; just what it sounds like, it does nothing – no encryption MAC aka Hash Function: SHA384: SHA-2 384-bit hash SHA256: SHA-2 256-bit hash SHA1 or SHA: SHA-1 160-bit hash MD5: MD5 128-bit hash Other: On older TMOS versions when using the COMPAT keyword it also enables two additional keywords: SSLv2: Ciphers supported on the SSLv2 protocol RC2: RC2 ciphers. So, let's go back to our example: tmm --clientciphers 'ECDHE+AES-GCM:ECDHE+AES' Note that you can combine keywords using '+' (plus sign). And multiple entries in the ciphers configuration line are separated with ':' (colon). You may also need to wrap the string in single quotes on the command line – I find it is a good habit to just always do so. We can also exclude suites or keywords. There are two ways to do that: '!' (exclamation point) is a hard exclusion. Anything excluded this way cannot be implicitly or explicitly re-enabled. It is disabled, period. '-' (minus sign or dash) is a soft exclusion. Anything excluded this way can be explicitly re-enabled later in the configuration string. (Note: The dash is also usedinthe names of many cipher suites, such as ECDHE-RSA-AES256-GCM-SHA384 or AES128-SHA. Do not confuse the dashes that are part of the cipher suite names with a soft exclusion, which alwaysprecedes, or prefixes,the value being excluded. 'AES128-SHA': AES128-SHA cipher suite. '-SHA': SHA is soft excluded. '-AES128-SHA': the AES128-SHA cipher suite is soft excluded. Position matters.) Let's look at the difference in hard and soft exclusions. We'll start with our base example: tmm --clientciphers 'ECDHE+AES-GCM:DHE+AES-GCM' ID SUITE BITS PROT METHOD CIPHER MAC KEYX 0: 49200 ECDHE-RSA-AES256-GCM-SHA384 256 TLS1.2 Native AES-GCM SHA384 ECDHE_RSA 1: 49199 ECDHE-RSA-AES128-GCM-SHA256 128 TLS1.2 Native AES-GCM SHA256 ECDHE_RSA 2: 159 DHE-RSA-AES256-GCM-SHA384 256 TLS1.2 Native AES-GCM SHA384 EDH/RSA 3: 158 DHE-RSA-AES128-GCM-SHA256 128 TLS1.2 Native AES-GCM SHA256 EDH/RSA Now let's look at a hard exclusion: tmm --clientciphers 'ECDHE+AES-GCM:!DHE:DHE+AES-GCM' ID SUITE BITS PROT METHOD CIPHER MAC KEYX 0: 49200 ECDHE-RSA-AES256-GCM-SHA384 256 TLS1.2 Native AES-GCM SHA384 ECDHE_RSA 1: 49199 ECDHE-RSA-AES128-GCM-SHA256 128 TLS1.2 Native AES-GCM SHA256 ECDHE_RSA And lastly a soft exclusion: tmm --clientciphers 'ECDHE+AES-GCM:-DHE:DHE+AES-GCM' ID SUITE BITS PROT METHOD CIPHER MAC KEYX 0: 49200 ECDHE-RSA-AES256-GCM-SHA384 256 TLS1.2 Native AES-GCM SHA384 ECDHE_RSA 1: 49199 ECDHE-RSA-AES128-GCM-SHA256 128 TLS1.2 Native AES-GCM SHA256 ECDHE_RSA 2: 159 DHE-RSA-AES256-GCM-SHA384 256 TLS1.2 Native AES-GCM SHA384 EDH/RSA 3: 158 DHE-RSA-AES128-GCM-SHA256 128 TLS1.2 Native AES-GCM SHA256 EDH/RSA Note that in the second example, the hard exclusion, we used '!DHE' and even though we then explicitly added 'DHE+AES-GCM' those ciphers were not enabled. This is because, once excluded with a hard exclusion, ciphers cannot be re-enabled. In the third example, the soft exclusion, we used '-DHE' and then 'DHE+AES-GCM'. This time it did enable those ciphers, which is possible with a soft exclusion. You might be wondering what soft disabling is useful for; why would you ever want to remove ciphers only to add them again? Reordering the ciphers is a common use case. As an example, DEFAULT orders ciphers differently in different versions, but mainly based on strength – bit size. Let's say we know 3DES is really 112-bit equivalent strength and not 168-bit as it is usually labeled. For some reason, maybe legacy clients, we can't disable them, but we want them to be last on the list. One way to do this is to first configure the DEFAULT list, then remove all of the 3DES ciphers. But then add the 3DES ciphers back explicitly – at the end of the list. Let's try it – compare the following: tmm --clientciphers 'DEFAULT' ID SUITE BITS PROT METHOD CIPHER MAC KEYX 0: 159 DHE-RSA-AES256-GCM-SHA384 256 TLS1.2 Native AES-GCM SHA384 EDH/RSA 1: 158 DHE-RSA-AES128-GCM-SHA256 128 TLS1.2 Native AES-GCM SHA256 EDH/RSA 2: 107 DHE-RSA-AES256-SHA256 256 TLS1.2 Native AES SHA256 EDH/RSA 3: 57 DHE-RSA-AES256-SHA 256 TLS1 Native AES SHA EDH/RSA 4: 57 DHE-RSA-AES256-SHA 256 TLS1.1 Native AES SHA EDH/RSA 5: 57 DHE-RSA-AES256-SHA 256 TLS1.2 Native AES SHA EDH/RSA 6: 57 DHE-RSA-AES256-SHA 256 DTLS1 Native AES SHA EDH/RSA 7: 103 DHE-RSA-AES128-SHA256 128 TLS1.2 Native AES SHA256 EDH/RSA 8: 51 DHE-RSA-AES128-SHA 128 TLS1 Native AES SHA EDH/RSA 9: 51 DHE-RSA-AES128-SHA 128 TLS1.1 Native AES SHA EDH/RSA 10: 51 DHE-RSA-AES128-SHA 128 TLS1.2 Native AES SHA EDH/RSA 11: 51 DHE-RSA-AES128-SHA 128 DTLS1 Native AES SHA EDH/RSA 12: 22 DHE-RSA-DES-CBC3-SHA 168 TLS1 Native DES SHA EDH/RSA 13: 22 DHE-RSA-DES-CBC3-SHA 168 TLS1.1 Native DES SHA EDH/RSA 14: 22 DHE-RSA-DES-CBC3-SHA 168 TLS1.2 Native DES SHA EDH/RSA 15: 22 DHE-RSA-DES-CBC3-SHA 168 DTLS1 Native DES SHA EDH/RSA 16: 157 AES256-GCM-SHA384 256 TLS1.2 Native AES-GCM SHA384 RSA 17: 156 AES128-GCM-SHA256 128 TLS1.2 Native AES-GCM SHA256 RSA 18: 61 AES256-SHA256 256 TLS1.2 Native AES SHA256 RSA 19: 53 AES256-SHA 256 TLS1 Native AES SHA RSA 20: 53 AES256-SHA 256 TLS1.1 Native AES SHA RSA 21: 53 AES256-SHA 256 TLS1.2 Native AES SHA RSA 22: 53 AES256-SHA 256 DTLS1 Native AES SHA RSA 23: 60 AES128-SHA256 128 TLS1.2 Native AES SHA256 RSA 24: 47 AES128-SHA 128 TLS1 Native AES SHA RSA 25: 47 AES128-SHA 128 TLS1.1 Native AES SHA RSA 26: 47 AES128-SHA 128 TLS1.2 Native AES SHA RSA 27: 47 AES128-SHA 128 DTLS1 Native AES SHA RSA 28: 10 DES-CBC3-SHA 168 TLS1 Native DES SHA RSA 29: 10 DES-CBC3-SHA 168 TLS1.1 Native DES SHA RSA 30: 10 DES-CBC3-SHA 168 TLS1.2 Native DES SHA RSA 31: 10 DES-CBC3-SHA 168 DTLS1 Native DES SHA RSA 32: 49200 ECDHE-RSA-AES256-GCM-SHA384 256 TLS1.2 Native AES-GCM SHA384 ECDHE_RSA 33: 49199 ECDHE-RSA-AES128-GCM-SHA256 128 TLS1.2 Native AES-GCM SHA256 ECDHE_RSA 34: 49192 ECDHE-RSA-AES256-SHA384 256 TLS1.2 Native AES SHA384 ECDHE_RSA 35: 49172 ECDHE-RSA-AES256-CBC-SHA 256 TLS1 Native AES SHA ECDHE_RSA 36: 49172 ECDHE-RSA-AES256-CBC-SHA 256 TLS1.1 Native AES SHA ECDHE_RSA 37: 49172 ECDHE-RSA-AES256-CBC-SHA 256 TLS1.2 Native AES SHA ECDHE_RSA 38: 49191 ECDHE-RSA-AES128-SHA256 128 TLS1.2 Native AES SHA256 ECDHE_RSA 39: 49171 ECDHE-RSA-AES128-CBC-SHA 128 TLS1 Native AES SHA ECDHE_RSA 40: 49171 ECDHE-RSA-AES128-CBC-SHA 128 TLS1.1 Native AES SHA ECDHE_RSA 41: 49171 ECDHE-RSA-AES128-CBC-SHA 128 TLS1.2 Native AES SHA ECDHE_RSA 42: 49170 ECDHE-RSA-DES-CBC3-SHA 168 TLS1 Native DES SHA ECDHE_RSA 43: 49170 ECDHE-RSA-DES-CBC3-SHA 168 TLS1.1 Native DES SHA ECDHE_RSA 44: 49170 ECDHE-RSA-DES-CBC3-SHA 168 TLS1.2 Native DES SHA ECDHE_RSA tmm --clientciphers 'DEFAULT:-3DES:!SSLv3:3DES+ECDHE:3DES+DHE:3DES+RSA' ID SUITE BITS PROT METHOD CIPHER MAC KEYX 0: 159 DHE-RSA-AES256-GCM-SHA384 256 TLS1.2 Native AES-GCM SHA384 EDH/RSA 1: 158 DHE-RSA-AES128-GCM-SHA256 128 TLS1.2 Native AES-GCM SHA256 EDH/RSA 2: 107 DHE-RSA-AES256-SHA256 256 TLS1.2 Native AES SHA256 EDH/RSA 3: 57 DHE-RSA-AES256-SHA 256 TLS1 Native AES SHA EDH/RSA 4: 57 DHE-RSA-AES256-SHA 256 TLS1.1 Native AES SHA EDH/RSA 5: 57 DHE-RSA-AES256-SHA 256 TLS1.2 Native AES SHA EDH/RSA 6: 57 DHE-RSA-AES256-SHA 256 DTLS1 Native AES SHA EDH/RSA 7: 103 DHE-RSA-AES128-SHA256 128 TLS1.2 Native AES SHA256 EDH/RSA 8: 51 DHE-RSA-AES128-SHA 128 TLS1 Native AES SHA EDH/RSA 9: 51 DHE-RSA-AES128-SHA 128 TLS1.1 Native AES SHA EDH/RSA 10: 51 DHE-RSA-AES128-SHA 128 TLS1.2 Native AES SHA EDH/RSA 11: 51 DHE-RSA-AES128-SHA 128 DTLS1 Native AES SHA EDH/RSA 12: 157 AES256-GCM-SHA384 256 TLS1.2 Native AES-GCM SHA384 RSA 13: 156 AES128-GCM-SHA256 128 TLS1.2 Native AES-GCM SHA256 RSA 14: 61 AES256-SHA256 256 TLS1.2 Native AES SHA256 RSA 15: 53 AES256-SHA 256 TLS1 Native AES SHA RSA 16: 53 AES256-SHA 256 TLS1.1 Native AES SHA RSA 17: 53 AES256-SHA 256 TLS1.2 Native AES SHA RSA 18: 53 AES256-SHA 256 DTLS1 Native AES SHA RSA 19: 60 AES128-SHA256 128 TLS1.2 Native AES SHA256 RSA 20: 47 AES128-SHA 128 TLS1 Native AES SHA RSA 21: 47 AES128-SHA 128 TLS1.1 Native AES SHA RSA 22: 47 AES128-SHA 128 TLS1.2 Native AES SHA RSA 23: 47 AES128-SHA 128 DTLS1 Native AES SHA RSA 24: 49200 ECDHE-RSA-AES256-GCM-SHA384 256 TLS1.2 Native AES-GCM SHA384 ECDHE_RSA 25: 49199 ECDHE-RSA-AES128-GCM-SHA256 128 TLS1.2 Native AES-GCM SHA256 ECDHE_RSA 26: 49192 ECDHE-RSA-AES256-SHA384 256 TLS1.2 Native AES SHA384 ECDHE_RSA 27: 49172 ECDHE-RSA-AES256-CBC-SHA 256 TLS1 Native AES SHA ECDHE_RSA 28: 49172 ECDHE-RSA-AES256-CBC-SHA 256 TLS1.1 Native AES SHA ECDHE_RSA 29: 49172 ECDHE-RSA-AES256-CBC-SHA 256 TLS1.2 Native AES SHA ECDHE_RSA 30: 49191 ECDHE-RSA-AES128-SHA256 128 TLS1.2 Native AES SHA256 ECDHE_RSA 31: 49171 ECDHE-RSA-AES128-CBC-SHA 128 TLS1 Native AES SHA ECDHE_RSA 32: 49171 ECDHE-RSA-AES128-CBC-SHA 128 TLS1.1 Native AES SHA ECDHE_RSA 33: 49171 ECDHE-RSA-AES128-CBC-SHA 128 TLS1.2 Native AES SHA ECDHE_RSA 34: 49170 ECDHE-RSA-DES-CBC3-SHA 168 TLS1 Native DES SHA ECDHE_RSA 35: 49170 ECDHE-RSA-DES-CBC3-SHA 168 TLS1.1 Native DES SHA ECDHE_RSA 36: 49170 ECDHE-RSA-DES-CBC3-SHA 168 TLS1.2 Native DES SHA ECDHE_RSA 37: 22 DHE-RSA-DES-CBC3-SHA 168 TLS1 Native DES SHA EDH/RSA 38: 22 DHE-RSA-DES-CBC3-SHA 168 TLS1.1 Native DES SHA EDH/RSA 39: 22 DHE-RSA-DES-CBC3-SHA 168 TLS1.2 Native DES SHA EDH/RSA 40: 22 DHE-RSA-DES-CBC3-SHA 168 DTLS1 Native DES SHA EDH/RSA 41: 10 DES-CBC3-SHA 168 TLS1 Native DES SHA RSA 42: 10 DES-CBC3-SHA 168 TLS1.1 Native DES SHA RSA 43: 10 DES-CBC3-SHA 168 TLS1.2 Native DES SHA RSA 44: 10 DES-CBC3-SHA 168 DTLS1 Native DES SHA RSA I added something else in there which I'll come back to later. Pitfalls As should be clear by now cipher configuration is a powerful tool, but as the song says, every tool is a weapon if you hold it right. And weapons are dangerous. With a little careless handling it is easy to lose a toe – or a leg. Whenever you are working with cipher suite configuration the old rule of 'measure twice, cut once' applies – and then double-check the work to be certain. There are several common pitfalls which await you. Misuse Perhaps the most common pitfall is simply misuse – using cipher suite configuration for that which it is not intended. And the single most common example of this comes from using cipher configuration to manipulate protocols. Given the keywords, as described above, it seems common for users to presume that if they want to disable a protocol, such as TLSv1.0, then the way to do that is to use a cipher suite keyword, such as !TLSv1. And, indeed, this may seem to work – but it isn't doing what is desired. The protocol is not disabled, only the ciphers that are supported for that protocol are. The protocol is configured on the VIP independently of the ciphers. !TLSv1 would disable all ciphers supported under the TLSv1.0 protocol, but not the protocol itself. Note that the protocol negotiation and the cipher negotiation in the SSL/TLS handshake are independent. What happens if the VIP only supports TLSv1.0/v1.1/v1.2 and the client only supports SSLv3 & TLSv1.0? Well, they'd agree on TLSv1.0 as the common protocol. The cipher list the client sends in the Client Hello is independent of the protocol that is eventually negotiated. Say the client sends AES128-SHA and the server has that in its list, so it is selected. OK, we've agreed on a protocol and a cipher suite – only the server won't do any ciphers on TLSv1.0 because of '!TLSv1' in the ciphers configuration, and the connection will fail. That may seem like splitting hairs, but it makes a difference. If a scanner is looking for protocols that are enabled, and not the full handshake, it may still flag a system which has been configured this way. The protocol is negotiated during the SSL/TLS handshake before the cipher is selected. This also means the system is doing more work, as the handshake continues further before failing, and the log messages may be misleading. Instead of logging a protocol incompatibility the logs will reflect the failure to find a viable cipher, which can be a red herring when it comes time to debug the configuration. The right way to do this is to actually disable the protocol, which doesn't involve the cipher suite configuration at all. For the control plane this is done through the ssl-protocol directive: tmsh list sys http ssl-protocol sys httpd { ssl-protocol "all -SSLv2 -SSLv3" } For example, if we wanted to disable TLSv1.0: tmsh modify sys http ssl-protocol 'all -SSLv2 -SSLv3 -TLSv1' tmsh list sys http ssl-protocol sys httpd { ssl-protocol "all -SSLv2 -SSLv3 -TLSv1" } For the data plane this can be done via the Options List in the SSL Profile GUI, via the No SSL, No TLSv1.1, etc. directives: Or via the command line: tmsh list ltm profile client-ssl Test options ltm profile client-ssl Test { options { dont-insert-empty-fragments } } tmsh modify ltm profile client-ssl Test options {dont-insert-empty-fragments no-tlsv1} tmsh list /ltm profile client-ssl Test options ltm profile client-ssl Test { options { dont-insert-empty-fragments no-tlsv1 } } The values are slightly different on the command line, use this command to see them all: tmsh modify ltm profile client-ssl <profile-name> options ? Use the right tool for the job and you'll be more likely to succeed. Truncation As I previously mentioned, in versions up to 11.5.0 the ciphers configuration string was truncated at 256 bytes. Starting in 11.5.0 that was increased to 768 bytes (see K11481: The SSL profile cipher lists have a 256 character limitation for more information), but that can still silently truncate long configurations. This is not a theoretical issue, we've seen users run into this in the real world. For example, little over a year ago I worked with a customer who was then using 11.4.1 HF8. They were trying to very precisely control which ciphers were enabled, and their order. In order to do this they'd decided to enumerate every individual cipher in their configuration – resulting in this cipher suite configuration string: TLSv1_2+ECDHE-RSA-AES256-CBC-SHA:TLSv1_1+ECDHE-RSA-AES256-CBC-SHA:TLSv1_2+ECDHE-RSA-AES128-CBC-SHA:TLSv1_1+ECDHE-RSA-AES128-CBC-SHA:TLSv1_2+DHE-RSA-AES256-SHA:TLSv1_1+DHE-RSA-AES256-SHA:TLSv1_2+DHE-RSA-AES128-SHA:TLSv1_1+DHE-RSA-AES128-SHA:TLSv1_2+AES256-SHA256:TLSv1_1+AES256-SHA:TLSv1_2+AES128-SHA256:TLSv1_1+AES128-SHA:TLSv1+ECDHE-RSA-AES256-CBC-SHA:TLSv1+ECDHE-RSA-AES128-CBC-SHA:TLSv1+DHE-RSA-AES256-SHA:TLSv1+DHE-RSA-AES128-SHA:TLSv1+AES256-SHA:TLSv1+AES128-SHA:TLSv1+DES-CBC3-SHA That string would save in the configuration and it was there if you looked at the bigip.conf file, but it was silently truncated when the configuration was loaded. Since this was 11.4.1, only the first 256 bytes were loaded successfully, which made the running configuration: TLSv1_2+ECDHE-RSA-AES256-CBC-SHA:TLSv1_1+ECDHE-RSA-AES256-CBC-SHA:TLSv1_2+ECDHE-RSA-AES128-CBC-SHA:TLSv1_1+ECDHE-RSA-AES128-CBC-SHA:TLSv1_2+DHE-RSA-AES256-SHA:TLSv1_1+DHE-RSA-AES256-SHA:TLSv1_2+DHE-RSA-AES128-SHA:TLSv1_1+DHE-RSA-AES128-SHA:TLSv1_2+AES256-S Note the last suite is truncated itself, which means it was invalid and therefore ignored. If their configuration had worked they would've had nineteen protocol+suite combinations – instead they had eight. Needless to say, this caused some problems. This customer was missing ciphers that they expected to have working. That is bad enough – but it could be worse. Let's imagine a customer who wants to specify several specific ciphers first, then generally enable a number of other TLSv1.2 & TLSv1.1 ciphers. And, of course, they are careful to disable dangerous ciphers! TLSv1_2+ECDHE-RSA-AES256-CBC-SHA:TLSv1_1+ECDHE-RSA-AES256-CBC-SHA:TLSv1_2+ECDHE-RSA-AES128-CBC-SHA:TLSv1_1+ECDHE-RSA-AES128-CBC-SHA:TLSv1_2+DHE-RSA-AES256-SHA:TLSv1_1+DHE-RSA-AES256-SHA:TLSv1_2+DHE-RSA-AES128-SHA:TLSv1_1+DHE-RSA-AES128-SHA:TLSv1_2:TLSv1_1:!RC4:!MD5:!ADH:!DES:!EXPORT OK, that looks fairly solid, right? What do you suppose the problem with this is? This is the problem; in 11.4.1 and earlier it would truncate to this: TLSv1_2+ECDHE-RSA-AES256-CBC-SHA:TLSv1_1+ECDHE-RSA-AES256-CBC-SHA:TLSv1_2+ECDHE-RSA-AES128-CBC-SHA:TLSv1_1+ECDHE-RSA-AES128-CBC-SHA:TLSv1_2+DHE-RSA-AES256-SHA:TLSv1_1+DHE-RSA-AES256-SHA:TLSv1_2+DHE-RSA-AES128-SHA:TLSv1_1+DHE-RSA-AES128-SHA:TLSv1_2:TLSv1_1: All of the exclusions were truncated off! Now we have the opposite problem – there are a number of ciphers enabled which the customer expects to be disabled! And they're BAD ciphers – ADH, DES, MD5, RC4. So this customer would be at high risk without realizing it. Be aware of this; it is very sneaky. The configuration will look fine; the truncation happens in the code when it loads the configuration. This is also one reason why I always recommend listing your exclusions first in the configuration string. Then you can never accidentally enable something. Unintended Consequences Let's say a new CVE is announced which exposes a very serious vulnerability in SSLv3 & TLSv1.0. There is no way to mitigate it, and the only solution is to limit connections to only TLSv1.1 & TLSv1.2. You want a cipher configuration to accomplish this. It seems straight-forward – just configure it to use only ciphers on TLSv1.1 & TLSv1.2: tmsh modify ltm profile client-ssl <profile> ciphers 'TLSv1_2:TLSv1_1' Congratulations, you've solved the problem. You are no longer vulnerable to this CVE. You know there is a but coming, right? What's wrong? Well, you just enabled all TLSv1.2 & TLSv1.1 ciphers. That includes such gems as RC4-MD5, RC4-SHA, DES, and a few ADH (Anonymous Diffie-Hellman) suites which have no authentication. As recently as 11.3.0 you'd even be enabling some 40-bit EXPORT ciphers. (We pulled them out of NATIVE in 11.4.0.) So you just leapt out of the frying pan and into the fire. Always, always, always check the configuration before using it. Running that through tmm --clientciphers 'TLSv1_2:TLSv1_1' would've raised red flags. Instead, this configuration would work without causing those problems: tmsh modify ltm profile client-ssl <profile> ciphers 'DEFAULT:!TLSv1:!SSLv3' Another option, and probably the better one, is to disable the SSLv3 and TLSv1.0 protocols on the VIP. As I discussed above. Of course, you can do both – belt and suspenders. And just to show you how easy it is to make such a mistake, F5 did this! In K13400: SSL 3.0/TLS 1.0 BEAST vulnerability CVE-2011-3389 and TLS protocol vulnerability CVE-2012-1870 we originally had the following in the mitigation section: Note: Alternatively, to configure an SSL profile to use only TLS 1.1-compatible, TLS 1.2-compatible, AES-GCM, or RC4-SHA ciphers using the tmsh utility, use the following syntax: tmsh create /ltm profile client-ssl <name> ciphers TLSv1_1:TLSv1_2:AES-GCM:RC4-SHA Yes, I had this fixed long ago. Remember back in the section on keywords I had this comparison example: tmm --clientciphers 'DEFAULT' tmm --clientciphers 'DEFAULT:-3DES:!SSLv3:3DES+ECDHE:3DES+DHE:3DES+RSA' Who caught the '!SSLv3' in the second line? Why do you think I added that? Did I need to? Hint: What do you think the side effect of blanket enabling all of those 3DES ciphers would be if I didn't explicitly disable SSLv3? Cipher Ordering In SSL/TLS there are two main models to the cipher suite negotiation – Server Cipher Preference or Client Cipher Preference. What does this mean? In SSL/TLS the client sends the list of cipher suites it is willing and able to support in the Client Hello. The server also has its list of cipher suites that it is willing and able to support. In Client Cipher Preference the server will select the first cipher on the client's list that is also in the server's list. Effectively this gives the client influence over which cipher is selected based on the order of the list it sends. In Server Cipher Preference the server will select the first server on its own list that is also on the client's list. So the server gives the order of its list precedence. BIG-IP always operates in Server Cipher Preference, so be very careful in how you order your cipher suites. Preferred suites should go at the top of the list. How you order your cipher suites will directly affect which ciphers are used. It doesn't matter if a stronger cipher is available if a weak cipher is matched first. HTTP/2 How is HTTP/2 a pitfall? The HTTP/2 RFC7540 includes a blacklist of ciphers that are valid in TLS, but should not be used in HTTP/2. This can cause a problem on a server where the TLS negotiation is decoupled from the ALPN exchange for the higher level protocol. The server might select a cipher which is on the blacklist, and then when the connection attempts to step up to HTTP/2 via ALPN the client may terminate the connection with extreme prejudice. It is well known enough to be called out in the RFC – Section 9.2.2. F5 added support for HTTP/2 in 12.0.0 – and we fell into this trap. Our DEFAULT ciphers list was ordered such that it was almost certain a blacklisted cipher would be selected.; This was fixed in 12.0.0 HF3 and 12.1.0, but serves as an example. On 12.0.0 FINAL through 12.0.0 HF2 a simple fix was to configure the ciphers to be 'ECDHE+AES-GCM:DEFAULT'. ECDHE+AES-GCM is guaranteed to be supported by any client compliant with RFC7540 (HTTP/2). Putting it first ensures it is selected before any blacklisted cipher. 3DES Back in the section on ciphers I mentioned that we label 3DES as being 168-bit, but that it only provides the equivalent of 112-bit strength. So, what did I mean by that? DES operates on 64-bit data blocks, using 56-bits of key. So it has a strength of 2 56 . 3DES, aka Triple DES, was a stop-gap designed to stretch the life of DES once 56-bits was too weak to be safe, until AES became available. 3DES use the exact same DES cipher, it just uses it three times – hence the name. So you might think 3x56-bits = 168-bits. 2 168 strong. Right? No, not really. The standard implementation of 3DES is known as EDE – for Encrypt, Decrypt, Encrypt. (For reasons we don't need to get into here.) You take the 64-bit data block, run it through DES once to encrypt it with K 1 , then run it through again to decrypt it using K 2 , then encrypt it once again using K 3 . Three keys, that's still 168-bits, right? Well, you'd think so. But the devil is in the (implementation) details. First of all there are three keying options for 3DES: - Keying option 1: K1, K2, K3 – 168 unique bits (but only 112-bit strength!) - Keying option 2: K1, K2, K1 – 112 unique bits (but only 80-bit strength!) - Keying option 3: K1, K1, K1 – 56 unique bits, 56-bit strength (Equivalent to DES due to EDE!) F5 uses keying option one, so we have 168-bits of unique key. However, 3DES with keying option one is subject to a meet-in-the-middle cryptographic attack which only has a cost of 2 112 . It has even been reduced as low as 2 108 , as described in this paper. So it does not provide the expected 168-bits of security, and is in fact weaker than AES128. To add some confusion, due to an old issue we used to describe 3DES as being 192-bit. See: K17296: The BIG-IP system incorrectly reports a 192-bit key length for cipher suites using 3DES (DES-CBC3) for more details. Of course, with the appearance of the Sweet32 attack last fall I would encourage everyone to disable 3DES completely whenever possible. We're also seeing a growing number of scanners and audit tools recategorizing 3DES as a 'Medium' strength cipher, down from 'High', and correspondingly lowering the grade for any site still supporting it. If you don't need it, turn it off. See K13167034: OpenSSL vulnerability CVE-2016-2183 for more information. Conclusion Believe it or not, that's the quick overview of cipher suite configuration on BIG-IP. There are many areas where we could dig in further and spend some time in the weeds, but I hope that this article helps at least one person understand cipher suite configuration better, and to avoid the pitfalls that commonly claim those who work with them. Additional Resources This article is by no means comprehensive, and for those interested I'd encourage additional reading: BIG-IP SSL Cipher History by David Holmes, here on DevCentral Cipher Rules And Groups in BIG-IP v13 by Chase Abbott, also on DevCentral OpenSSL Cipher Documentation K8802: Using SSL ciphers with BIG-IP Client SSL and Server SSL profiles K15194: Overview of the BIG-IP SSL/TLS cipher suite K13163: SSL ciphers supported on BIG-IP platforms (11.x - 12.x) K13156: SSL ciphers used in the default SSL profiles (11.x - 12.x) K17370: Configuring the cipher strength for SSL profiles (12.x) K13171: Configuring the cipher strength for SSL profiles (11.x) K14783: Overview of the Client SSL profile (11.x - 12.x) K14806: Overview of the Server SSL profile (11.x - 12.x)20KViews9likes17Comments