SNI Routing with BIG-IP
In the previous article, The Three HTTP Routing Patterns, Lori MacVittie covers 3 methods of routing. Today we will look at Server Name Indication (SNI) routing as an additional method of routing HTTPS or any protocol that uses TLS and SNI. Using SNI we can route traffic to a destination without having to terminate the SSL connection. This enables several benefits including: Reduced number of Public IPs Simplified configuration More intelligent routing of TLS traffic Terminating SSL Connections When you havea SSL certificate and key you can perform the cryptographic actions required to encrypt traffic using TLS. This is what I refer to as “terminating the SSL connection” throughout this article. When you want to route traffic this is a chickenand an egg problem, becausefor TLS traffic you want to be able to route the traffic by being able to inspect the contents, but this normally requires being able to “terminate the SSL connection”. The goal of this article is to layer in traffic routing for TLS traffic without having to require having/knowing the original SSL certificate and key. Server Name Indication (SNI) SNI is a TLS extension that makes it possible to "share" certificates on a single IP address. This is possible due to a client using a TLS extension that requests a specific name before the server responds with a SSL certificate. Prior to SNI, the other options would be a wildcard certificate or Subject Alternative Name (SAN) that allows you to specify multiple names with a single certificate. SNI with Virtual Servers It has been possible to use SNI on F5 BIG-IP since TMOS 11.3.0. The following KB13452 outlines how it can be configured. In this scenario (from the KB article) the BIG-IP is terminating the SSL connection. Not all clients support SNI and you will always need to specify a “fallback” profile that will be used if a SNI name is not used or matched. The next example will look at how to use SNI without terminating the SSL connection. SNI Routing Occasionally you may have the need to have a hybrid configuration of terminating SSL connections on the BIG-IP and sending connections without terminating SSL. One method is to create two separate virtual servers, one for SSL connections that the BIG-IP will handle (using clientssl profile) and one that it will not handle SSL (just TCP). This works OK for a small number of backends, but does not scale well if you have many backends (run out of Public IP addresses). Using SNI Routing we can handle everything on a single virtual server / Public IP address. There are 3 methods for performing SNI Routing with BIG-IP iRule with binary scan a. Article by Colin Walker code attribute to Joel Moses b. Code Share by Stanislas Piron iRule with SSL::extensions Local Traffic Policy Option #1 is for folks that prefer complete control of the TLS protocol. It only requires the use of a TCP profile. Options #2 and #3 only require the use of a SSL persistence profile and TCP profile. SNI Routing with Local Traffic Policy We will skip option #1 and #2 in this article and look at using a Local Traffic Policy for SNI Routing. For a review of Local Traffic Policies check out the following DevCentral articles: LTM Policy Jan 2015 Simplifying Local Traffic Policies in BIG-IP 12.1 June 2016 In previous articles about Local Traffic Policiesthe focus was on routing HTTP traffic, but today we will use it to route SSL connections using SNI. In the following example, using a Local Traffic Policy named “sni_routing”, we are setting a condition on the SSL Extension “servername” and sending the traffic to a pool without terminating the SSL connection. The pool member could be another server or another BIG-IP device. The next example will forward the traffic to another virtual server that is configured with a clientssl profile. This uses VIP targeting to send traffic to another virtual server on the same device. In both examples it is important to note that the “condition”/“action” has been changed from occurring on “request” (that maps to a HTTP L7 request) to “ssl client hello”. By performing the action prior to any L7 functions occurring, we can forward the traffic without terminating the SSL connection. The previous example policy, “sni_routing”, can be attached to a Virtual Server that only has a TCP profile and SSL persistence profile. No HTTP or clientssl profile is required! This method can also be used to solve the issue of how to consolidate multiple SSL virtual servers behind a single virtual server that have different APM and/or ASM policies. This is similar to the architecture that is used by the Container Connector for Cloud Foundry; in creating a two-tier load balancing solution on a single device. Routed Correctly? TLS 1.3 has interesting proposals on how to obscure the servername (TLS in TLS?), but for now this is a useful and practical method of handling multiple SSL certs on a single IP. In the future this may still be possible as well with TLS 1.3. For example the use of a HTTP Fronting service could be a tier 1 virtual server (this is just my personal speculation, I have not tried, at the time of publishing this was still a draft proposal). In other news it has been demonstrated that a combination of using SNI and a different host header can be used for “domain fronting”. A method to enforce consistent policy (prevent domain fronting) would be to layer in additional conditions that match requested SNI servername (TLS extension) with requested HOST header (L7 HTTP header). This would help enforce that a tenant is using a certificate that is associated with their application and not “borrowing” the name and certificate that is being used by an adjacent service. We don’t think of a TLS extension as an attribute that can be used to route application traffic, but it is useful and possible on BIG-IP.21KViews0likes16CommentsDecrypting SSL traffic - PMS and egress
Hi - two questions combined. Background - trying to catch and decipher tcpdump both for Client -> VIP and F5-> Pool Members traffic I'm following this tutorial:Decrypt with tcpdump --f5 ssl I managed to catch the frontend traffic, but I'm struggling with creating the PMS key. I want to automate it using the provided wireshark cmd command, but I get the error: C:\Program Files\Wireshark: invalid option -- 'T' C:\Program Files\Wireshark: invalid option -- 'e' I'm using Wireshark 3.4.8 - what would be the equivalent options for my version? Unfortunately using a Linux in this environment is out of the question. I can only work on Windows stepping stone and can't send the captures to my PC Second issue: Catching the backend traffic does not produce the F5 TLS in the pcap capture... The server ssl profile is present, but I have no idea how to force the --f5 ssl option in tcpdump to catch the keys. Will appreciate any advice - It is my second day struggling with the issue2.1KViews0likes14CommentsSSL Orchestrator Advanced Use Cases: Outbound SNAT Persistence
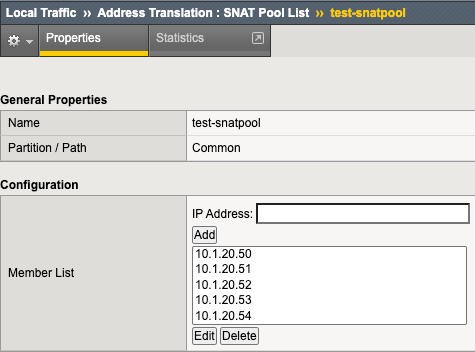
Introduction F5 BIG-IP is synonymous with "flexibility". You likely have few other devices in your architecture that provide the breadth of capabilities that come native with the BIG-IP platform. And for each and every BIG-IP product module, the opportunities to expand functionality are almost limitless. In this article series we examine the flexibility options of the F5 SSL Orchestrator in a set of "advanced" use cases. If you haven't noticed, the world has been steadily moving toward encrypted communications. Everything from web, email, voice, video, chat, and IoT is now wrapped in TLS, and that's a good thing. The problem is, malware - that thing that creates havoc in your organization, that exfiltrates personnel records to the Dark Web - isn't stopped by encryption. TLS 1.3 and multi-factor authentication don't eradicate malware. The only reasonable way to defend against it is to catch it in the act, and an entire industry of security products are designed for just this task. But ironically, encryption makes this hard. You can't protect against what you can't see. F5 SSL Orchestrator simplifies traffic decryption and malware inspection, and dynamically orchestrates traffic to your security stack. But it does much more than that. SSL Orchestrator is built on top of F5's BIG-IP platform, and as stated earlier, is abound with flexibility. SSL Orchestrator Use Case: Outbound SNAT Persistence It may not be the most obvious thing to think about persistence in the vein of outbound traffic. We are all groomed to accept that any given load balancer can handle persistence (or "affinity", or "stickiness") to backend servers. This is an important characteristic for sure. But in an outbound scenario, you don't load balance remote servers, so why on Earth would you need persistence? Well, I'm glad you asked. There indeed happens to be a somewhat unique, albeit infrequent use case where two different servers need to persist on YOUR IP address. The classic example is a site that requires federated authentication, where the service provider (SP) generates a token (perhaps a SAML auth request) and inside of that request the SP has embedded the client IP. The client receives this message and is redirected to the IdP to authenticate. But in this case the client is talking to the outside world through a forward proxy, and outbound source NAT (SNAT) could be required in this environment. That means there's a potential that the client IP address as seen from the two remote servers could be different. So if the IdP needs to verify the client IP based on what's embedded in the authentication request token, that could possibly fail. The good news here is that federated authentication doesn't normally require client IP verification, and there aren't many other similar use cases, but it can happen. The F5 BIG-IP, as with ANY proxy server, load balancer, or ADC device, clearly supports server affinity, and in a highly flexible way. But, as with ANY proxy server, load balancer, or ADC device, that doesn't apply to SNAT addresses. Nevertheless, the F5 BIG-IP can be configured to do this, which is exactly what this article is about. We're going to flex some BIG-IP muscle to derive a unique and innovative way to enable outbound SNAT persistence. What we're basically talking about is ensuring that a single internal client persists a single outbound SNAT IP address, when and where needed, and as long as possible. It's important to note here that we're not really talking about persistence in the same way you think about load balanced server affinity. With affinity, you're stapling a single (remote) client "session" to a single load balanced server. With SNAT persistence, you're stapling a single outbound SNAT IP to a single internal client so that all remote servers see that same source address. Same-same but different-different. To do this we'll need a SNAT pool and an iRule. We need the SNAT pool to define the SNAT addresses we can use. And since SNAT pools don't provide a persistence option like regular pools do, we'll use an iRule to provide the stickiness. It's also worth noting here, again since we're not really talking about load balancing stickiness, that the IP persistence mechanism in the iRule may not (likely will not) evenly distribute the IPs in the SNAT pool. Your best bet is to provide as many SNAT pool IPs as possible and reasonable. The good news here is that, because you're using a BIG-IP, you can define exactly how you assert that IP stickiness. In most cases, you'll probably just want to persist on the internal client IP, but you could also persist on: Client source address and remote server port Client source address and remote destination addresses Client source, day of the week, the year+month+day % mod 2, a hash of the word-of-the-day...and hopefully you get the idea. Lot's of options. To make this work, let's start with the SNAT pool. Navigate to Local Traffic -> Address Translation -> SNAT Pool List in the BIG-IP and click Create. In the Member List section, add as many SNAT IPs as you can afford. Remember, these are going to be IPs on your outbound VLAN, so in the same subnet as your outbound VLAN self-IP. Figure: SNAT pool list You don't need to assign the SNAT pool to anything directly. The iRule will handle that. And now onto the iRule. Navigate to Local Traffic -> iRules -> iRule List in the BIG-IP, and click Create. Copy the following into the iRule editor: when RULE_INIT { ## This iRule should be applied to your SSLO intercaption rule ending with in-t-4. catch { unset -nocomplain static::snat_ips } ## For each SNAT IP needed define the IP versus dynamically looking it up. ## These need to be in the real SNAT pool as well so ARP works. set static::snat_ips(1) 10.1.20.50 set static::snat_ips(2) 10.1.20.51 set static::snat_ips(3) 10.1.20.52 set static::snat_ips(4) 10.1.20.53 set static::snat_ips(5) 10.1.20.54 ## Set to how many SNAT IPs were added set static::array_size 5 } when CLIENT_ACCEPTED priority 100 { ## Select and uncomment only ONE of the below SNAT persistence options ## Persist SNAT based on client address only snat $static::snat_ips([expr {[crc32 [IP::client_addr]] % $static::array_size}]) ## Persist SNAT based on client address and remote port #snat $static::snat_ips([expr {[crc32 [IP::client_addr] [TCP::remote_port]] % $static::array_size}]) ## Persist SNAT based on client address and remote address #snat $static::snat_ips([expr {[crc32 [IP::client_addr] [IP::local_addr]] % $static::array_size}]) } Let's take a moment to explain what this iRule is actually doing, and it is fairly straightforward. In RULE_INIT, which fires ONCE when you update the iRule, the members of the defined SNAT pool are read into an array. Then a second static variable is created to store the size of the array. These values are stored as static, global variables. In CLIENT_ACCEPTED we set a priority of 100 to control the order of execution under SSL Orchestrator as there is already a CLIENT_ACCEPTED iRule event on the topology (we want our new event to run first). Below that you're provided with three choices for persistence: persist on source IP only, source IP and destination port, or source IP and destination IP. You'll want to uncomment only ONE of these. Each basically performs a quick CRC hash on the selected value, then calculates a modulus based on the array size. This returns a number within the size of the array, that is then applied as the index to the array to extract one of the array values. This calculation is always the same for the same input value(s), so effectively persisting on that value. The selected SNAT IP is then fed to the 'snat' command, and there you have it. As stated, you're probably only going to need the source-only persistence option. Using either of the others will pin a SNAT IP to a client IP and protocol port (ex. client IP:443 or client IP:80), or pin a SNAT IP to a specific host (ex. client IP:www.example.com), respectively. At the end of the day, you can insert any reasonable expression that will result in the selection of one of the values in the SNAT pool array, so the sky is really the limit here. The last step is easiest of all. You need to attach this iRule to your SSL Orchestrator topology. To do that. navigate to SSL Orchestrator -> Configuration in the UI, select the Interception Rules tab, and click to edit the respective outbound interception rule. Scroll to the bottom of this page, and under Resources, add the new iRule to the Selected column. The order doesn't matter. Click Deploy to complete the change, and you're done. You can do a packet capture on your outbound VLAN to see what is happening. tcpdump -lnni [outbound vlan] host 93.184.216.34 And then access https://www.example.com to test. For your IP address you should see a consistent outgoing SNAT IP. If you have access to a Linux client, you can add multiple IP addresses to an interface and test with each: ifconfig eth0:1 10.1.10.51 ifconfig eth0:2 10.1.10.52 ifconfig eth0:3 10.1.10.53 ifconfig eth0:4 10.1.10.54 ifconfig eth0:5 10.1.10.55 curl -vk https://www.example.com --interface 10.1.10.51 curl -vk https://www.example.com --interface 10.1.10.52 curl -vk https://www.example.com --interface 10.1.10.53 curl -vk https://www.example.com --interface 10.1.10.54 curl -vk https://www.example.com --interface 10.1.10.55 And again there you have it. In just a few steps you've been able to enable outbound SNAT persistence, and along the way you have hopefully recognized the immense flexibility at your command.1.7KViews1like5Comments
Understanding the Authenticate Name Option on Server SSL profile on BIG-IP
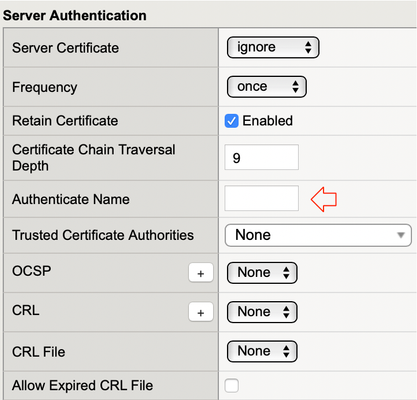
Quick Intro Have you ever wondered what this little option on Server SSL profile really does in practice? This is what this article is all about. If you're only interested about what I learnt during my lab tests, please feel free to read just Lab Test Results section. Otherwise, enjoy the lab walkthrough :) Lab Test Results In case you just want to know what it is, this setting looks at bothcommonNameandsubjectAltNameextension and if whatever name set on Authenticate Name doesn't match the name in any of these 2 fields I mentioned, certificate authentication fails and BIG-IP resets connection. Note: for Authenticate Name to work, Server Certificate has to be set to Require, i.e. BIG-IP should be configured to check the validity of Server Side certificate. On top of that,ca-file(Trusted Certificate Authorities in the GUI) is also required to be set, otherwise BIG-IP has no trusted Root CA list to validate server's certificate. What it is This is like another layer of authentication. When server sends us a Certificate andpeer-cert-modeis set to require, BIG-IP looks up Root CA present in ca-file and confirms that server's certificate is trusted. Then, whenauthenticate-nameis also set, BIG-IP checkssubjectAltNameextension andcommonNamefor a match of what we've typed in this field. If no match is found, certificate authentication fails and we do not trust certificate. Otherwise, certificate is trusted and we proceed with handshake. Lab Test When Authenticate Name does not match Certificate's commonName or subjectAltName I created an end-entity X.509v3 TLS Certificate and set commonName (CN) toserver1.rodrigoandsubjectAltNameextension toserver01.rodrigoas seen below: I set Server Certificate (peer-cert-mode in tmsh) to require, added the Root CA that signed back-end server's certificate to BIG-IP's Trusted Certificate Authorities (ca-file in tmsh) and authentication-name tofail.rodrigo: On Wireshark,we see that authentication fails as soon as we receiveCertificatemessage from server: Note: If we want BIG-IP to display the specific alert such as unknown_ca above, we need to disable generic-alert on Server SSL settings. It fails because fail.rodrigo is neither inCNnor insubjectAltName. I had set server1.rodrigo instead, remember? Let's break it down into more details: back-end server sends Certificate message to BIG-IP because peer-cert-mode is set to require, BIG-IP looks up the Root CA list in ca-file (root-ca.crt here) BIG-IP answers the following question: was back-end certificate signed by any of the certificates listed in root-ca.crt? If not, authentication fails immediately and we never get to use authenticate-name In this case it was, so BIG-IP moves on to check if fail.rodrigo is in either commonName or subjectAltName fields of back-end's X.509v3 certificate Because fail.rodrigo doesn't match server1.rodrigo, authentication fails and BIG-IP resets connection. When Authenticate Name matches Certificate's commonName or subjectAltName I've now set authenticate-name to server1.rodrigo and TLS handshake suceeds: Let's break it down into more details: back-end server sends Certificate message to BIG-IP because peer-cert-mode is set to require, BIG-IP looks up the Root CA list in ca-file (root-ca.crt here) BIG-IP answers the following question: was back-end certificate signed by any of the certificates listed in root-ca.crt? If not, authentication fails immediately and we never get to use authenticate-name In this case it was, so BIG-IP moves on to check if server1.rodrigo is in either commonName or subjectAltName fields of back-end's X.509v3 certificate Because server1.rodrigo matches server1.rodrigo in both commonName and SubjectAltName fields, authentication succeeds and TLS handshake proceeds If you ever wondered where to find commonName and SubjectAltName on TLS headers, here's where they are: The above snippet is from back-end's Certificate message that is sent to BIG-IP as part of TLS handshake. Hope that's helpful.1.7KViews3likes15CommentsSSL Orchestrator Advanced Use Cases: Client Certificate Constrained Delegation (C3D) Support
Introduction F5 BIG-IP is synonymous with "flexibility". You likely have few other devices in your architecture that provide the breadth of capabilities that come native with the BIG-IP platform. And for each and every BIG-IP product module, the opportunities to expand functionality are almost limitless. In this article series we examine the flexibility options of the F5 SSL Orchestrator in a set of "advanced" use cases. If you haven't noticed, the world has been steadily moving toward encrypted communications. Everything from web, email, voice, video, chat, and IoT is now wrapped in TLS, and that's a good thing. The problem is, malware - that thing that creates havoc in your organization, that exfiltrates personnel records to the Dark Web - isn't stopped by encryption. TLS 1.3 and multi-factor authentication don't eradicate malware. The only reasonable way to defend against it is to catch it in the act, and an entire industry of security products are designed for just this task. But ironically, encryption makes this hard. You can't protect against what you can't see. F5 SSL Orchestrator simplifies traffic decryption and malware inspection, and dynamically orchestrates traffic to your security stack. But it does much more than that. SSL Orchestrator is built on top of F5's BIG-IP platform, and as stated earlier, is abound with flexibility. SSL Orchestrator Use Case: Client Certificate Constrained Delegation (C3D) Using certificates to authenticate is one of the oldest and most reliable forms of authentication. While not every application supports modern federated access or multi-factor schemes, you'll be hard-pressed to find something that doesn't minimally support authentication over TLS with certificates. And coupled with hardware tokens like smart cards, certificates can enable one of the most secure multi-factor methods available. But certificate-based authentication has always presented a unique challenge to security architectures. Certificate "mutual TLS" authentication requires an end-to-end TLS handshake. When a server indicates a requirement for the client to submit its certificate, the client must send both its certificate, and a digitally-signed hash value. This hash value is signed (i.e. encrypted) with the client's private key. Should a device between the client and server attempt to decrypt and re-encrypt, it would be unable to satisfy the server's authentication request by virtue of not having access to the client's private key (to create the signed hash). This makes encrypted malware inspection complicated, often requiring a total bypass of inspection to sites that require mutual TLS authentication. Fortunately, F5 has an elegant solution to this challenge in the form of Client Certificate Constrained Delegation, affectionally referred to as "C3D". The concept is reasonably straightforward. In very much the same way that SSL forward proxy re-issues a remote server certificate to local clients, C3D can re-issue a remote client certificate to local servers. A local server can continue to enforce secure mutual TLS authentication, while allowing the BIG-IP to explicitly decrypt and re-encrypt in the middle. This presents an immediate advantage in basic load balancing, where access to the unencrypted data allows the BIG-IP greater control over persistence. In the absence of this, persistence would typically be limited to IP address affinity. But of course, access to the unencrypted data also allows the content to be scanned for malicious malware. C3D actually takes this concept of certificate re-signing to a higher level though. The "constrained delegation" portion of the name implies a characteristic much like Kerberos constrained delegation, where (arbitrary) attributes can be inserted into the re-signed token, like the PAC attributes in a Kerberos ticket, to inform the server about the client. Servers for their part can then simply filter on client certificates issued by the BIG-IP (to prevent direct access), and consume any additional attributes in the certificate to understand how better to handle the client. With C3D you can maintain strong mutual TLS authentication all the way through to your servers, while allowing the BIG-IP to more effectively manage availability. And combined with SSL Orchestrator, C3D can enable decryption and inspection of content for malware inspection. This article describes how to configure SSL Orchestrator to enable C3D for inbound decrypted inspection. Arguably, most of what follows is the C3D configuration itself, as the integration with SSL Orchestrator is pretty simple. Note that Client Certificate Constrained Delegation (C3D) is included with Local Traffic Manager (LTM) 13.0 and beyond, but for integration with SSL Orchestrator you should be running 14.1 or later.To learn more about C3D, please see the following resources: K14065425: Configuring Client Certificate Constrained Delegation (C3D):https://support.f5.com/csp/article/K14065425 Manual Chapter: SSL Traffic Management:https://techdocs.f5.com/en-us/bigip-15-1-0/big-ip-system-ssl-administration/ssl-traffic-management.html#GUID-B4D2529E-D1B0-4FE2-8C7F-C3774ADE1ED2 SSL::c3d iRule reference - not required to use C3D, but adds powerful functionalityhttps://clouddocs.f5.com/api/irules/SSL__c3d.html The integration of C3D with SSL Orchestrator involves effectively replacing the client and server SSL profiles that the SSL Orchestrator topology creates, with C3D SSL profiles. This is done programmatically with an iRule, so no "non-strict" customization is required at the topology. Also note that an inbound (reverse proxy) SSL Orchestrator topology will take the form of a "gateway mode" deployment (a routed path to multiple applications), or "application mode" deployment (a single application instance hosted at the BIG-IP). See section 2.5 of the SSL Orchestrator deployment guide for a deeper examination of gateway and application modes: https://clouddocs.f5.com/sslo-deployment-guide/ The C3D integration is only applicable to application mode deployments. Configuration C3D itself involves the creation of client and server SSL profiles: Create a new Client SSL profile: Configuration Certificate Key Chain: public-facing server certificate and private key. This will be the certificate and key presented to the client on inbound request. It will likely be the same certificate and key defined in the SSL Orchestrator inbound topology. Client Authentication Client Certificate: require Trusted Certificate Authorities: bundle that can validate client certificate. This is a certificate bundle used to verify the client's certificate, and will contain all of the client certificate issuer CAs. Advertised Certificate Authorities: optional CA hints bundle. Not expressly required, but this certificate bundle is forwarded to the client during the TLS handshake to "hint" at the correct certificate, based on issuer. Client Certificate Constrained Delegation Client Certificate Constrained Delegation: Enabled Client Fallback Certificate (new in 15.1): option to select a default client certificate if client does not send one. This option was introduced in 15.1 and provides the means to select an alternate (local) certificate if the client does not present one. The primary use case here might be to select a "template" certificate, and use an iRule function to insert arbitrary attributes. OCSP: optional client certificate revocation control. This option defines an OCSP revocation provider for the client certificate. Unknown OCSP Response Control (new in 15.1): determines what happens when OCSP returns Unknown. If an OCSP revocation provider is selected, this option defines what to do if the response to the OCSP query is "unknown". Create a new Server SSL profile: Configuration Certificate: default.crt. The certificate and key here are used as "templates" for the re-signed client certificate. Key: default.key Client Certificate Configuration Delegation Client Certificate Constrained Delegation: Enabled CA Certificate: local forging CA cert. This is the CA certificate used to re-sign the client certificate. This CA must be trusted by the local servers. CA Key: local forging CA key CA Passphrase: optional CA passphrase Certificate Extensions: extensions from the real client cert to be included in the forged cert. This is the list of certificate extensions to be copied from the original certificate to the re-issued certificate. Custom Extension: additional extensions to copy to forged cert from real cert (OID). This option allows you to insert additional extensions to be copied, as OID values. Additional considerations: Under normal conditions, the F5 and backend server attempt to resume existing SSL sessions, whereby the server doesn’t send a Certificate Request message. The effect is that all connections to the backend server use the same forged client cert. There are two ways to get around this: Set a zero-length cache value in the server SSL profile, or Set server authentication frequency to ‘always’ in the server SSL profile CA certificate considerations: A valid signing CA certificate should possess the following attributes. While it can work in some limited scenarios, a self-signed server certificate is generally not an adequate option for the signing CA. keyUsage: certificate extension containing "keyCertSign" and "digitalSignature" attributes basicConstraints: certificate extension containing "CA = true" (for Yes), marked as "Critical" With the client and server SSL profiles built, the C3D configuration is basically done. To integrate with an inbound SSL Orchestrator topology, create a simple iRule and add it to the topology's Interception Rule configuration. Modify the SSL profile paths below to reflect the profiles you created earlier. ### Modify the SSL profile paths below to match real C3D SSL profiles when CLIENT_ACCEPTED priority 250 { ## set clientssl set cmd1 "SSL::profile /Common/c3d-clientssl" ; eval $cmd1 } when SERVER_CONNECTED priority 250 { ## set serverssl SSL::profile "/Common/c3d-serverssl" } In the SSL Orchestrator UI, either from topology workflow, or directly from the corresponding Interception Rule configuration, add the above iRule and deploy. The above iRule programmatically overrides the SSL profiles applied to the Interception Rule (virtual server), effectively enabling C3D support. At this point, the virtual server will request a client certificate, perform revocation checks if defined, and then mint a local copy of the client certificate to pass to the backend server. Optionally, you can insert additional certificate attributes via the server SSL profile configuration, or more dynamically through additional iRule logic: ### Added in 15.1 - allows you to send a forged cert to the server ### irrespective of the client side authentication (ex. APM SSO), ### and insert arbitrary values when SERVERSSL_SERVERCERT { ### The following options allow you to override/replace a submitted ### client cert. For example, a minted client certificate can be sent ### to the server irrespective of the client side authentication method. ### This certificate "template" could be defined locally in the iRule ### (Base64-encoded), pulled from an iFile, or some other certificate source. # set cert1 [b64decode "LS0tLS1a67f7e226f..."] # set cert1 [ifile get template-cert] ### In order to use a template cert, it must first be converted to DER format # SSL::c3d cert [X509::pem2der $cert1] ### Insert arbitrary attributes (OID:value) SSL::c3d extension 1.3.6.1.4.1.3375.3.1 "TEST" } If you've configured the above, a server behind SSL Orchestrator that requires mutual TLS authentication can receive minted client certificates from external users, and SSL Orchestrator can explicitly decrypt and pass traffic to the set of malware inspection tools. You can look at the certificate sent to the server by injecting a tcpdump packet between the BIG-IP and server, then open in Wireshark. tcpdump -lnni [VLAN] -Xs0 -w capture.pcap [additional filters] Finally, you might be asking what to do with certificate attributes injected by C3D, and really it depends on what the server can support. The below is a basic example in an Apache config file to block a client certificate that doesn't contain your defined attribute. <Directory /> SSLRequire "HTTP/%h" in PeerExtList("1.3.6.1.4.1.3375.3.1") RewriteEngine on RewriteCond %{SSL::SSL_CLIENT_VERIFY} !=SUCCESS RewriteRule .? - [F] ErrorDocument 403 "Delegation to SPN HTTP/%h failed. Please pass a valid client certificate" </Directory> And there you have it. In just a few steps you've configured your SSL Orchestrator to integrate with Client Certificate Constrained Delegation to support mutual TLS authentication, and along the way you have hopefully recognized the immense flexibility at your command. Updates As of F5 BIG-IP 16.1.3, there are some new C3D capabilities: C3D has been updated to encode and return the commonName (CN) found in the client certificate subject field in printableString format if possible, otherwise the value will be encoded as UTF8. C3D has been updated to support inserting a subject commonName (CN) via 'SSL::c3d subject commonName' command: when CLIENTSSL_HANDSHAKE { if {[SSL::cert count] > 0} { SSL::c3d subject commonName [X509::subject [SSL::cert 0] commonName] } } C3D has been updated to support inserting a Subject Alternative Name (SAN) via 'SSL::c3d extention SAN' command: when CLIENTSSL_HANDSHAKE { SSL::c3d extension SAN "DNS:*.test-client.com, IP:1.1.1.1" } C3D has been updated to add the Authority Key Identifier (AKI) extension to the client certificate if the CA certificate has a Subject Key Identifier (SKI) extension. Another interesting use case is copying the real client certificate Subject Key Identifier (SKI) to the minted client certificate. By default, the minted client certificate will not contain an SKI value, but it's easy to configure C3D to copy the origin cert's SKI by modifying the C3D server SSL profile. In the "Custom extension" field of the C3D section, add 2.5.29.14 as an available extension. As of F5 BIG-IP 17.1.0 (SSL Orchestrator 11.0), C3D has been integrated natively.Now, for a deployed Inbound topology, the C3D SSL profiles are listed in the Protocol Settings section of the Interception Rules tab. You can replace the client and server SSL profiles created by SSL Orchestrator, with C3D SSL profiles in the Interception Rules tab to support C3D. The C3D support is now extended to both Gateway and Application modes.2.8KViews2likes2Comments
Implementing ECC+PFS on LineRate (Part 1/3): Choosing ECC Curves and Preparing SSL Certificates
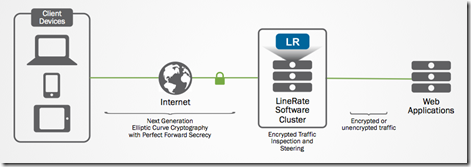
(Editors note: the LineRate product has been discontinued for several years. 09/2023) --- Overview In case you missed it,Why ECC and PFS Matter: SSL offloading with LineRatedetails some of the reasons why ECC-based SSL has advantages over RSA cryptography for both performance and security. This article will generate all the necessary ECC certificates with the secp384r1 curve so that they may be used to configure an LineRate System for SSL Offload. Getting Started with LineRate In order to appreciate the advantages of SSL/TLS Offload available via LineRate as discussed in this article, let's take a closer look at how to configure SSL/TLS Offloading on a LineRate system. This example will implement Elliptical Curve Cryptography and Perfect Forward Secrecy. SSL Offloading will be added to an existing LineRate System that has one public-facing Virtual IP (10.10.11.11) that proxies web requests to a Real Server on an internal network (10.10.10.1). The following diagram demonstrates this configuration: Figure 1: A high-level implementation of SSL Offload Overall, these steps will be completed in order to enable SSL Offloading on the LineRate System: Generate a private key specifying the secp384r1 elliptic curve Obtain a certificate from a CA Configure an SSL profile and attach it to the Virtual IP Note that this implementation will enable only ECDHE cipher suites. ECDH cipher suites are available, but these do not implement the PFS feature. Further, in production deployments, considerations to implement additional types of SSL cryptography might be needed in order to allow backward compatibility for older clients. Generating a private key for Elliptical Curve Cryptography When considering the ECC curve to use for your environment, you may choose one from the currently available curves list in the LineRate documentation. It is important to be cognizant of the curve support for the browsers or applications your application targets using. Generally, the NIST P-256, P-384, and P-521 curves have the widest support. This example will use the secp384r1 (NIST P-384) curve, which provides an RSA equivalent key of 7680-bits. Supported curves with OpenSSL can be found by running the openssl ecparam -list_curves command, which may be important depending on which curve is chosen for your SSL/TLS deployment. Using OpenSSL, a private key is generated for use with ssloffload.lineratesystems.com. The ECC SECP curve over a 384-bit prime field (secp384r1) is specified: openssl ecparam -genkey -name secp384r1 -out ssloffload.lineratesystems.com.key.pem This command results in the following private key: -----BEGIN EC PARAMETERS----- BgUrgQQAIg== -----END EC PARAMETERS----- -----BEGIN EC PRIVATE KEY----- MIGkAgEBBDD1Kx9hghSGCTujAaqlnU2hs/spEOhfpKY9EO3mYTtDmKqkuJLKtv1P 1/QINzAU7JigBwYFK4EEACKhZANiAASLp1bvf/VJBJn4kgUFundwvBv03Q7c3tlX kh6Jfdo3lpP2Mf/K09bpt+4RlDKQynajq6qAJ1tJ6Wz79EepLB2U40fC/3OBDFQx 5gSjRp8Y6aq8c+H8gs0RKAL+I0c8xDo= -----END EC PRIVATE KEY----- Generating a Certificate Request (CSR) to provide the Certificate Authority (CA) After the primary key is obtained, a certificate request (CSR) can be created. Using OpenSSL again, the following command is issued filling out all relevant information in the successive prompts: openssl req -new -key ssloffload.lineratesystems.com.key.pem -out ssloffload.lineratesystems.com.csr.pem This results in the following CSR: -----BEGIN CERTIFICATE REQUEST----- MIIB3jCCAWQCAQAwga8xCzAJBgNVBAYTAlVTMREwDwYDVQQIEwhDb2xvcmFkbzET MBEGA1UEBxMKTG91aXN2aWxsZTEUMBIGA1UEChMLRjUgTmV0d29ya3MxGTAXBgNV BAsTEExpbmVSYXRlIFN5c3RlbXMxJzAlBgNVBAMTHnNzbG9mZmxvYWQubGluZXJh dGVzeXN0ZW1zLmNvbTEeMBwGCSqGSIb3DQEJARYPYS5yYWdvbmVAZjUuY29tMHYw EAYHKoZIzj0CAQYFK4EEACIDYgAEi6dW73/1SQSZ+JIFBbp3cLwb9N0O3N7ZV5Ie iX3aN5aT9jH/ytPW6bfuEZQykMp2o6uqgCdbSels+/RHqSwdlONHwv9zgQxUMeYE o0afGOmqvHPh/ILNESgC/iNHPMQ6oDUwFwYJKoZIhvcNAQkHMQoTCGNpc2NvMTIz MBoGCSqGSIb3DQEJAjENEwtGNSBOZXR3b3JrczAJBgcqhkjOPQQBA2kAMGYCMQCn h1NHGzigooYsohQBzf5P5KO3Z0/H24Z7w8nFZ/iGTEHa0+tmtGK/gNGFaSH1ULcC MQCcFea3plRPm45l2hjsB/CusdNo0DJUPMubLRZ5mgeThS/N6Eb0AHJSjBJlE1fI a4s= -----END CERTIFICATE REQUEST----- Obtaining a Certificate from a Certificate Authority (CA) Rather than using a self-signed certificate, a test certificate is obtained from Entrust. Upon completing the certificate request and receiving it from Entrust, a simple conversion needs to be done to PEM format. This can be done with the following OpenSSL command: openssl x509 -inform der -in ssloffload.lineratesystems.com.cer -out ssloffload.lineratesystems.com.cer.pem This results in the following certificate: -----BEGIN CERTIFICATE----- MIIC5jCCAm2gAwIBAgIETUKHWzAKBggqhkjOPQQDAzBtMQswCQYDVQQGEwJVUzEW MBQGA1UEChMNRW50cnVzdCwgSW5jLjEfMB0GA1UECxMWRm9yIFRlc3QgUHVycG9z ZXMgT25seTElMCMGA1UEAxMcRW50cnVzdCBFQ0MgRGVtb25zdHJhdGlvbiBDQTAe Fw0xNDA4MTExODQ3MTZaFw0xNDEwMTAxOTE3MTZaMGkxHzAdBgNVBAsTFkZvciBU ZXN0IFB1cnBvc2VzIE9ubHkxHTAbBgNVBAsTFFBlcnNvbmEgTm90IFZlcmlmaWVk MScwJQYDVQQDEx5zc2xvZmZsb2FkLmxpbmVyYXRlc3lzdGVtcy5jb20wdjAQBgcq hkjOPQIBBgUrgQQAIgNiAASLp1bvf/VJBJn4kgUFundwvBv03Q7c3tlXkh6Jfdo3 lpP2Mf/K09bpt+4RlDKQynajq6qAJ1tJ6Wz79EepLB2U40fC/3OBDFQx5gSjRp8Y 6aq8c+H8gs0RKAL+I0c8xDqjgeEwgd4wDgYDVR0PAQH/BAQDAgeAMB0GA1UdJQQW MBQGCCsGAQUFBwMBBggrBgEFBQcDAjA3BgNVHR8EMDAuMCygKqAohiZodHRwOi8v Y3JsLmVudHJ1c3QuY29tL0NSTC9lY2NkZW1vLmNybDApBgNVHREEIjAggh5zc2xv ZmZsb2FkLmxpbmVyYXRlc3lzdGVtcy5jb20wHwYDVR0jBBgwFoAUJAVL4WSCGvgJ zPt4eSH6cOaTMuowHQYDVR0OBBYEFESqK6HoSFIYkItcfekqqozX+z++MAkGA1Ud EwQCMAAwCgYIKoZIzj0EAwMDZwAwZAIwXWvK2++3500EVaPbwvJ39zp2IIQ98f66 /7fgroRGZ2WoKLBzKHRljVd1Gyrl2E3BAjBG9yPQqTNuhPKk8mBSUYEi/CS7Z5xt dXY/e7ivGEwi65z6iFCWuliHI55iLnXq7OU= -----END CERTIFICATE----- Note that the certificate generation process is very familiar with Elliptical Curve Cryptography versus traditional cryptographic algorithms like RSA. Only a few differences are found in the generation of the primary key where an ECC curve is specified. Continue the Configuration Now that the certificates needed to configure Elliptical Curve Cryptography have been created, it is now time to configure SSL Offloading on LineRate. Part 2: Configuring SSL Offload on LineRate continues the demonstration of SSL Offloading by importing the certificate information generated in this article and getting the system up and running. In case you missed it,Why ECC and PFS Matter: SSL offloading with LineRatedetails some of the reasons why ECC-based SSL has advantages over RSA cryptography for both performance and security. (Editors note: the LineRate product has been discontinued for several years. 09/2023) Stay Tuned! Next week a demonstration on how to verify a correct implementation of SSL with ECC+PFS on LineRate will make a debut on DevCentral. The article will detail how to check for ECC SSL on the wire via WireShark and in the browser. In the meantime, take some time to download LineRate and test out its SSL Offloading capabilities. In case you missed any content, or would like to reference it again, here are the articles related to implementing SSL Offload with ECC and PFS on LineRate: Why ECC and PFS Matter: SSL offloading with LineRate Implementing ECC+PFS on LineRate (Part 1/3): Choosing ECC Curves and Preparing SSL Certificates Implementing ECC+PFS on LineRate (Part 2/3): Configuring SSL Offload on LineRate Implementing ECC+PFS on LineRate (Part 3/3): Confirming the Operation of SSL Offloading385Views0likes0CommentsSSL Orchestrator Advanced Use Cases: DNS-over-HTTPS Detection
Introduction F5 BIG-IP is synonymous with "flexibility". You likely have few other devices in your architecture that provide the breadth of capabilities that come native with the BIG-IP platform. And for each and every BIG-IP product module, the opportunities to expand functionality are almost limitless. In this article series we examine the flexibility options of the F5 SSL Orchestrator in a set of "advanced" use cases. If you haven't noticed, the world has been steadily moving toward encrypted communications. Everything from web, email, voice, video, chat, and IoT is now wrapped in TLS, and that's a good thing. The problem is, malware - that thing that creates havoc in your organization, that exfiltrates personnel records to the Dark Web - isn't stopped by encryption. TLS 1.3 and multi-factor authentication don't eradicate malware. The only reasonable way to defend against it is to catch it in the act, and an entire industry of security products are designed for just this task. But ironically, encryption makes this hard. You can't protect against what you can't see. F5 SSL Orchestrator simplifies traffic decryption and malware inspection, and dynamically orchestrates traffic to your security stack. But it does much more than that. SSL Orchestrator is built on top of F5's BIG-IP platform, and as stated earlier, is abound with flexibility. Let us now explore one perspective of that flexibility and how SSL Orchestrator can be used to handle DNS-over-HTTPS and DNS-over-TLS. SSL Orchestrator Use Case: DNS-over-HTTPS and DNS-over-TLS Handling Despite the rapid evolution of Internet standards, and increasing amount of encryption, there's one aspect of our daily online world that hasn't really changed that much in its nearly 4 decades of breath. That of course is DNS. We don't tend to think about it often, which is probably why it hasn't evolved as much as other things, but it truly is the heart and backbone of everything we do online. That is, unless you want to memorize "2607:f8b0:400a:0804:0000:0000:0000:2004" as the way to get to Google, you had better have a working DNS. But DNS is inherently insecure. It's been shown to be vulnerable to all manner of attacks, and for the purposes of this discussion specifically, also exposes where you're going. That is, while the HTTP payload may be encrypted, there's still that (visible) DNS request that goes out first. That's not to say that there haven't been any improvements though. DNSSEC was developed to help secure DNS and prevent spoofing, but in the many years since its introduction it still isn't as widespread as we'd have hoped. DNS-over-HTTPS (DoH) and DNS-over-TLS (DoT) are more recent developments that focus mainly on the privacy aspect of DNS communications (or lack thereof). With DoH and DoT, clients and servers forego the typical DNS protocol request over UDP or TCP port 53 and embed the request inside an encrypted HTTPS or pure TLS connection. But...while that sounds pretty cool, there can be additional consequences to encrypting DNS, both good and bad: [Good] DoH and DoT can protect against ISPs that use your DNS information for targeted advertising. [Bad] DoH and DoT can effectively blind local DNS security and filtering controls. DNS monitoring is often an effective defense against spam and malware infections. [Bad] DoH and DoT providers are public services (ex. Cloudflare and Google), so while DNS is being protected from eavesdropping along the way, the providers have access to your DNS requests. The US National Security Agency (NSA) actually published a warning on this: https://media.defense.gov/2021/Jan/14/2002564889/-1/-1/0/CSI_ADOPTING_ENCRYPTED_DNS_U_OO_102904_21.P... The basic idea in this document is that while your DNS privacy is a good thing, encrypted DoH and DoT can also mask malware command-and-control. If you strictly follow the NSA guidance, you could either block DoH and/or DoT altogether, or force users to only use a local enterprise DoH resolver. If you don't have access to a local DoH resolver though, what else could you do? Well, I'm so glad you asked. DoH and DoT are of course encrypted, so unless you disable either protocol at the client, set up a local DoH resolver and force clients to it, or attempt to do encrypted analysis to find DoH traffic, you need to decrypt and inspect. And as it turns out, F5 has an elegant solution to do just that. In this blog post I am going to present a few solutions on how to handle these protocols through SSL Orchestrator decrypted analysis. The protocol implementations of DoH and DoT are a little different, so I will address them separately. Handling DNS-over-HTTPS For all intents and purposes, DoH looks and feels like normal HTTPS traffic. There are some semi-unique patterns you might be able to follow to infer that something is DoH rather than regular HTTPS (i.e., packet size, frequency), but it’s never going to be completely accurate. You could also potentially filter on the IP addresses of the known public DoH services, but that list is rather large and growing: https://github.com/curl/curl/wiki/DNS-over-HTTPS, and clients can ultimately choose the service they point to. If you’re serious about actually detecting DoH traffic with reasonable accuracy, then there’s no better way than through decrypted analysis. Now, once you've decrypted HTTPS and detected that it's DoH, there are a number of things you can do: Simply detect and block: there are actually three forms of DoH requests – Wireformat GET and POST, and JSON (detailed here:https://developers.cloudflare.com/1.1.1.1/dns-over-https), though the vast majority of clients use the Wireformat GET and POST methods. In any case, this option follows the NSA's first recommendation to simply detect and block DoH requests. A browser that receives a reject on a DoH request will natively revert to normal TCP/UDP DNS to allow your local DNS security tools to do what they do best. Detect and log: you may simply want to log that DoH is passing through your network, who's asking, and what they're asking for as an extension to your current DNS monitoring protocols. Detect and blackhole: also, as a possible extension to your current DNS protection protocols, you may need to block some DoH requests from happening. As mentioned earlier, if you simply block DoH, the client will revert to DNS. One of the best ways to block a DoH/DNS request is to provide a good but fake response instead, a technique called "blackholing". In this approach, you can flag specific hostnames (matching on URL categories) to provide a blackhole response. Let’s now look at each of the above options in turn. The first option is actually pretty straightforward. You just need to add the below iRule to an SSL Orchestrator outbound layer 3 topology*, on the “-in-t” TCP tunnel virtual server. On any decrypted HTTPS traffic, the iRule examines the HTTP request methods for the three signature DoH methods and sends a reject on a match. Easy peasy. when HTTP_REQUEST priority 750 { if { ( [HTTP::method] equals "GET" and [HTTP::header exists "accept"] and [HTTP::header "accept"] equals "application/dns-json" ) or \ ( [HTTP::method] equals "GET" and [HTTP::header exists "accept"] and [HTTP::header "accept"] equals "application/dns-message" ) or \ ( [HTTP::method] equals "POST" and [HTTP::header exists "content-type"] and [HTTP::header "content-type"] equals "application/dns-message" ) } { reject } } The second two options above are available in a single iRule here:https://github.com/f5devcentral/sslo-script-tools/tree/main/sslo-dns-over-https-detection. As with the previous, import the iRule to the BIG-IP, then associate that iRule with an SSL Orchestrator outbound layer 3 topology*. You'll need to make a few adjustments in the iRule to suit for your environment, and those are all presented as simple static variable assignments: static::LOCAL_LOG: enable or disable local Syslog logging (0 = off, 1 = on). static::HSL: enable or disable remote high-speed logging (0 = off, 1 = on). static::URLDB_LICENSED: set to 1 (on) if you've licensed and provisioned the subscription based URLDB, or 0 (off) if you have not and want to just use custom URL categories for DoH blackholing. static::BLACKHOLE_URLCAT: leave empty to disable or add a list of URL categories to search for URL-based DoH blackholing (ex. /Common/block-doh-urls) static::BLACKHOLE_RTYPE_A: enable or disable blackholing matched A record requests (0 = off, 1 = on). static::BLACKHOLE_RTYPE_AAAA: enable or disable blackholing matched AAAA record requests (0 = off, 1 = on). static::BLACKHOLE_RTYPE_TXT: enable or disable blackholing matched TXT record requests (0 = off, 1 = on). You can quickly test the solution by enabling DoH support in a browser. Please refer to the following instructions for each: https://developers.cloudflare.com/1.1.1.1/encryption/dns-over-https/encrypted-dns-browsers/. With the static::LOCAL_LOG value set to 1 (enabled), you can tail the BIG-IP LTM log (tail -f /var/log/ltm) and watch the DoH traffic flow across the SSL Orchestrator topology. 10.1.10.50:59804-104.18.42.171:443 :: DoH (WireFormat POST) Request: A:www.google.com 10.1.10.50:59804-104.18.42.171:443 :: DoH (WireFormat POST) Request: A:encrypted-tbn0.gstatic.com 10.1.10.50:59804-104.18.42.171:443 :: DoH (WireFormat POST) Request: A:fonts.gstatic.com 10.1.10.50:59812-104.18.42.171:443 :: DoH (WireFormat POST) Request: A:www.gstatic.com 10.1.10.50:59812-104.18.42.171:443 :: DoH (WireFormat POST) Request: A:id.google.com 10.1.10.50:59812-104.18.42.171:443 :: DoH (WireFormat POST) Request: A:play.google.com Handling DNS-over-TLS DNS-over-TLS (DoT) is essentially plain DNS wrapped in TLS. If you decrypt it, you’ll see a regular DNS request. DoT by standard, travels on TCP port 853, so that’s one very simple way to block DoT traffic, by just blocking that port. But if you wanted to actually log the DoT requests flowing through the BIG-IP, or blackhole some URLs, you again have to decrypt. The aforementioned DoH logging iRule can also handle DoT requests, inspecting any decrypted TCP:853 traffic: https://github.com/f5devcentral/sslo-script-tools/tree/main/sslo-dns-over-https-detection. The same static variable flags apply. Considering DoH/DoT proxy options I would be remiss in not mentioning options to actually proxy DoH and DoT traffic, and BIG-IP 16.1 introduced two new capabilities: DoH proxy – where the BIG-IP proxies client DoH requests to external DoH resources. You get to explicitly decrypt here, so you get another opportunity to log and control the DNS. DoH server – where the BIG-IP proxies client DoH requests to external TPC or UDP DNS resources. As with the proxy option, you get to decrypt the client’s DoH request. You can find out more about both of these capabilities here: https://support.f5.com/csp/article/K05451012 To proxy DoT to DoT, you simply need a TCP:853 virtual server with client and server SSL profiles. There are also various programmatic options to convert DoT to DNS, DNS to DoT, and DNS to DoH. But an important consideration here is that to proxy you would need clients to direct their DNS/DoT/DoH requests to your local resource. In some cases, you can do that through DHCP, or through enterprise browser policy management, but other than simply blocking outbound access to these protocols, it can be non-trivial to prevent clients from trying to use any of the external providers. That is specifically where decrypted analysis can be beneficial. Summary With an iRule and just a few configuration changes we have been able to implement a capability on top of SSL Orchestrator to log and actively control encrypted DNS. Decrypted inspection of DoH and DoT is just one of the many interesting benefits of and SSL Orchestrator solution. A demo of the above is available here:SSL Orchestrator Advanced Use Case: DNS over HTTPS * The iRules will also technically work for outbound layer 2 topologies. 1.4KViews1like1Comment
Tourniquet iRule to detect, BLOCK, log, and count CVE-2016-9244 "Ticketbleed" attacks
Problem this snippet solves: This iApp installs the Tourniquet iRule ir-tourniquet which will detect, block, log, and count attempts to exploit CVE-2016-9244 "Ticketbleed". Attach the Tourniquet iRule to any TCP+TLS or UDP+DTLS virtual server with a Client SSL Profile. (The iRule works on BIG-IP TMOS v11.0 and above.) The Tourniquet iRule logs the source IP address and geolocation of each possible attack and counts attacks (per-virtual-server) using iStats. The Tourniquet iRule is for anyone (such as a honeypot operator) who wants to log the sources of Ticketbleed attacks and for BIG-IP users who want to utilize RFC-5077 TLS Session Tickets while still running vulnerable (older) versions of BIG-IP TMOS (by blocking Ticketbleed attacks, the Tourniquet iRule makes it safe to enable Session Tickets). NOTE: The best way to avoid the CVE-2016-9244 Ticketbleed vulnerability is to upgrade BIG-IP TMOS to a non-vulnerable version. See F5 Solution Note K05121675. The second-best way (imposing a modest performance cost) is to disable Session Tickets in your Client SSL Profile(s). The performance cost of the Tourniquet iRule is very small unless an attacker tries to flood your BIG-IP with Ticketbleed attacks. In that case, the Tourniquet iRule will at least help you track the attacker down. The Tourniquet iRule blocks Ticketbleed attacks on vulnerable versions of BIG-IP TMOS. It also has an option to log Ticketbleed attacks then allow them to proceed, if you really want to do that. How to use this snippet: Download the Tourniquet-iRule-v1.zip file (below). Extract (unzip) the Tourniquet-iRule-v1.tmpl file. In the BIG-IP Management GUI, navigate to iApps / Templates. Click Import, browse to select the template file, then click Upload. Navigate to iApps / Application Services. Click Create, then enter a unique name (for example, t ) and select the template Tourniquet_iRule . Click Finished. The Tourniquet iRule ir-tourniquet will be created (in an Application folder, for example as /Common/t.app/ir-tourniquet ). You may then navigate to Local Traffic / Virtual Servers, edit your virtual servers that have Client SSL Profiles, and add the Tourniquet iRule to each virtual server in the iRules section of the Resources tab. (If you really want to allow Ticketbleed attacks for some reason (making your BIG-IP insecure!), you can change the relevant setting in the iApp then click Finished to update the iRule.) Code : 73863271Views0likes0Comments
Bleichenbacher vs. Forward Secrecy: How much of your TLS is still RSA?
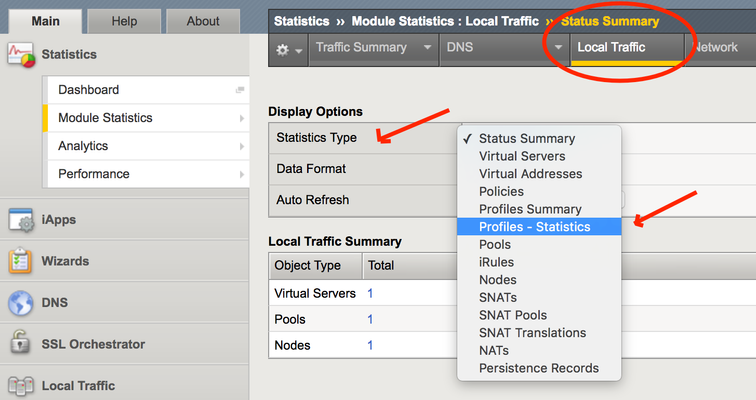
The RSA algorithm has been the go-to public key algorithm for the last fifteen years. But, perhaps like RC4, MD5 and Al Franken, it’s time forRSA to retire. TLS 1.3, the upcoming version of the de facto web encryption protocol, does not even include RSA among its allowed key exchange algorithms. The world is moving toward “Forward Secret” ciphers which use ephemeral keys, exchanged with either elliptic curve or straight-up Diffie-Hellman cryptography. These forward secret ciphers are typically noted as ECDHE or DHE. The former is vastly preferred these days; there are nearly 20 ECDHE servers for every DHE server. Of immediate concern to F5 users is the recent issuance of CVE-2017-6168, a series of Bleichenbacher-style attacks against F5 RSA key exchanges from version 11.6 to version 13. Patches have been issued for the vulnerable versions, but some customers have complicated patching schedules. They’re wondering if they can simply disable the RSA protocol on their F5 virtual servers and offer only forward secret ciphers. The general answer is “very probably.” All modern browsers prefer forward secret ciphers, so most modern human end-users already use it. A small but statistically significant number of F5 deployments offer no forward secrecy because they rely on passive TLS monitoring. If that is you, then may I suggest that instead of reading this article, you watch this ten-minute light-board video made specially for you. It's about how to do passive monitoring even with TLS 1.3. SSL Visibility: The Ultimate Passive Inspection Architecture But back to the task at hand. Let's assume that you aren't currently disabling forward secrecy, and we're back to thequestion “can you disable RSA?” That depends on how many of your users are still using it. Maybe your application has a bunch of automated queries from bespoke legacy software that only uses RSA. Or maybe your Jet Li fan site, which is still somehow in Alexa’s top 8 billion list, still receives a lot visitors running Windows XP in Guangdong Province, using TLS v 1.0, RSA and RC4. How would you know? Getting the TLS Statistics You can see what percentage of your customers are still using RSA instead of ECDHE with either F5 graphical user interface (GUI) or via command line (CLI). I’ll give examples of both methods using version 13.0 but these statistics have been available in the same methods since before germs. In the GUI, From the Main tab on the left, select the Statistics control at the top of the list. Then select the Module Statistics menu and from that, the Local Traffic menu. When the screen refreshes, you’ll see a selector under Display Options titled Statistics Type. Click it and choose Profiles Summary. You’ll see a giant list of profile types. When you click the View… link next to the “Client SSL” a giant, juicy list of crypto stats will appear. You’ll be interested in one group in particular; the one named “Key Exchange Method”. Very likely most of the key exchange types will have 0 entries (no one should be using anonymous Diffie-Hellman for example). But three in the middle include the two forward secrecy algorithms, ephemeral Diffie-Hellman (DHE) and ephemeral elliptic curve Diffie-Hellman (ECDHE). Sandwiched between them is the RSA cipher. Here’s a sample: Add the values of the two forward secret ciphers and compare that sum to the RSA. In this example, there are 99 forward secret key exchanges and only 5 RSA key exchanges, for a rate of just under 5%. You can get these same statistics from the command line with the simple tmsh command: (tmos)# show ltm profile client-ssl This command shows the profile statistics individually and you may have to add them together to get the global numbers. Or maybe you wanted them broken down by specific profile in the first place. Having the RSA percentage at hand can help you decide whether or not you want to disable the RSA key exchange. If your F5 has a really long uptime, then the counts will include RSA key exchanges from months or years ago when forward secrecy wasn’t so popular, and that might distort your decision. You could get more timely numbers by hitting the “clear statistics” button at the top of the page and then watching for a period of hours or days to see the mix of ECDHE vs RSA key exchanges. I would record or screen shot the old numbers before you do, just in case. Disabling RSA Key Exchanges If you are a good enough administrator that you’re already using F5’s TMOS version 13, you can associate the “f5-ecc” cipher group to your client ssl profile and get only forward secret ciphers. Or you could use the cipher builder from the Local Traffic | Ciphers main tab to build a cipher group that excludes RSA. If you’re using a version prior to 13.0, then see knowledge base article K21905460 associated to CVE-2017-6168 for some good cipher string recommendations. Or, read the cipher string primer in my award-winning F5 SSL Recommended Practices guide. Note that using RSA certificates with forward secrecy is still okay. As long as each cipher in the cipher list includes ECDHE or DHE you’ll be safe from Bleichenbachers. Hopefully this information was of some use to you, dear reader, and can help you make the decision about how to treat your cryptographic key exchanges now, and in the future.747Views0likes0Comments
SSL::enable/SSL::disable unexpected behaviour
I have a question about the specific bahaviour of LTM with regard to SSL::enable/SSL::disable. I have a virtual server with two pools: One pool has a member that needs TLS communication; The other pool has a member that doesn't use TLS (i.e., it uses plain text HTTP). The pool selection is based on the request URI (e.g., the first URI-path selects the pool). I have a serverside SSL profile configured to my virtual server. When I use the iRule below, the behaviour is not quite what I expected: when HTTP_REQUEST { if { } { select the tls-pool: enable server side SSL SSL::enable serverside pool } else { select the http-pool: disable server side SSL SSL::disable serverside pool } } ` The observed behaviour is as follows: Client connects to virtual server (new TCP connection). Client issues a request that selects the http-pool. The http-pool member responds (confirmed: the 'SSL::disable' works). Over the same client TCP connection, the client issues a request that selects the tls-pool. The tls-pool member responds (confirmed: server side TLS is working). Over the same client TCP connection, the client issues a request that selects the http-pool again. This fails! A tcpdump reveals that LTM is sending a TLS Client Hello to the http pool member. The pool member responds with a '400 Bad Request', I get errors in /var/log/ltm: `warning tmm2[1688]: 01260009:4: Connection error: ssl_null_parse:3177: record length too large (22) warning tmm2[1688]: 01260013:4: SSL Handshake failed for TCP 192.168.10.10:80 -> 192.168.10.1:50214 ` and the client side TCP connection is aborted (TCP RST). When I rewrite my iRule to perform the 'SSL::enable' and 'SSL::disable' in a SERVER_CONNECTED event, all seems to work fine: `when HTTP_REQUEST { if { } { set tls 1 pool } else { set tls 0 pool } } when SERVER_CONNECTED { if { $tls == 1 } { SSL::enable serverside } else { SSL::disable serverside } } What is the difference? My guess is it has to do with attach/detach. But I seem to miss the subtle difference...584Views1like2Comments