Scalable AI Deployment: Harnessing OpenVINO and NGINX Plus for Efficient Inference
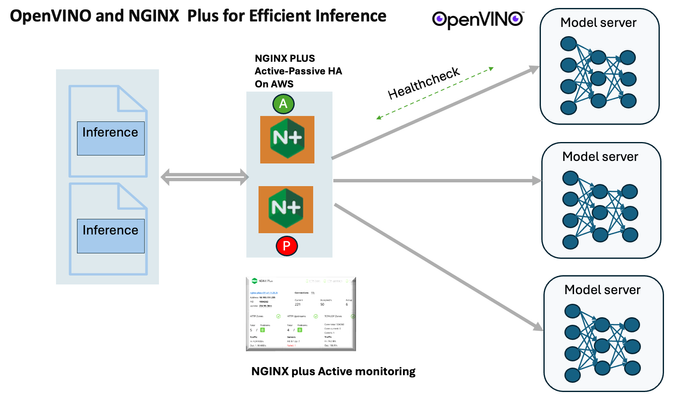
Introduction In the realm of artificial intelligence (AI) and machine learning (ML), the need for scalable and efficient AI inference solutions is paramount. As organizations deploy increasingly complex AI models to solve real-world problems, ensuring that these models can handle high volumes of inference requests becomes critical. NGINX Plus serves as a powerful ally in managing incoming traffic efficiently. As a high-performance web server and reverse proxy server, NGINX Plus is adept at load balancing and routing incoming HTTP and TCP traffic across multiple instances of AI model serving environments. The OpenVINO Model Server, powered by Intel's OpenVINO toolkit, is a versatile inference server supporting various deep learning frameworks and hardware acceleration technologies. It allows developers to deploy and serve AI models efficiently, optimizing performance and resource utilization. When combined with NGINX Plus capabilities, developers can create resilient and scalable AI inference solutions capable of handling high loads and ensuring high availability. Health checks allow NGINX Plus to continuously monitor the health of the upstream OVMS instances. If an OVMS instance becomes unhealthy or unresponsive, NGINX Plus can automatically route traffic away from it, ensuring that inference requests are processed only by healthy OVMS instances. Health checks provide real-time insights into the health status of OVMS instances. Administrators can monitor key metrics such as response time, error rate, and availability, allowing them to identify and address issues proactively before they impact service performance. In this article, we'll delve into the symbiotic relationship between the OpenVINO Model Server, and NGINX Plus to construct a robust and scalable AI inference solution. We'll explore setting up the environment, configuring the model server, harnessing NGINX Plus for load balancing, and conducting testing. By the end, readers will gain insights into how to leverage Docker, the OpenVINO Model Server, and NGINX Plus to build scalable AI inference systems tailored to their specific needs. Flow explanation: Now, let's walk through the flow of a typical inference request. When a user submits an image of a zebra for inference, the request first hits the NGINX load balancer. The load balancer then forwards the request to one of the available OpenVINO Model Server containers, distributing the workload evenly across multiple containers. The selected container processes the image using the optimized deep-learning model and returns the inference results to the user. In this case, the object is named zebra. OpenVINO™ Model Server is a scalable, high-performance solution for serving machine learning models optimized for Intel® architectures. The server provides an inference service via gRPC, REST API, or C API -- making it easy to deploy new algorithms and AI experiments. You can visit https://hub.docker.com/u/openvino for reference. Setting up: We'll begin by deploying model servers within containers. For this use case, I'm deploying the model server on a virtual machine (VM). Let's outline the steps to accomplish this: Get the docker image for OpenVINO ONNX run time docker pull openvino/onnxruntime_ep_ubuntu20 You can also visit https://docs.openvino.ai/nightly/ovms_docs_deploying_server.html for OpenVINO model server deployment in a container environment. Begin by creating a docker-compose file following the structure below: https://raw.githubusercontent.com/f5businessdevelopment/F5openVino/main/docker-compose.yml version: '3' services: resnet1: image: openvino/model_server:latest command: > --model_name=resnet --model_path=/models/resnet50 --layout=NHWC:NCHW --port=9001 volumes: - ./models:/models ports: - "9001:9001" resnet2: image: openvino/model_server:latest command: > --model_name=resnet --model_path=/models/resnet50 --layout=NHWC:NCHW --port=9002 volumes: - ./models:/models ports: - "9002:9002" # Add more services for additional containers resnet3: image: openvino/model_server:latest command: > --model_name=resnet --model_path=/models/resnet50 --layout=NHWC:NCHW --port=9003 volumes: - ./models:/models ports: - "9003:9003" resnet4: image: openvino/model_server:latest command: > --model_name=resnet --model_path=/models/resnet50 --layout=NHWC:NCHW --port=9004 volumes: - ./models:/models ports: - "9004:9004" resnet5: image: openvino/model_server:latest command: > --model_name=resnet --model_path=/models/resnet50 --layout=NHWC:NCHW --port=9005 volumes: - ./models:/models ports: - "9005:9005" resnet6: image: openvino/model_server:latest command: > --model_name=resnet --model_path=/models/resnet50 --layout=NHWC:NCHW --port=9006 volumes: - ./models:/models ports: - "9006:9006" resnet7: image: openvino/model_server:latest command: > --model_name=resnet --model_path=/models/resnet50 --layout=NHWC:NCHW --port=9007 volumes: - ./models:/models ports: - "9007:9007" resnet8: image: openvino/model_server:latest command: > --model_name=resnet --model_path=/models/resnet50 --layout=NHWC:NCHW --port=9008 volumes: - ./models:/models ports: - "9008:9008" Make sure you have Docker and Docker Compose installed on your system. Place your model files in the `./models/resnet50` directory on your local machine. Save the provided Docker Compose configuration to a file named `docker-compose.yml`. Run the following command in the directory containing the `docker-compose.yml` file to start the services: docker-compose up -d You can now access the OpenVINO Model Server instances using the specified ports (e.g., `http://localhost:9001` for `resnet1` and `http://localhost:9002` for `resnet2`). - Ensure that the model files are correctly placed in the `./models/resnet50` directory before starting the services. Set up an NGINX Plus proxy server. You can refer to https://docs.nginx.com/nginx/admin-guide/installing-nginx/installing-nginx-plus/ for NGINX Plus installation also You have the option to configure VMs with NGINX Plus on AWS by either: Utilizing the link provided below, which guides you through setting up NGINX Plus on AWS via the AWS Marketplace: NGINX Plus on AWS Marketplace or Following the instructions available on GitHub at the provided repository link. This repository facilitates spinning up VMs using Terraform on AWS and deploying VMs with NGINX Plus under the GitHub repository - F5 OpenVINO The NGINX Plus proxy server functions as a proxy for upstream model servers. Within the upstream block, backend servers (model_servers) are defined along with their respective IP addresses and ports. In the server block, NGINX listens on port 80 to handle incoming HTTP/2 requests targeting the specified server name or IP address. Requests directed to the root location (/) are then forwarded to the upstream model servers utilizing the gRPC protocol. The proxy_set_header directives are employed to maintain client information integrity while passing requests to the backend servers. Ensure to adjust the IP addresses, ports, and server names according to your specific setup. Here is an example configuration that is also available at GitHubhttps://github.com/f5businessdevelopment/F5openVino upstream model_servers { server 172.17.0.1:9001; server 172.17.0.1:9002; server 172.17.0.1:9003; server 172.17.0.1:9004; server 172.17.0.1:9005; server 172.17.0.1:9006; server 172.17.0.1:9007; server 172.17.0.1:9008; zone model_servers 64k; } server { listen 80 http2; server_name 10.0.0.19; # Replace with your domain or public IP location / { grpc_pass grpc://model_servers; health_check type=grpc grpc_status=12; # 12=unimplemented proxy_set_header Host $host; proxy_set_header X-Real-IP $remote_addr; proxy_set_header X-Forwarded-For $proxy_add_x_forwarded_for; } } If you are using gRPC with SSL please refer to the detailed configuration at NGINX Plus SSL Configuration Here is the explanation: upstream model_servers { server 172.17.0.1:9001; # Docker bridge network IP and port for your container server 172.17.0.1:9002; # Docker bridge network IP and port for your container .... .... } This section defines an upstream block named model_servers, which represents a group of backend servers. In this case, there are two backend servers defined, each with its IP address and port. These servers are typically the endpoints that NGINX will proxy requests to. server { listen 80 http2; server_name 10.1.1.7; # Replace with your domain or public IP This part starts with the main server block. It specifies that NGINX should listen for incoming connections on port 80 using the HTTP/2 protocol (http2), and it binds the server to the IP address 10.1.1.7. Replace this IP address with your domain name or public IP address. location / { grpc_pass grpc://model_servers; health_check type=grpc grpc_status=12; # 12=unimplemented proxy_set_header Host $host; proxy_set_header X-Real-IP $remote_addr; proxy_set_header X-Forwarded-For $proxy_add_x_forwarded_for; } Within the location/block, NGINX defines how to handle requests to the root location. In this case, it's using gRPC (grpc_pass grpc://model_servers;) to pass the requests to the upstream servers defined in the model_servers block. The proxy_set_header directives are used to set headers that preserve client information when passing requests to the backend servers. These headers include Host, X-Real-IP, and X-Forwarded-For. Health checks with type=grpc enable granular monitoring of individual gRPC services and endpoints. You can verify the health of specific gRPC methods or functionalities, ensuring each service component is functioning correctly. In summary, this NGINX configuration sets up a reverse proxy server that listens for HTTP/2 requests on port 80 and forwards them to backend servers (model_servers) using the gRPC protocol. It's commonly used for load balancing or routing requests to multiple backend servers. Inference Testing: This is how you can conduct testing. On the client side, we utilize a script named predict.py. Below is the script for reference # Import necessary libraries import numpy as np from classes import imagenet_classes from ovmsclient import make_grpc_client # Create a gRPC client to communicate with the server # Replace "10.1.1.7:80" with the IP address and port of your server client = make_grpc_client("10.1.1.7:80") # Open the image file "zebra.jpeg" in binary read mode with open("zebra.jpeg", "rb") as f: img = f.read() # Send the image data to the server for prediction using the "resnet" model output = client.predict({"0": img}, "resnet") # Extract the index of the predicted class with the highest probability result_index = np.argmax(output[0]) # Print the predicted class label using the imagenet_classes dictionary print(imagenet_classes[result_index]) This script imports necessary libraries, establishes a connection to the server at the specified IP address and port, reads an image file named "zebra.jpeg," sends the image data to the server for prediction using the "resnet" model, retrieves the predicted class index with the highest probability, and prints the corresponding class label. Results: Execute the following command from the client machine. Here, we are transmitting this image of Zebra to the model server. python3 predict.py zebra.jpg #run the Inference traffic zebra. The prediction output is 'zebra'. Let's now examine the NGINX Plus logs cat /var/log/nginx/access.log 10.1.1.7 - - [13/Apr/2024:00:18:52 +0000] "POST /tensorflow.serving.PredictionService/Predict HTTP/2.0" 200 4033 "-" "grpc-python/1.62.1 grpc-c/39.0.0 (linux; chttp2)" This log entry shows that a POST request was made to the NGINX server at the specified timestamp, and the server responded with a success status code (200). The request was made using gRPC, as indicated by the user agent string. Conclusion: Using NGINX Plus, organizations can achieve a scalable and efficient AI inference solution. NGINX Plus can address disruptions caused by connection timeouts/errors, sudden spikes in request rates, or changes in network topology. OpenVINO Model Server optimizes model performance and inference speed, utilizing Intel hardware acceleration for enhanced efficiency. NGINX Plus acts as a high-performance load balancer, distributing incoming requests across multiple model server instances for improved scalability and reliability. Together, this enables seamless scaling of AI inference workloads, ensuring optimal performance and resource utilization. You can look at this video for reference: https://youtu.be/Sd99woO9FmQ References: https://hub.docker.com/u/openvino https://docs.nginx.com/nginx/deployment-guides/amazon-web-services/high-availability-keepalived/ https://www.nginx.com/blog/nginx-1-13-10-grpc/ https://github.com/f5businessdevelopment/F5openVino.git https://docs.openvino.ai/nightly/ovms_docs_deploying_server.html301Views0likes0CommentsHow I did it - "Securing Nvidia Triton Inference Server with NGINX Plus Ingress Controller”
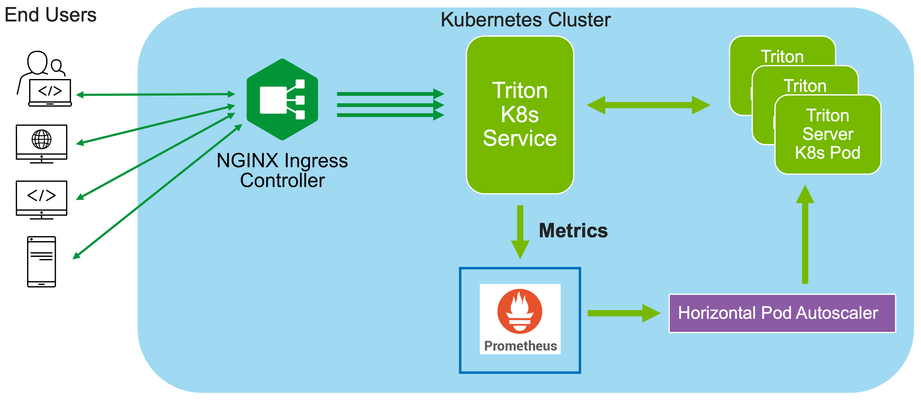
In this installment of "How I Dit it", we step into the world of AI and Machine learning (ML) and take a look at how F5’s NGINX Plus Ingress Controller can provide secure and scalable external access to Nvidia’s Triton Inference Servers hosted on Kubernetes.249Views0likes0Comments
Securing and Scaling Hybrid Application with F5 NGINX (Part 1)
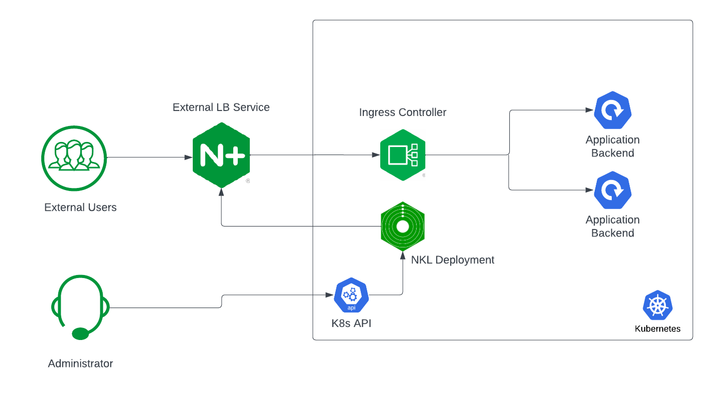
If you are using Kubernetes in production, then you are likely using an ingress controller. The ingress controller is the core engine managing traffic entering and exiting the Kubernetes cluster. Because the ingress controller is a deployment running inside the cluster, how do you route traffic to the ingress controller? How do you route external traffic to internal Kubernetes Services? Cloud providers offer a simple convenient way to expose Kubernetes Services using an external load balancer. Simply deploy a Managed Kubernetes Service (EKS, GKE, AKS) and create a Kubernetes Service of type LoadBalancer. The cloud providers will host and deploy a load balancer providing a public IP address. External users can connect to Kubernetes Services using this public entry point. However, this integration only applies to Managed Kubernetes Services hosted by cloud providers. If you are deploying Kubernetes in private cloud/on-prem environments, you will need to deploy your own load balancer and integrate it with the Kubernetes cluster. Furthermore, Kubernetes Load Balancing integrations in the cloud are limited to TCP Load Balancing and generally lack visibility into metrics, logs, and traces. We propose: A solution that applies regardless of the underlying infrastructure running your workloads Guidance around sizing to avoid bottlenecks from high traffic volumes Application delivery use cases that go beyond basic TCP/HTTP load balancing In the solution depicted below, I deploy NGINX Plus as the external LB service for Kubernetes and route traffic to the NGINX Ingress Controller. The NGINX Ingress Controller will then route the traffic to the application backends. The NLK (NGINX Load Balancer for Kubernetes) deployment is a new controller by NGINX that monitors specified Kubernetes Services and sends API calls to manage upstream endpoints of the NGINX External Load Balancer In this article, I will deploy the components both inside the Kubernetes cluster and NGINX Plus as the external load balancer. Note: I like to deploy both the NLK and Kubernetes cluster in the same subnet to avoid network issues. This is not a hard requirement. Prerequisites The blog assumes you have experience operating in Kubernetes environments. In addition, you have the following: Access to a Kubernetes environment; Bare Metal, Rancher Kubernetes Engine (RKE), VMWare Tanzu Kubernetes (VTK), Amazon Elastic Kubernetes (EKS), Google Kubernetes Engine (GKE), Microsoft Azure Kubernetes Service (AKS), and RedHat OpenShift NGINX Ingress Controller – Deploy NGINX Ingress Controller in the Kubernetes cluster. Installation instructions can be found in the documentation. NGINX Plus – Deploy NGINX Plus on VM or bare metal with SSH access. This will be the external LB service for the Kubernetes cluster. Installation instructions can be found in the documentation. You must have a valid license for NGINX Plus. You can get started today by requesting a 30-day free trial. Setting up the Kubernetes environment I start with deploying the back-end applications. You can deploy your own applications, or you can deploy our basic café application as an example. $ kubectl apply –f cafe.yaml Now I will configure routes and TLS settings for the ingress controller $ kubectl apply –f cafe-secret.yaml $ kubectl apply –f cafe-virtualserver.yaml To ensure the ingress rules are successfully applied, you can examine the output of kubectl get vs. The VirtualServer definition should be in the Valid state. NAMESPACE NAME STATE HOST IP PORTS default cafe-vs Valid cafe.example.com Setting up NGINX Plus as the external LB A fresh install of NGINX Plus will provide the default.conf file in the /etc/nginx/conf.d directory. We will add two additional files into this directory. Simply copy the bulleted files into your /etc/nginx/conf.d directory dashboard.conf; This will enable the real-time monitoring dashboard for NGINX Plus kube_lb.conf; The nginx configuration as the external load balancer for Kubernetes. You can change the configuration file to fit your requirements. In part 1 of this series, we enabled basic routing and TLS for one cluster. You will also need to generate TLS cert/keys and place them in the /etc/ssl/nginx folder of the NGINX Plus instance. For the sake of this example, we will generate a self-signed certificate with openssl. $ openssl req -x509 -nodes -days 365 -newkey rsa:2048 -keyout default.key -out default.crt -subj "/CN=NLK" Note: Using self-signed certificates is for testing purposes only. In a live production environment, we recommend using a secure vault that will hold your secrets and trusted CAs (Certificate Authorities). Now I can validate the configuration and reload nginx for the changes to take effect. $ nginx –t $ nginx –s reload I can now connect to the NGINX Plus dashboard by opening a browser and entering http://<external-ip-nginx>:9000/dashboard.html#upstreams The HTTP upstream table should be empty as we have not deployed the NLK Controller yet. We will do that in the next section. Installing the NLK Controller You can install the NLK Controller as a Kubernetes deployment that will configure upstream endpoints for the external load balancer using the NGINX Plus API. First, we will create the NLK namespace $ kubectl create ns nlk And apply the RBAC settings for the NKL deployment $ kubectl apply -f serviceaccount.yaml $ kubectl apply -f clusterrole.yaml $ kubectl apply -f clusterrolebinding.yaml $ kubectl apply -f secret.yaml The next step is to create a ConfigMap defining the API endpoint of the NGINX Plus external load balancer. The API endpoint is used by the NLK Controller to configure the NGINX Plus upstream endpoints. We simply modify the nginx-hosts field in the manifest from our GitHub repository to the IP address of the NGINX external load balancer. nginx-hosts: http://<nginx-plus-external-ip>:9000/api Apply the updated ConfigMap and deploy the NLK controller $ kubectl apply –f nkl-configmap.yaml $ kubectl apply –f nkl-deployment I can verify the NLK controller deployment is running and the ConfigMap data is applied. $ kubectl get pods –o wide –n nlk $ kubectl describe cm nginx-config –n nlk You should see the NLK deployment in status Running and the URL should be defined under nginx-hosts. The URL is the NGINX Plus API endpoint of the external load Balancer. Now that the NKL Controller is successfully deployed, the external load balancer is ready to route traffic to the cluster. The final step is deploying a Kubernetes Service type NodePort to expose the Kubernetes cluster to NGINX Plus. $ kubectl apply –f nodeport.yaml There are a couple things to note about the NodePort Service manifest. Fields on line 7 and 14 are required for the NLK deployment to configure the external load balancer appropriately: The nginxinc.io/nkl-cluster annotation The port name matching the upstream block definition in the NGINX Plus configuration (See line 42 in kube_lb.conf) and preceding nkl- apiVersion: v1 kind: Service metadata: name: nginx-ingress namespace: nginx-ingress annotations: nginxinc.io/nlk-cluster1-https: "http" # Must be added spec: type: NodePort ports: - port: 443 targetPort: 443 protocol: TCP name: nlk-cluster1-https selector: app: nginx-ingress Once the service is applied, you can note down the assigned nodeport selecting the NGINX Ingress Controller deployment. In this example, that node port is 32222. $ kubectl get svc –o wide –n nginx-ingress NAME TYPE CLUSTER-IP PORT(S) SELECTOR nginx-ingress NodePort x.x.x.x 443:32222/TCP app=nginx-ingress If I reconnect to my NGINX Pus dashboard, the upstream tab should be populated with the worker node IPs of the Kubernetes cluster and matching the node port of the nginx-ingress Service (32222). You can list the node IPs of your cluster to make sure they match the IPs in the dashboard upstream tab. $ kubectl get nodes -o wide | awk '{print $6}' INTERNAL-IP 10.224.0.6 10.224.0.5 10.224.0.4 Now I can connect to the Kubernetes application from our local machine. The hostname we used in our example (cafe.example.com) should resolve to the IP address of the NGINX Plus load balancer. Wrapping it up Most enterprises deploying Kubernetes in production will install an ingress controller. It is the DeFacto standard for application delivery in container orchestrators like Kubernetes. DevOps/NetOps engineers are now looking for guidance on how to scale out their Kubernetes footprint in the most efficient way possible. Because enterprises are embracing the hybrid approach, they will need to implement their own integrations outside of cloud providers. The solution we propose: is applicable to hybrid environments (particularly on-prem) Sizing information to avoid bottlenecks from large traffic volumes Enterprise Load Balancing capabilities that stretch beyond a TCP LoadBalancing Service In the next part of our series, I will dive into the third bullet point into much more detail and cover Zero Trust use cases with NGINX Plus, providing extra later of security in your hybrid model.195Views0likes0Comments
F5 TIC3.0 Capability Mappings
About The information below lists how F5 products address TIC 3.0 capability requirements (Dec 2023/Version 3.1) from the context of how F5 can help the broader agency. Important Note: Prior to reading this please read each capability as defined in https://www.cisa.gov/sites/default/files/2023-12/CISA%20TIC%203.0%20Security%20Capabilities%20Catalog_508c.pdf If a capability is not explicitly listed it should be assumed the F5 product does not meet the requirement. At the core the security provided by TIC 3.0 is based on Zero Trust. If you would like to learn more about how F5 can help your agency meet its Zero Trust requirements, please contact your local account team for additional detail. F5 Products Background F5 BIG-IP is a reverse proxy with web application security and authentication capabilities. BIG-IP provides these capabilities for traditional applications. F5 BIG-IP delivers applications securely, efficiently and at scale. BIG-IP Web Application Firewall protects applications from the ever-evolving security threat landscape. Specific BIG-IP software modules are matched to certain capabilities below where applicable. F5 NGINX Plusis a reverse proxy with web application security and authentication capabilities in a containerized format. NGINX+ typical use cases is to provide these protections for modern containerized applications. F5 Distributed Cloud is a SaaS offering that provides Application Delivery, WAAP, DNS, DDOS to applications as an edge service. F5 Distributed Cloud also offers a “Customer Edge” CE that provides many of these same capabilities on-prem or in a Cloud Service Provider. F5 Distributed Cloud will be referred to as “F5 XC” below. TIC 3.0 Capabilities Universal Security Capabilities Central Log Management with Analysis BIG-IP BIG-IP provides application security and telemetry logging enterprise wide to a centralized log store. NGINX Plus NGINX Plus provides application security and telemetry logging enterprise wide to a centralized log store. F5 XC F5 XC provides application security and telemetry logging enterprise wide to a centralized log store. Configuration Management BIG-IP BIG-IP configuration and capabilities can be fully automated and orchestrated. NGINX Plus NGINX Plus configuration and capabilities can be fully automated and orchestrated. F5 XC F5 XC configuration and capabilities can be fully automated and orchestrated. Incident Response Planning and Incident Handling BIG-IP F5 BIG-IP provides the ability to detect, prevent and log application security events. NGINX Plus F5 NGINX Plus provides the ability to detect, prevent and log application security events in a containerized form factor. F5 XC F5 Distributed Cloud provides the ability to detect, prevent and log application security events. Strong Authentication BIG-IP F5 BIG-IP supports requiring SAML, OIDC, Active Directory, and mTLS authentication before a client can access an application NGINX Plus F5 BIG-IP NGINX Plus supports requiring OIDC, and mTLS authentication before a client can access an application containerized format. F5 XC N/A Enterprise Threat Intelligence BIG-IP F5 provides threat intelligence feeds that help organizations detect whether they are a target of a threat campaign. This service can be leveraged by BIG-IP. NGINX Plus F5 provides threat intelligence feeds that help organizations detect whether they are a target of a threat campaign. This service can be leveraged by NGINX Plus. F5 XC F5 provides threat intelligence feeds that help organizations detect whether they are a target of a threat campaign. This service can be leveraged by F5 XC. Dynamic Threat Discovery BIG-IP BIG-IP can learn HTTP traffic patterns and establish a baseline to protect applications. NGINX Plus N/A F5 XC N/A Continuous Monitoring Reporting BIG-IP BIG-IP provides application security and telemetry logging providing vital application access, performance, and threat data for analysis. NGINX Plus NGINX Plus provides application security and telemetry logging providing vital application access, performance, and threat data for analysis. F5 XC F5 XC provides application security and telemetry logging providing vital application access, performance, and threat data for analysis. Web PEP Capabilities Break and Inspect BIG-IP F5 BIG-IP provides the ability to decrypt TLS traffic and send the decrypted traffic to any number of security devices, allowing the security devices. NGINX Plus N/A F5 XC N/A Active Content Mitigation BIG-IP BIG-IP provides the ability to decrypt TLS traffic and send this traffic to a content filtering solution for further inspection. This allows the filtering solution to inspect previously encrypted traffic and remove any malicious content. NGINX Plus N/A F5 XC N/A Certificate Denylisting BIG-IP F5 BIG-IP can enforce certification revocation on clients (human or non-human) presenting certificates (mTLS/Smart Card/CAC/PIV) via OCSP or CRLs before granting access to the application. BIG-IP can also be configured to deny certificates based on a blacklist. NGINX Plus F5 BIG-IP can enforce certification revocation on clients (human or non-human) presenting certificates (mTLS/Smart Card/CAC/PIV) via OCSP or CRLs before granting access to the application. F5 XC N/A Content Filtering BIG-IP BIG-IP provides the ability to decrypt TLS traffic and send this traffic to a content filtering solution for further inspection. This allows the filtering solution to inspect previously encrypted traffic and remove any malicious content. NGINX Plus N/A F5 XC N/A Authenticated Proxy BIG-IP F5 BIG-IP is a reverse proxy that provides the ability to require SAML, OIDC, Active Directory and mTLS authentication before a client can access an application. NGINX Plus F5 BIG-IP NGINX Plus is a reverse proxy that provides the ability to require OIDC, and mTLS authentication before a client can access an application in a containerized format. F5 XC N/A Data Loss Prevention BIG-IP BIG-IP can detect and block sensitive data leaving an application. Data patterns that are deemed sensitive can be added. Additionally, BIG-IP provides the ability to decrypt TLS traffic and send this traffic to a DLP solution for further inspection preventing sensitive data leakage. NGINX Plus NGINX Plus can detect and block sensitive data leaving an application. Data patterns that are deemed sensitive can be added. F5 XC F5 XC can detect and block sensitive data leaving an application. Data patterns that are deemed sensitive can be added. Domain Resolution Filtering BIG-IP BIG-IP can report of block DNS over HTTPS originating from or destined for your agency. NGINX Plus N/A F5 XC N/A Protocol Compliance Enforcement BIG-IP BIG-IP provides protocol compliance for both HTTP and DNS with the ability to report or reject traffic that is out of compliance. NGINX Plus NGINX Plus provides protocol compliance for HTTP with the ability to report or reject traffic that is out of compliance. F5 XC F5 XC provides protocol compliance for HTTP with the ability to report or reject traffic that is out of compliance. Domain Category Filtering BIG-IP BIG-IP provides break and inspect capabilities for traffic egressing from the network. Categories may be configured to bypass break and inspect for domain categories (e.g., banking, medical, government). This is typically done so that PII data is not inspected. NGINX Plus N/A F5 XC F5 XC CEs provide forward proxy capabilities with the ability to restrict domain and URL access. https://docs.cloud.f5.com/docs/how-to/network-firewall/forward-proxy-policies Domain Reputation Filtering BIG-IP BIG-IP provides the ability to deny access to domains via a list or categories of domains enforced at the HTTP protocol layer. Domain filtering can also be provided via DNS using a list of domains or an integration with a RPZ provider such as Spamhaus or SUBRL. NGINX Plus N/A F5 XC N/A Bandwidth Control BIG-IP F5 BIG-IP provides the ability to limit bandwidth on a per application basis. https://techdocs.f5.com/en-us/BIG-IP-16-1-0/big-ip-policy-enforcement-manager-implementations/managing-traffic-with-bandwidth-controllers.html NGINX Plus F5 NGINX Plus provides the ability to rate limit on a per application basis in a containerized/Kubernetes environment. F5 XC F5 XC provides the ability to rate limit on a per application basis at a regional edge, on-prem or in the cloud. Malicious Content Filtering BIG-IP BIG-IP provides the ability to decrypt TLS traffic and send this traffic to a content filtering solution for further inspection. This allows the filtering solution to inspect previously encrypted traffic and remove any malicious content. NGINX Plus N/A F5 XC N/A Access Control BIG-IP F5 BIG-IP provides the ability to define policies to limit actions on protected web applications. This is achieved by limiting on a per user and per application basis the URLs and HTTP methods that a user is permitted to access. NGINX Plus F5 NGINX Plus provides the ability to define policies to limit actions on protected web applications. This is achieved by limiting on a per user and per application basis the URLs and HTTP methods that a user is permitted to access. F5 XC F5 XC provides the ability to define policies to limit actions on protected web applications. This is achieved by limiting on a per user and per application basis the URLs and HTTP methods that a user is permitted to access. Resiliency PEP Security Capabilities Distributed Denial of Service Protections BIG-IP BIG-IP provides protection against DOS attacks at layers 3-7 by providing the ability to learn traffic patterns and establish a baseline. BIG-IP Layer 3-4 capabilities provide protection against IP, UDP and TCP based attacks. Layer 7 capabilities provide protection against DNS, TLS and HTTP based DOS attacks. NGINX Plus NGINX Plus provides protection against HTTP based DOS attacks. F5 XC F5 XC provides protection against HTTP based DOS attacks. Elastic Expansion BIG-IP F5 BIG-IP provides the ability to scale out applications by distributed the application traffic across as many instances as needed. NGINX Plus F5 NGINX Plus provides the ability to scale out applications by distributed the application traffic across as many instances as needed in a containerized environment. F5 XC F5 XC provides the ability to scale out applications by distributed the application traffic across as many instances as needed. Regional Delivery BIG-IP N/A NGINX Plus N/A F5 XC F5 XC provides the ability through a Regional Edge to host containerized application and their associated services through a secure scalable fabric. Additionally, F5 XC’s Regional Edge provides the ability to scale, secure and deliver applications across a geographically dispersed set of environments. Domain Name System PEP Security Capabilities Domain Name Sinkholing BIG-IP Domain Name Sinkholing DNS using a list of domains or an integration with a RPZ provider such as Spamhaus or SUBRL. NGINX Plus N/A F5 XC N/A Domain Name Verification for Agency Clients BIG-IP F5 BIG-IP can enforce that queries from agency clients utilize DNSSEC NGINX Plus N/A F5 XC N/A Domain Name Validation for Agency Domains BIG-IP F5 BIG-IP can enforce DNSSEC chain of trust for all agency domains. NGINX Plus N/A F5 XC N/A Intrusion Detection PEP Security Capabilities Intrusion Detection and Prevention Systems BIG-IP F5 BIG-IP provides Intrusion Detection capabilities that allow for the reporting and blocking of threats over a wide range of protocols. NGINX Plus N/A F5 XC N/A Enterprise PEP Security Capabilities Virtual Private Network BIG-IP F5 BIG-IP provides site-to-site IPSEC capabilities along with end user remote access SSL VPN. NGINX Plus N/A F5 XC N/A Application Container BIG-IP N/A NGINX Plus F5 NGINX Plus provides load balancing, ingress services (for K8s), WAF, HTTP DOS protection and API Security for containerized services. F5 XC F5 XC provides the ability to host containerized services in F5 XC Regional Edge. Services PEP Security Capabilities Active Content Mitigation BIG-IP BIG-IP provides the ability to decrypt TLS traffic and send this traffic to a content filtering solution for further inspection. This allows the filtering solution to inspect previously encrypted traffic and remove any malicious content. NGINX Plus N/A F5 XC N/A Data Loss Prevention BIG-IP BIG-IP can detect and block sensitive data leaving an application. Data patterns that are deemed sensitive can be added. Additionally, BIG-IP provides the ability to decrypt TLS traffic and send this traffic to a DLP solution for further inspection preventing sensitive data leakage. NGINX Plus NGINX Plus can detect and block sensitive data leaving an application. Data patterns that are deemed sensitive can be added. F5 XC F5 XC can detect and block sensitive data leaving an application. Data patterns that are deemed sensitive can be added. Protocol Compliance Enforcement BIG-IP F5 BIG-IP provides the ability to enforce protocol compliance for HTTP and DNS protocols. NGINX Plus F5 NGINX Plus provides the ability to enforce protocol compliance for the HTTP protocol. F5 XC F5 XC provides the ability to enforce protocol compliance for the HTTP protocol. Malicious Content Filtering BIG-IP BIG-IP provides the ability to decrypt TLS traffic and send this traffic to a content filtering solution for further inspection. This allows the filtering solution to inspect previously encrypted traffic and remove any malicious content. NGINX Plus N/A F5 XC N/A Access Control BIG-IP F5 BIG-IP provides the ability to define policies to limit actions on protected web applications. This is achieved by limiting on a per user and per application basis the URLs and HTTP methods that a user is permitted to access. NGINX Plus F5 NGINX Plus provides the ability to define policies to limit actions on protected web applications. This is achieved by limiting on a per user and per application basis the URLs and HTTP methods that a user is permitted to access. F5 XC F5 XC provides the ability to define policies to limit actions on protected web applications. This is achieved by limiting on a per user and per application basis the URLs and HTTP methods that a user is permitted to access. Identity PEP Security Capabilities Behavioral Baselining BIG-IP BIG-IP can learn HTTP traffic patterns and establish a baseline to protect applications. NGINX Plus N/A F5 XC N/A Multi-factor Authentication BIG-IP F5 BIG-IP supports requiring SAML, OIDC, Active Directory, and mTLS authentication before a client can access an application NGINX Plus F5 BIG-IP NGINX Plus supports requiring OIDC, and mTLS authentication before a client can access an application containerized format. F5 XC N/A Continuous Authentication BIG-IP F5 BIG-IP provides the ability to authenticate users prior to accessing an application. After access to the application BIG-IP can enforce periodic requests for authentication to reverify the client’s identity in addition to their OS posture. NGINX Plus N/A F5 XC N/A190Views2likes0CommentsAchieving an SSL Labs A+ score with F5 products
Overview Transport Layer Security (TLS, formerly SSL or Secure Sockets Layer) is a verywell-establishedlayer 5 protocol with many moving parts. It has been augmented significantly over the years to address a seemingly endless series of new requirements and vulnerabilities. Despite its significant maturity, TLS remains a misunderstood system thatorganizationsstruggle with. This article aims to describe what is required to achieve a good TLS configuration on F5 products, from the point of view of an industry standard SSL Labs testing tool from Qualys. Generally, getting a good score (at the moment!) from SSL Labs involves a few main points: Restricting the supported protocols to TLS 1.2 and 1.3 Disabling weak ciphers, algorithms, andconfiguration options Enabling HTTP Strict Transport Security (HSTS). If you do the above things, you should easily be able toachievean A or A+ score. Having HSTS enabled means that a client browser will always try to connect to your site using HTTPS. You should be somewhat cautious when enabling HSTS, as this setting is cached by the client browser (for a definableperiod). If you hadacatastrophe with your site, it could potentially leave it unreachable as browsers would never try to connect via HTTP. In myview,the risk is low and the reward is high. F5 Distributed Cloud If you haveanHTTPS-enabledLoad Balancer configuration configured on F5 Distributed Cloud, then this task couldn't be easier. The 'TLS Security Level' setting of 'High' should get you an 'A' score, and all you need to do to achieve an 'A+' is enable HSTS. Make sure 'TLS Security Level' is set to 'High', tick the 'Add HSTS Header' option and pat yourself on the back because you're all done. F5 BIG-IP To securely configureanHTTPS service on a BIG-IP, we are going to configure twoobjects,anHTTP profile and an SSL profile. This article will presume that you have an existing Virtual Server and other underlying configuration (SSL certificates, etc). SSL profile The SSL profile needs to be using a cipher group such as 'f5-secure' and the following options set: No SSL, No DTLS, No TLS v1.1, Single DH use, No DTLS v1.2, No SSLv3, No TLSv1. I also recommend changing the SSL signing hash algorithm to SHA256 or SHA384. A sample Client SSL configuration looks like this: ltm profile client-ssl clientssl_Mysite-2023 { cert-key-chain { Mysite-Chain-0 { cert Mysite-2023 chain Mysite-2023 key Mysite-2023 } } cipher-group f5-secure ciphers none defaults-from clientssl options { dont-insert-empty-fragments no-ssl no-dtls no-tlsv1.1 single-dh-use no-dtlsv1.2 no-dtlsv1 no-sslv3 no-tlsv1 } ssl-sign-hash sha384 } HTTP profile The HTTP profile also needs some changes to insert the headers associated with HSTS: ltm profile http http_Mysite-2023 { defaults-from http hsts { include-subdomains enabled maximum-age 31536000 mode enabled preload disabled } proxy-type reverse } If you are using iRules to do other HTTP transforms, then you may need to do the HSTS HTTP header insertions in an iRule due to the order of operations of the TMM proxy. These instructions have been developed on TMOS 17.1. Similar results should be possible on older versions back to TMOS 14.1. Anything olderwon'tsupport the requisite ciphers and protocols required for a good score. NGINX Plus Because NGINX has such strong community support, the TLS security settings required for a good SSL Labs score with NGINX Plus are easily found. The settings below will do the trick: ssl_session_cache shared:le_nginx_SSL:1m; ssl_session_timeout 1440m; ssl_protocols TLSv1.3 TLSv1.2; ssl_prefer_server_ciphers on; ssl_ciphers EECDH+ECDSA+AESGCM:EECDH+aRSA+AESGCM:EECDH+ECDSA+SHA512:EECDH+ECDSA+SHA384:EECDH+ECDSA+SHA256:ECDH+AESGCM:ECDH+AES256:DH+AESGCM:DH+AES256:RSA+AESGCM:!aNULL:!eNULL:!LOW:!RC4:!3DES:!MD5:!EXP:!PSK:!SRP:!DSS; ssl_buffer_size 4k; add_header Strict-Transport-Security 'max-age=31536000; includeSubDomains; preload' always; If you are using LetsEncrypt, you may find these settings are automatically installed for you when certbot manages your certificates. For a more thorough discussion of configuring TLS on NGINX+, please review this article. Other considerations Disabling TLS 1.1 (and older) as described in this guide will mean that old browsers can no longer connect to your site using HTTPS. Browsers that can't support at least TLS 1.2 probably shouldn't be usedanymore,as there is likely a very large number of other problems they are vulnerable to. Someorganizationscreate a non-SSL landing page that presents a "sorry" page for such browsers. I can envisage a little logic in an iRule that checks for old HTTPUser Agent's andredirectsto a "sorry" page, while newer browsers are redirected to a HTTPS site. Another piece of the puzzle to consider isDNSconfiguration—whichis a topic large enough for its own post. That aside, it is worth mentioning that you should implement a CAA record (Certificate Authority Authorization) that defines which TLS Certificate Authorities are allowed to issue certificates for your DNS domain. It is a simple change that SSL Labs looks for in its tests (though it doesn't appear to change the score). The DNS record is similar to below: example.org. CAA 128 issue "letsencrypt.org" For moreinformation,look at RFC 6844. Conclusion Theseinstructions to achieve a good SSL Labs score and the required configurations are valid at the time of published, but a good security posture is a moving target and as such requires constant evaluation. That is one distinct advantage of F5 DistributedCloud—theconfigurations are constantly beinganalyzedand enhanced behind-the-scenes by a team of expert engineers.690Views1like0Comments
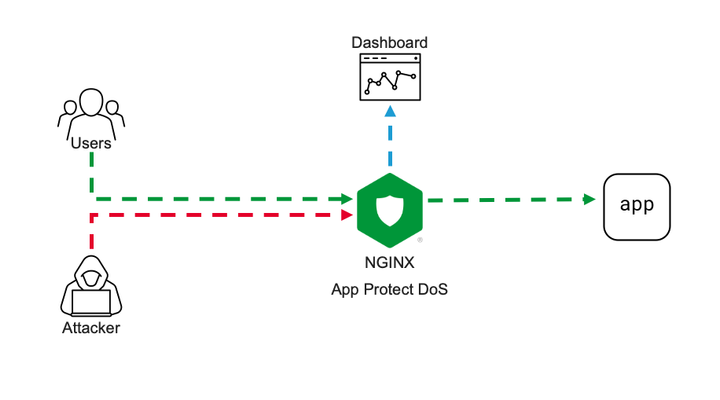
L7 DoS Protection with NGINX App Protect DoS
Intro NGINX security modules ecosystem becomes more and more solid. Current App Protect WAF offering is now extended by App Protect DoS protection module. App Protect DoS inherits and extends the state-of-the-art behavioral L7 DoS protection that was initially implemented on BIG-IPand now protects thousands of workloads around the world. In this article, I’ll give a brief explanation of underlying ML-based DDoS prevention technology and demonstrate few examples of how precisely it stops various L7 DoS attacks. Technology It is important to emphasize the difference between the general volumetric-based protection approach that most of the market uses and ML-based technology that powers App Protect DoS. Volumetric-based DDoS protection is an old and well-known mechanism to prevent DDoS attacks. As the name says, such a mechanism counts the number of requests sharing the same source or destination, then simply drops or applies rate-limiting after some threshold crossed. For instance, requests sourcing the same IP are dropped after 100 RPS, requests going to the same URL after 200 RPS, and rate-limiting kicks in after 500 RPS for the entire site. Obviously, the major drawback of such an approach is that the selection criterion is too rough. It can causeerroneous drops of valid user requests and overall service degradation. The phenomenon when a security measure blocks good requests is called a “false positive”. App Protect DoS implements much more intelligent techniques to detect and fight off DDoS attacks. At a high level, it monitors all ongoing traffic and builds a statistical model in other words a baseline in aprocesscalled “learning”. The learning process almost never stops, thereforea baseline automatically adjusts to the current web application layout, a pattern of use, and traffic intensity. This is important because it drastically reduces maintenance cost and reaction speed for the solution. There is no more need to manually customize protection configuration for every application or traffic change. Infinite learning produces a legitimate question. Why can’t the system learn attack traffic as a baseline and how does it detect an attack then? To answer this question let us define what a DDoS attack is. A DDoS attack is a traffic stream that intends to deny or degrade access to a service. Note, the definition above doesn’t focus on the amount of traffic. ‘Low and slow’ DDoS attacks can hurt a service as severely as volumetric do. Traffic is only considered malicious when a service level degrades. So, this means that attack traffic can become a baseline, but it is not a big deal since protected service doesn’t suffer. Now only the “service degradation” term separates us from the answer. How does the App Protect DoS measure a service degradation? As humans, we usually measure the quality of a web service in delays. The longer it takes to get a response the more we swear. App Protect DoS mimics human behavior by measuring latency for every single transaction and calculates the level of stress for a service. If overall stress crosses a threshold App Protect DoS declares an attack. Think of it; a service degradation triggers an attack signal, not a traffic volume. Volume is harmless if an application servermanages to respond quickly. Nice! The attack is detected for a solid reason. What happens next? First of all, the learning process stops and rolls back to a moment when the stress level was low. The statistical model of the traffic that was collected during peacetime becomes a baseline for anomaly detection. App Protect DoS keeps monitoring the traffic during an attack and uses machine learning to identify the exact request pattern that causes a service degradation. Opposed to old-school volumetric techniques it doesn’t use just a single parameter like source IP or URL, but actually builds as accurate as possible signature of entire request that causes harm. The overall number of parameters that App Protect DoS extracts from every request is in the dozens. A signature usually contains about a dozen including source IP, method, path, headers, payload content structure, and others. Now you can see that App Protect DoS accuracy level is insane comparing to volumetric vectors. The last part is mitigation. App Protect DoS has a whole inventory of mitigation tools including accurate signatures, bad actor detection, rate-limiting or even slowing down traffic across the board, which it usesto return service. The strategy of using those is convoluted but the main objective is to be as accurate as possible and make no harm to valid users. In most cases, App Protect DoS only mitigates requests that match specific signatures and only when the stress threshold for a service is crossed. Therefore, the probability of false positives is vanishingly low. The additional beauty of this technology is that it almost doesn’t require any configuration. Once enabled on a virtual server it does all the job "automagically" and reports back to your security operation center. The following lines present a couple of usage examples. Demo Demo topology is straightforward. On one end I have a couple of VMs. One of them continuously generates steady traffic flow simulating legitimate users. The second one is supposed to generate various L7 DoS attacks pretending to be an attacker. On the other end, one VM hosts a demo application and another one hosts NGINX with App Protect DoS as a protection tool. VM on a side runs ELK cluster to visualize App Protect DoS activity. Workflow of a demo aims to showcase a basic deployment example and overall App Protect DoS protection technology. First, I’ll configure NGINX to forward traffic to a demo application and App Protect DoS to apply for DDoS protection. Then a VM that simulates good users will send continuous traffic flow to App Protect DoS to let it learn a baseline. Once a baseline is established attacker VM will hit a demo app with various DoS attacks. While all this battle is going on our objective is to learn how App Protect DoS behaves, and that good user's experience remains unaffected. Similar to App Protect WAF App Protect DoS is implemented as a separate module for NGINX. It installs to a system as an apt/yum package. Then hooks into NGINX configuration via standard “load_module” directive. load_module modules/ngx_http_app_protect_dos_module.so; Once loaded protection enables under either HTTP, server, or location sections. Depending on what would you like to protect. app_protect_dos_enable [on|off] By default, App Protect DoS takes a protection configuration from a local policy file “/etc/nginx/BADOSDefaultPolicy.json” { "mitigation_mode" : "standard", "use_automation_tools_detection": "on", "signatures" : "on", "bad_actors" : "on" } As I mentioned before App Protect DoS doesn’t require complex config and only takes four parameters. Moreover, default policy covers most of the use cases therefore, a user only needs to enable App Protect DoS on a protected object. The next step is to simulate good users’ traffic to let App Protect DoS learn a good traffic pattern. I use a custom bash script that generates about 6-8 requests per second like an average surfing activity. While inspecting traffic and building a statistical model of good traffic App Protect DoS sends logs and metrics to Elasticsearch so we can monitor all its activity. The dashboard above represents traffic before/after App Protect DoS, degree of application stress, and mitigations in place. Note that the rate of client-side transactions matches the rate of server-side transactions. Meaning that all requests are passing through App Protect DoS and there are not any mitigations applied. Stress value remains steady since the backend easily handles the current rate and latency does not increase. Now I am launching an HTTP flood attack. It generates several thousands of requests per second that can easily overwhelm an unprotected web server. My server has App Protect DoS in front applying all its’ intelligence to fight off the DoS attack. After a few minutes of running the attack traffic, the dashboard shows the following situation. The attack tool generated roughly 1000RPS. Two charts on the left-hand side show that all transactions went through App Protect DoS and were reaching a demo app for a couple of minutes causing service degradation. Right after service stress has reached a threshold an attack was declared (vertical red line on all charts). As soon as the attack has been declared App Protect DoS starts to apply mitigations to resume the service back to life. As I mentioned before App Protect DoS tries its best not to harm legitimate traffic. Therefore, it iterates from less invasive mitigations to more invasive. During the first several seconds when App Protect DoS just detected an attack and specific anomaly signature is not calculated yet. App Protect DoS applies an HTTP redirect to all requests across the board. Such measure only adds a tiny bit of latency for a web browser but allows it to quickly filter out all not-so-intelligent attack tools that can’t follow redirects. In less than a minute specific anomaly signature gets generated. Note how detailed it is. The signature contains 11 attributes that cover all aspects: method, path, headers, and a payload. Such a level of granularity and reaction time is not feasible neither for volumetric vectors nor a SOC operator armed with a regex engine. Once a signature is generated App Protect DoS reduces the scope of mitigation to only requests that match the signature. It eliminates a chance to affect good traffic at all. Matching traffic receives a redirect and then a challenge in case if an attacker is smart enough to follow redirects. After few minutes of observation App Protect DoS identifies bad actors since most of the requests come from the same IP addresses (right-bottom chart). Then switches mitigation to bad actor challenge. Despite this measure hits all the same traffic it allows App Protect DoS to protect itself. It takes much fewer CPU cycles to identify a target by IP address than match requests against the signature with 11 attributes. From now on App Protect DoS continues with the most efficient protection until attack traffic stops and server stress goes away. The technology overview and the demo above expose only a tiny bit of App Protect DoS protection logic. A whole lot of it engages for more complicated attacks. However, the results look impressive. None of the volumetric protection mechanisms or even a human SOC operator can provide such accurate mitigation within such a short reaction time. It is only possible when a machine fights a machine.4.2KViews1like3CommentsAgility sessions announced
Good news, everyone! This year's virtual Agilitywill have over 100 sessions for you to choose from, aligned to 3 pillars. There will be Breakouts (pre-recorded 25 minutes, unlimited audience) Discussion Forums (live content up to 45 minutes, interactive for up to 75 attendees) Quick Hits (pre-recorded 10 minutes, unlimited audience) So, what kind of content are we talking about? If you'd like to learn more about how to Simplify Delivery of Legacy Apps, you might be interested in Making Sense of Zero Trust: what’s required today and what we’ll need for the future (Discussion Forum) Are you ready for a service mesh? (breakout) BIG-IP APM + Microsoft Azure Active Directory for stronger cybersecurity defense (Quick Hits) If you'd like to learn more about how to Secure Digital Experiences, you might be interested in The State of Application Strategy 2022: A Sneak Peak (Discussion Forum) Security Stack Change at the Speed of Business (Breakout) Deploy App Protect based WAF Solution to AWS in minutes (Quick Hits) If you'd like to learn more about how to Enable Modern App Delivery at Scale, you might be interested in Proactively Understanding Your Application's Vulnerabilities (Discussion Forum Is That Project Ready for you? Open Source Maturity Models (Breakout) How to balance privacy and security handling DNS over HTTPS (Quick Hits) The DevCentral team will be hosting livestreams, and the DevCentral lounge where we can hang out, connect, and you can interact directly with session presenters and other technical SMEs. Please go to https://agility2022.f5agility.com/sessions.html to see the comprehensive list, and check back with us for more information as we get closer to the conference.438Views7likes1Comment
Using Pulumi and AWS Secrets Manager to Launch NGINX Plus Instances in AWS
Introduction Some time ago we published an article on using CloudFormation Templates to create NGINX Plus instances. In this follow up article, we will be doing the same thing using Pulumi, an infrastructure as code platform that allows you to use familiar languages to write the code that builds your infrastructure. Within NGINX, we have used Pulumi to build a Modern Application Reference Architecture, which initially targets Kubernetes deployments. It might also be helpful to look at how you can use Pulumi to deploy NGINX Plus instances on AWS, into whatever VPC and subnet you specify. A critical part of NGINX Plus install is to copy your NGINX Plus SSL Certificate and Key - required for access tothe NGINX Plus private repository - into /etc/nginx/ssl/. There a few different ways to achieve this, but the AWS SecretsManager service provides a lot of audit, access control, and security capabilities. In the previous CloudFormation example, the new EC2 Instance was configured to connect to AWS secrets manager and retrieve the secrets as part of the cloudinit post-install scripts. This is fine, but also requires creating an IAM role for the new server, which is an additional step, and increases the permissions of your instances. Because Pulumi integrates into common languages - Python in my example - we can be a little more flexible with how we do things, and we can retrieve the secrets and include them into the start up scrips (using the userdata field). Prerequisites You're going to need a functioning Pulumi installation that can communicate with AWS and a sample Python project. We recommend following the tutorial and checking you can perform the AWS equivalent of "Hello World' - creating an S3 Bucket. You can use this same project to create an NGINX install by editing the __main__.py file or create a new blank one. You will also need your NGINX repo access certificate and key saved as secrets in AWS Secrets manager - in this case we are storing them with the names "nginxcert" and "nginxkey". You can get a free 30 day trial of NGINX Plus from NGINX.com The Code Snippets Let's take a look at the key parts of the Python code: First import the pulumi modules import pulumi import pulumi_aws as aws Now define some variables - in a production setting these would obviously NOT be hard coded, but read as parameters. # Variables VPC = "<your VPC>" AMI = "ami-0964546d3da97e3ab" # This is the ubuntu 20.04 LTS AMI for us-west-2 WebSecGroup = "<web server security group id>" AdminSecGroup = "<admin SSH security group>" subNet = "<subnet to deploy into>" size= "t2.micro" keyPair = "<SSH Key pair>" Get the secret from AWS Secrets Manager: # Get thesecrets cert = aws.secretsmanager.get_secret_version(secret_id="nginxcert") key = aws.secretsmanager.get_secret_version(secret_id="nginxkey") Next build the userdata for post install, this involves concatenating a number of strings together, along with the retrieved secrets, which need some minor text processing: userdata = """#!/bin/bash -xe sudo apt-get update -y # good practice to update existing packages sudo mkdir /etc/ssl/nginx # install the key and secret echo \" """ # Add the certificate userdata = userdata + cert.secret_string userdata = userdata + """ \"| tr -d '"{}'| sudo tee /etc/ssl/nginx/nginx-repo.crt echo \" """ # Add the key userdata = userdata + key.secret_string # Do the NGINX install userdata = userdata + """ \"| tr -d '"{}'| sudo tee /etc/ssl/nginx/nginx-repo.key sudo wget https://cs.nginx.com/static/keys/nginx_signing.key && sudo apt-key add nginx_signing.key sudo wget https://cs.nginx.com/static/keys/app-protect-security-updates.key && sudo apt-key add app-protect-security-updates.key sudo apt-get install -y apt-transport-https lsb-release ca-certificates printf "deb https://pkgs.nginx.com/plus/ubuntu `lsb_release -cs` nginx-plus\n" | sudo tee /etc/apt/sources.list.d/nginx-plus.list sudo wget -P /etc/apt/apt.conf.d https://cs.nginx.com/static/files/90pkgs-nginx sudo apt-get update -y # good practice to update existing packages sudo apt-get install nginx-plus -y # install web server sudo systemctl start nginx.service # start webserver """ Finally, we are going to create the instance: server = aws.ec2.Instance('webserver-www', instance_type=size, vpc_security_group_ids=[WebSecGroup, AdminSecGroup], # reference security group from above ami=AMI, subnet_id=subNet, key_name=keyPair, user_data=userdata,associate_public_ip_address = True ) And then print out the private DNS name - although there are plenty more fields you may wish to export: pulumi.export('ip',server.private_dns) To create the instance, we issue the "pulumi up" command: % pulumi up Previewing update (test) View Live: https://app.pulumi.com/RuncibleSpoon/nginx/test/previews/2663305a-8544-4776-b2c3-4cd2abe0f723 Type Name Plan Info + pulumi:pulumi:Stacknginx-test create 6 warnings + └─ aws:ec2:Instancewebserver-wwwcreate Diagnostics: pulumi:pulumi:Stack (nginx-test): warning: rotation_enabled is deprecated: Use the aws_secretsmanager_secret_rotation data source instead warning: rotation_lambda_arn is deprecated: Use the aws_secretsmanager_secret_rotation data source instead warning: rotation_rules is deprecated: Use the aws_secretsmanager_secret_rotation data source instead warning: rotation_enabled is deprecated: Use the aws_secretsmanager_secret_rotation data source instead warning: rotation_lambda_arn is deprecated: Use the aws_secretsmanager_secret_rotation data source instead warning: rotation_rules is deprecated: Use the aws_secretsmanager_secret_rotation data source instead Do you want to perform this update? yes Updating (test) View Live: https://app.pulumi.com/RuncibleSpoon/nginx/test/updates/30 Type Name StatusInfo + pulumi:pulumi:Stacknginx-test created 6 warnings + └─ aws:ec2:Instancewebserver-wwwcreated Diagnostics: pulumi:pulumi:Stack (nginx-test): warning: rotation_enabled is deprecated: Use the aws_secretsmanager_secret_rotation data source instead warning: rotation_lambda_arn is deprecated: Use the aws_secretsmanager_secret_rotation data source instead warning: rotation_rules is deprecated: Use the aws_secretsmanager_secret_rotation data source instead warning: rotation_enabled is deprecated: Use the aws_secretsmanager_secret_rotation data source instead warning: rotation_lambda_arn is deprecated: Use the aws_secretsmanager_secret_rotation data source instead warning: rotation_rules is deprecated: Use the aws_secretsmanager_secret_rotation data source instead Outputs: ip : "ip-10-0-1-90.us-west-2.compute.internal" Resources: + 2 created Duration: 50s This will build an NGINX Plus instance in the subnet of your choice. While there is more to be done to fully configure an NGINX instance this code provides a base on which to build more production-ready deployments.1.1KViews0likes0CommentsAWS CloudFormation EC2 UserData example to install NGINX Plus on Ubuntu 20.04 LTS using AWS SecretsManager
Introduction There are a number of ways to automate NGINX Plus instance creation on AWS - you can create a custom AMI, or build a container image. Tools like Ansible, terraform, Pulumi etc. can also install and configure NGINX Plus. This example was tested in CloudFormation template that creates an Ubuntu 20.04 LTS EC2 instance and the uses UserData script to install NGINX Plus. A critical part of NGINX Plus install is to copy your NGINX Plus SSL Certificate and Key - required for access tothe NGINX Plus private repository - into /etc/nginx/ssl/. There a few different ways to achieve this, but the AWS SecretsManager service provides a lot of audit, access control, and security capabilities. You can use the snippets below in your AWS CloudFormation templates to retrieve the NGINX certificate and key from AWS, configure the NGINX repository on your EC2 Instance, and then download and install the software. Prerequisites Store your NGINX Plus Certificate and Key in AWS Secrets Manager - in my example I'm storing the certificate and key in separate secret objects. Create an IAM Role and policy to allow your EC2 Instance to access the secrets. My Policy looks like this: { "Version": "2012-10-17", "Statement": [ { "Sid": "VisualEditor0", "Effect": "Allow", "Action": [ "secretsmanager:GetResourcePolicy", "secretsmanager:GetSecretValue", "secretsmanager:DescribeSecret", "secretsmanager:ListSecretVersionIds" ], "Resource": "arn:aws:secretsmanager:*:<account ID>:secret:*" } ] } Obviously you may want to alter the the scope of the resource access. Attach this policy to a role and assign the role to your EC2 Instance in the CFT: Create a parameter (you could skip this and just add the name to the Instance Profile in the next step, but parameters can be useful if you want to change things at deploy time): NginxInstanceRole: Description: Role for instance Instance Type: String Default: EC2Secrets Reference parameter in the EC2 instance profile: NGInstanceProfile: Type: AWS::IAM::InstanceProfile Properties: InstanceProfileName: !Sub "nginx-instance-profile-${AWS::StackName}" Path: / Roles: - !Ref NginxInstanceRole Reference the instance profile in the EC2 block: # EC2 instance which will have access for http and ssh EC2Instance: Type: 'AWS::EC2::Instance' Properties: InstanceType: !Ref InstanceType SubnetId: !Ref SubnetID SecurityGroupIds: - !Ref WebSecurityGroupID - !Ref AdminSecurityGroupID KeyName: !Ref KeyPairName ImageId: !Ref InstanceImageId IamInstanceProfile: !Ref NginxInstanceRole UserData Block Now in the UserData section of your EC2 instance spec the following commands will: Install the jq package (to parse some output) Install the the AWS CLI Pull the secrets using 'aws secretsmanager get-secrets-value' Use the jq package and tr to get the files into the correct format (there may be a better way to manage this). Follow the standard NGINX plus install (add NGINX repo etc) Start the NGINX Plus service UserData: Fn::Base64: !Sub | #!/bin/bash -xe sudo apt-get update -y # good practice to update existing packages sudo apt-get install -y awscli sudo apt install -y jq sudo mkdir /etc/ssl/nginx # install the key and secret aws secretsmanager get-secret-value --secret-id nginxcert --region ${AWS::Region}| jq --raw-output '.SecretString'| tr -d '"{}'| sudo tee /etc/ssl/nginx/nginx-repo.crt aws secretsmanager get-secret-value --secret-id nginxkey --region ${AWS::Region}| jq --raw-output '.SecretString'| tr -d '"{}'| sudo tee /etc/ssl/nginx/nginx-repo.key # Add the repo sudo wget https://cs.nginx.com/static/keys/nginx_signing.key && sudo apt-key add nginx_signing.key sudo wget https://cs.nginx.com/static/keys/app-protect-security-updates.key && sudo apt-key add app-protect-security-updates.key sudo apt-get install -y apt-transport-https lsb-release ca-certificates printf "deb https://pkgs.nginx.com/plus/ubuntu `lsb_release -cs` nginx-plus\n" | sudo tee /etc/apt/sources.list.d/nginx-plus.list sudo wget -P /etc/apt/apt.conf.d https://cs.nginx.com/static/files/90pkgs-nginx # Install and start sudo apt-get update -y # good practice to update existing packages sudo apt-get install nginx-plus -y # install web server sudo systemctl start nginx.service # start webserver This should produce a working NGINX Plus install. Comment below if you'd like a complete working CFT example linked to this article.8.3KViews0likes0Comments