Securing and Scaling Hybrid Application with F5 NGINX (Part 1)
If you are using Kubernetes in production, then you are likely using an ingress controller. The ingress controller is the core engine managing traffic entering and exiting the Kubernetes cluster. Because the ingress controller is a deployment running inside the cluster, how do you route traffic to the ingress controller? How do you route external traffic to internal Kubernetes Services?
Cloud providers offer a simple convenient way to expose Kubernetes Services using an external load balancer. Simply deploy a Managed Kubernetes Service (EKS, GKE, AKS) and create a Kubernetes Service of type LoadBalancer. The cloud providers will host and deploy a load balancer providing a public IP address. External users can connect to Kubernetes Services using this public entry point.
However, this integration only applies to Managed Kubernetes Services hosted by cloud providers. If you are deploying Kubernetes in private cloud/on-prem environments, you will need to deploy your own load balancer and integrate it with the Kubernetes cluster. Furthermore, Kubernetes Load Balancing integrations in the cloud are limited to TCP Load Balancing and generally lack visibility into metrics, logs, and traces.
We propose:
- A solution that applies regardless of the underlying infrastructure running your workloads
- Guidance around sizing to avoid bottlenecks from high traffic volumes
- Application delivery use cases that go beyond basic TCP/HTTP load balancing
In the solution depicted below, I deploy NGINX Plus as the external LB service for Kubernetes and route traffic to the NGINX Ingress Controller. The NGINX Ingress Controller will then route the traffic to the application backends. The NLK (NGINX Load Balancer for Kubernetes) deployment is a new controller by NGINX that monitors specified Kubernetes Services and sends API calls to manage upstream endpoints of the NGINX External Load Balancer
In this article, I will deploy the components both inside the Kubernetes cluster and NGINX Plus as the external load balancer.
Note: I like to deploy both the NLK and Kubernetes cluster in the same subnet to avoid network issues. This is not a hard requirement.
Prerequisites
The blog assumes you have experience operating in Kubernetes environments. In addition, you have the following:
- Access to a Kubernetes environment; Bare Metal, Rancher Kubernetes Engine (RKE), VMWare Tanzu Kubernetes (VTK), Amazon Elastic Kubernetes (EKS), Google Kubernetes Engine (GKE), Microsoft Azure Kubernetes Service (AKS), and RedHat OpenShift
- NGINX Ingress Controller – Deploy NGINX Ingress Controller in the Kubernetes cluster. Installation instructions can be found in the documentation.
- NGINX Plus – Deploy NGINX Plus on VM or bare metal with SSH access. This will be the external LB service for the Kubernetes cluster. Installation instructions can be found in the documentation. You must have a valid license for NGINX Plus. You can get started today by requesting a 30-day free trial.
Setting up the Kubernetes environment
I start with deploying the back-end applications. You can deploy your own applications, or you can deploy our basic café application as an example.
$ kubectl apply –f cafe.yaml
Now I will configure routes and TLS settings for the ingress controller
$ kubectl apply –f cafe-secret.yaml

$ kubectl apply –f cafe-virtualserver.yaml
To ensure the ingress rules are successfully applied, you can examine the output of kubectl get vs.
The VirtualServer definition should be in the Valid state.
NAMESPACE     NAME             STATE    HOST                         IP      PORTS
default       cafe-vs          Valid    cafe.example.com
Setting up NGINX Plus as the external LB
A fresh install of NGINX Plus will provide the default.conf file in the /etc/nginx/conf.d directory. We will add two additional files into this directory. Simply copy the bulleted files into your /etc/nginx/conf.d directory
- dashboard.conf; This will enable the real-time monitoring dashboard for NGINX Plus
- kube_lb.conf; The nginx configuration as the external load balancer for Kubernetes. You can change the configuration file to fit your requirements. In part 1 of this series, we enabled basic routing and TLS for one cluster.
You will also need to generate TLS cert/keys and place them in the /etc/ssl/nginx folder of the NGINX Plus instance. For the sake of this example, we will generate a self-signed certificate with openssl.
$ openssl req -x509 -nodes -days 365 -newkey rsa:2048 -keyout default.key -out default.crt -subj "/CN=NLK"
Note: Using self-signed certificates is for testing purposes only. In a live production environment, we recommend using a secure vault that will hold your secrets and trusted CAs (Certificate Authorities).
Now I can validate the configuration and reload nginx for the changes to take effect.
$ nginx –t
$ nginx –s reload
I can now connect to the NGINX Plus dashboard by opening a browser and entering
http://<external-ip-nginx>:9000/dashboard.html#upstreams
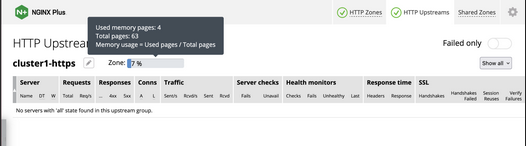
The HTTP upstream table should be empty as we have not deployed the NLK Controller yet.
We will do that in the next section.
Installing the NLK Controller
You can install the NLK Controller as a Kubernetes deployment that will configure upstream endpoints for the external load balancer using the NGINX Plus API. First, we will create the NLK namespace
$ kubectl create ns nlk
And apply the RBAC settings for the NKL deployment
$ kubectl apply -f serviceaccount.yaml
$ kubectl apply -f clusterrole.yaml
$ kubectl apply -f clusterrolebinding.yaml
$ kubectl apply -f secret.yaml
The next step is to create a ConfigMap defining the API endpoint of the NGINX Plus external load balancer. The API endpoint is used by the NLK Controller to configure the NGINX Plus upstream endpoints. We simply modify the nginx-hosts field in the manifest from our GitHub repository to the IP address of the NGINX external load balancer.
nginx-hosts:

    http://<nginx-plus-external-ip>:9000/api
Apply the updated ConfigMap and deploy the NLK controller
$ kubectl apply –f nkl-configmap.yaml

$ kubectl apply –f nkl-deployment
I can verify the NLK controller deployment is running and the ConfigMap data is applied.
$ kubectl get pods –o wide –n nlk
$ kubectl describe cm nginx-config –n nlk 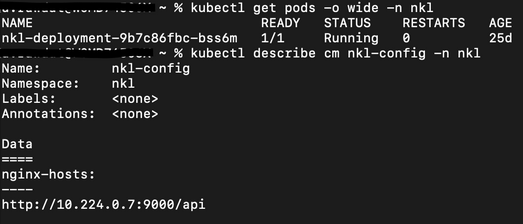
You should see the NLK deployment in status Running and the URL should be defined under nginx-hosts. The URL is the NGINX Plus API endpoint of the external load Balancer. Now that the NKL Controller is successfully deployed, the external load balancer is ready to route traffic to the cluster.
The final step is deploying a Kubernetes Service type NodePort to expose the Kubernetes cluster to NGINX Plus.
$ kubectl apply –f nodeport.yaml
There are a couple things to note about the NodePort Service manifest. Fields on line 7 and 14 are required for the NLK deployment to configure the external load balancer appropriately:
- The nginxinc.io/nkl-cluster annotation
- The port name matching the upstream block definition in the NGINX Plus configuration (See line 42 in kube_lb.conf) and preceding nkl-
apiVersion: v1
kind: Service
metadata:
  name: nginx-ingress
  namespace: nginx-ingress
  annotations:
    nginxinc.io/nlk-cluster1-https: "http"   # Must be added
spec:
  type: NodePort
  ports:
  - port: 443
    targetPort: 443
    protocol: TCP
    name: nlk-cluster1-https
  selector:
    app: nginx-ingress
Once the service is applied, you can note down the assigned nodeport selecting the NGINX Ingress Controller deployment. In this example, that node port is 32222.
$ kubectl get svc –o wide –n nginx-ingress

NAME            TYPE       CLUSTER-IP   PORT(S)          SELECTOR

nginx-ingress   NodePort   x.x.x.x      443:32222/TCP    app=nginx-ingress
If I reconnect to my NGINX Pus dashboard, the upstream tab should be populated with the worker node IPs of the Kubernetes cluster and matching the node port of the nginx-ingress Service (32222).
You can list the node IPs of your cluster to make sure they match the IPs in the dashboard upstream tab.
$ kubectl get nodes -o wide | awk '{print $6}'
INTERNAL-IP
10.224.0.6
10.224.0.5
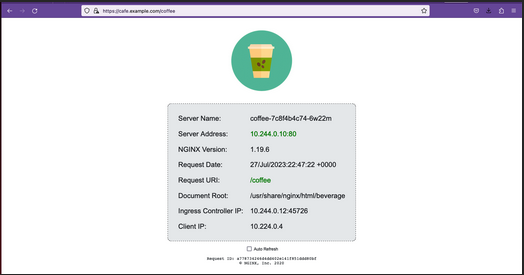
10.224.0.4Now I can connect to the Kubernetes application from our local machine. The hostname we used in our example (cafe.example.com) should resolve to the IP address of the NGINX Plus load balancer.
Wrapping it up
Most enterprises deploying Kubernetes in production will install an ingress controller. It is the DeFacto standard for application delivery in container orchestrators like Kubernetes. DevOps/NetOps engineers are now looking for guidance on how to scale out their Kubernetes footprint in the most efficient way possible. Because enterprises are embracing the hybrid approach, they will need to implement their own integrations outside of cloud providers.
The solution we propose:
- is applicable to hybrid environments (particularly on-prem)
- Sizing information to avoid bottlenecks from large traffic volumes
- Enterprise Load Balancing capabilities that stretch beyond a TCP LoadBalancing Service
In the next part of our series, I will dive into the third bullet point into much more detail and cover Zero Trust use cases with NGINX Plus, providing extra later of security in your hybrid model.