Security Certificate Inventory and Management
Hello! Several years ago, I was tasked with oversight for our security certificate inventory and management after we encountered unintended outages because no change management was in place to insure everyone was on the same page. Our change management process is considerably better as we're using actual change requests instead email. 😃 Our previous security certificate inventory was a privately held spreadsheet by the person managing most of our certificate renewals and update. If our Nagios admin cannot configure an alert to check a cert, we're at risk of missing a certificate expiration. We have self signed certificates as well as certificates purchased from vendors. We're now relying on report from Nagios based on certificate checks configured by our Nagios admin. This data goes into Splunk and I receive a weekly report with certificate data. I'm using a MS Team channel that includes systems admins as well as database and application development resources. I alert the group when a certificate or certificates are expiring in 30 days. I've been told that no certificate renewals can be done more than 30 days prior to expiration. In short, I nag until someone submits a change request with a scheduled maintenance window to update the certificate(s) prior to expiration. Although our current process is much better than when I first became involved, improvement is needed so I'm asking for suggestions/recommendations. What security certificate inventory management solutions are you using? What are your security certificate management processes? Thank you! Jodi23Views0likes1CommentTACACS+ Remote Role Configuration for BIG-IP
Several years ago (can it really have been 2009?) I wrote up a solution for using tacacs+ as the authentication and authorization source for BIG-IP user management. Much has changed in five years: new roles have been added to the system, tmsh has replaced bigpipe, and unrelated to our end of the solution, my favorite flavor of the free tacacs daemon, tac_plus, is no longer available! This article will cover all the steps necessary to get a tacacs+ installation established on a Ubuntu server, configure tacacs+, configure the BIG-IP to utilize that tacacs+ server, and test the installation. Before that, however, I'll address the role information necessary to make it all work. The tacacs config in this article is dependent on a version that I am no longer able to get installed on a modern linux flavor. Instead, try this Dockerized tacacs+ server for your testing. The details in the rest of the article are still appropriate. BIG-IP Remote Role Details There are quite a few more roles than previously. The table below shows all the roles available as of TMOS version 11.5.1. Role Role Value admin 0 resource-admin 20 user-manager 40 auditor 80 manager 100 application-editor 300 operator 400 certificate-manager 500 irule-manager 510 guest 700 web-application-security-administrator 800 web-application-security-editor 810 acceleration-policy-editor 850 no-access 900 In addition to the role, the console (tmsh or disabled) and partition (all, Common (default) or specified partition) settings need to be addressed. Installing tac_plus First, download the tac_plus package from pro-bono to /var/tmp. I'm assuming you already have gcc installed, if you don't, please check google for installing gcc on your Ubuntu installation. Change directory to /var/tmp and extract the package. cd /var/tmp/ #current file is DEVEL.201407301604.tar.bz2 tar xvf DEVEL.201407301604.tar.bz2 Change directory into PROJECTS, configure the package for tacacs, then compile and install it. Do these steps one at a time (don't copy and paste the group.) cd PROJECTS ./configure tac_plus make sudo make install After a successful installation, copy the sample configuration to the config directory, and copy the init script over to the system init script directory, modify the file attributes and permissions, then apply the init script to the system. sudo cp /usr/local/etc/mavis/sample/tac_plus.cfg /usr/local/etc/ sudo cp /var/tmp/PROJECTS/tac_plus/extra/etc_init.d_tac_plus /etc/init.d/tac_plus sudo chmod 755 /etc/init.d/tac_plus sudo update-rc.d tac_plus defaults Configuring tac_plus Now that the installation is complete, the configuration file needs to be cleaned up and configured. There are many options that can extend the power of the tac_plus daemon, but this article will focus on authentication and authorization specific to the BIG-IP role information described above. Starting with the daemon listener itself, this is contained in the spawnd id. I changed the port to the default tacacs port, which is 49 (tcp). id = spawnd { listen = { port = 49 } spawn = { instances min = 1 instances max = 10 } background = no } Next, the logging locations and host information need to be set. I left the debug values alone, as well as the binding address. Assume all the remaining code snippets from the tac_plus configuration are wrapped in the id = tac_plus { } section. debug = PACKET AUTHEN AUTHOR access log = /var/log/access.log accounting log = /var/log/acct.log host = world { address = ::/0 prompt = "\nAuthorized access only!\nTACACS+ Login\n" key = f5networks } After the host data is configured, the groups need to be configured. For this exercise, the groups will be aligned to the administrator, application editor, user manager, and ops roles, with admins and ops getting console access. Admins will have access to all partitions, ops will have access only to partition1, and the remaining groups will have access to the Common partition. group = adm { service = ppp { protocol = ip { set F5-LTM-User-Info-1 = adm set F5-LTM-User-Console = 1 set F5-LTM-User-Role = 0 set F5-LTM-User-Partition = all } } } group = appEd { service = ppp { protocol = ip { set F5-LTM-User-Info-1 = appEd set F5-LTM-User-Console = 0 set F5-LTM-User-Role = 300 set F5-LTM-User-Partition = Common } } } group = userMgr { service = ppp { protocol = ip { set F5-LTM-User-Info-1 = userMgr set F5-LTM-User-Console = 0 set F5-LTM-User-Role = 40 set F5-LTM-User-Partition = Common } } } group = ops { service = ppp { protocol = ip { set F5-LTM-User-Info-1 = ops set F5-LTM-User-Console = 1 set F5-LTM-User-Role = 400 set F5-LTM-User-Partition = partition1 } } } Finally, map a user to each of those groups for testing the solution. I would not recommend using a clear key (host configuration) or clear passwords in production, these are shown here for demonstration purposes only. Mapping to /etc/password, or even a centralized ldap/ad solution would be far better for operational considerations. user = f5user1 { password = clear letmein member = adm } user = f5user2 { password = clear letmein member = appEd } user = f5user3 { password = clear letmein member = userMgr } user = f5user4 { password = clear letmein member = ops } Save the file, and then start the tac_plus daemon by typing service tac_plus start. Configuring BIG-IP Now that the tacacs configuration is complete and the service is available, the BIG-IP needs to be configured to use it! The remote role configuration is pretty straight forward in tmsh, and note that the role info aligns with the groups configured in tac_plus. auth remote-role { role-info { adm { attribute F5-LTM-User-Info-1=adm console %F5-LTM-User-Console line-order 1 role %F5-LTM-User-Role user-partition %F5-LTM-User-Partition } appEd { attribute F5-LTM-User-Info-1=appEd console %F5-LTM-User-Console line-order 2 role %F5-LTM-User-Role user-partition %F5-LTM-User-Partition } ops { attribute F5-LTM-User-Info-1=ops console %F5-LTM-User-Console line-order 4 role %F5-LTM-User-Role user-partition %F5-LTM-User-Partition } userMgr { attribute F5-LTM-User-Info-1=userMgr console %F5-LTM-User-Console line-order 3 role %F5-LTM-User-Role user-partition %F5-LTM-User-Partition } } } Note: Because we defined the behaviors for each role in tac_plus, they don't need to be redefined here, which is why the % syntax is used in this configuration for the console, role, and user-partition. However, if it is preferred to define the behaviors on box, that can be done instead and then you can just define the F5-LTM-User-Info-1 attribute on tac_plus. Either way is supported. Here's an example of the alternative on the BIG-IP side for the admin role. adm { attribute F5-LTM-User-Info-1=adm console enabled line-order 1 role administrator user-partition All } Final step is to set the authentication source to tacacs and set the host parameters. auth source { type tacacs } auth tacacs system-auth { debug enabled protocol ip secret $M$2w$jT3pHxY6dqGF1tHKgl4mWw== servers { 192.168.6.10 } service ppp } Testing the Solution It wouldn't be much of a solution if it didn't work, so the following screenshots show the functionality as expected in the GUI and the CLI. F5user1 This user is in the admin group, and should have access to all the partitions, be an administrator, and be able to not only connect to the console, but jump out of tmsh to the advanced shell. You can do this with the run util bash command in tmsh. F5user2 This user is an application editor, and should have access only to the common partition with no access to the console. Notice the failed logins at the CLI, and the partition is firm with no drop down. F5user3 This user has the user manager role and like the application editor has no access to the console. The partition is hard-coded to common as well. F5user4 Finally, the last user is mapped to the ops group, so they will be bound to partition1, and whereas they have console access, they do not have access to the advanced shell as they are not an admin user.4.7KViews1like5Comments
Log message code list?
SOL16197: Reviewing BIG-IP log files describes local traffic log message format as: Message code is split into: Message code: The code that is associated with the message. The code is comprised of the following sub-codes: Product Code: The first two hex digits form the product code. For example, 0x01 is the BIG-IP product code. Subset Code: The third and fourth hex digits are the subset code. For example, 0x2a is the subset code for LIBHAL. Message Number: The next four digits form the message number within a module. Severity Level: The last digit between the colon symbols is the severity level, with 0 being the highest severity level. Are the Product and Subset codes listed anywhere? Would help in processing log messages further in Splunk or similar tool.635Views0likes5Comments
Upload SSL certificate/key via REST API
Hello All, Looking to see if anyone knows of a method of uploading certs and keys to a BIGIP unit, using a method similar to the following example, but using REST instead of the SOAP API. Example: puts bigip["Management.KeyCertificate"].certificate_import_from_pem('MANAGEMENT_MODE_DEFAULT', [ cert['cert_name'] ], [ File.open(cert['cert_file']).read ], true) puts bigip["Management.KeyCertificate"].key_import_from_pem('MANAGEMENT_MODE_DEFAULT', [ cert['cert_name'] ], [ File.open(cert['key_file']).read ], true) Thanks!2.7KViews0likes10CommentsTuning the TCP Profile, Part One
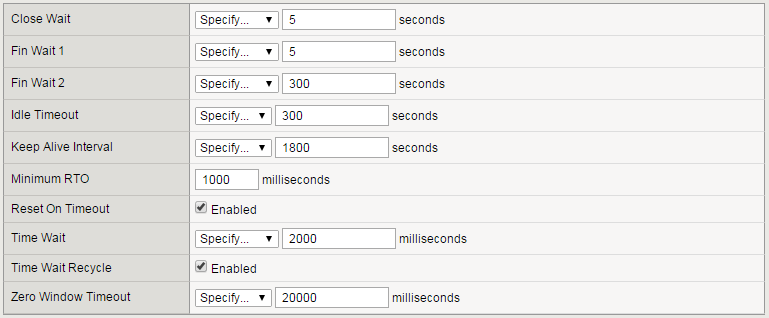
A few months ago I pointed out some problems with the existing F5-provided TCP profiles, especially the default one. Today I'll begin a pass through the (long) TCP profile to point out the latest thinking on how to get the most performance for your applications. We'll go in the order you see these profile options in the GUI. But first, a note about programmability: in many cases below, I'm going to ask you to generalize about the clients or servers you interact with, and the nature of the paths to those hosts. In a perfect world, we'd detect that stuff automatically and set it for you, and in fact we're rolling that out setting by setting. In the meantime, you can customize your TCP parameters on a per-connection basis using iRules for many of the settings described below, something I'll explain further where applicable. In general, when I refer to "performance" below, I'm referring to the speed at which your customer gets her data. Performance can also refer to the scalability of your application delivery due to CPU and memory limitations, and when that's what I mean, I'll say so. Timer Management The one here with a big performance impact isMinimum RTO. When TCP computes its Retransmission Timeout (RTO), it takes the average measured Round Trip Time (RTT) and adds a few standard deviations to make sure it doesn't falsely detect loss. (False detections have very negative performance implications.) But if RTT is low and stable that RTO may betoolow, and the minimum is designed to catch known fluctuations in RTT that the connection may not have observed. Set Minimum RTO too low, and TCP may improperly enter congestion response and reduce the sending rate all the way down to one packet per round trip. Set it too high, and TCP sits idle when it ought to retransmit lost data. So what's the right value? Obviously, if you have a sense of the maximum RTT to your clients (which you can get with the ping command), that's a floor for your value. Furthermore, many clients and servers will implement some sort of Delayed ACK, which reduces ACK volume by sometimes holding them back for up to 200ms to see if it can aggregate more data in the ACK. RFC 5681 actually allows delays of up to 500ms, but this is less common. So take the maximum RTT and add 200 to 500 ms. Another group of settings aren't really about throughput,but to help clients and servers to close gracefully, at the cost of consuming some system resources. Long Close Wait, Fin Wait 1, Fin Wait 2, and Time Wait timers will keep connection state alive to make sure the remote host got all the connection close messages. Enabling Reset On Timeout sends a message that tells the peer to tear down the connection. Similarly, disabling Time Wait Recycle will prevent new connections from using the same address/port combination, making sure that the old connection with that combination gets a full close. The last group of settingskeeps possibly dead connections alive,using system resources to maintain state in case they come back to life. Idle Timeout and Zero Window Timeout commit resources until the timer expires. If you set Keep Alive Interval to a valuelessthan the Idle Timeout, then on the clientside BIG-IP will keep the connection alive as long as the client keeps responding to keepalive and the server doesn't terminate the connection itself. In theory, this could be forever! Memory Management In terms of high throughput performance, you want all of these settings to be as large as possible up to a point. The tradeoff is that setting them too high may waste memory and reduce the number of supportable concurrent connections. I say "may" waste because these are limitson memory use, and BIG-IP doesn't allocate the memory until it needs it for buffered data.Even so, the trick is to set the limits large enough that there are no performance penalties, but no larger. Send Buffer and Receive Window are easy to set in principle, but can be tricky in practice. For both, answer these questions: What is the maximum bandwidth (Bytes/second) that BIG-IP might experience sending or receiving? Out of all paths data might travel, what minimum delay among those paths is the highest? (What is the "maximum of the minimums"?) Then you simply multiply Bytes/second by seconds of delay to get a number of bytes. This is the maximum amount of data that TCP ought to have in flight at any one time, which should be enough to prevent TCP connections from idling for lack of memory. If your application doesn't involve sending or receiving much data on that side of the proxy, you can probably get away with lowering the corresponding buffer size to save on memory. For example, a traditional HTTP proxy's clientside probably can afford to have a smaller receive buffer if memory-constrained. There are three principles to follow in setting Proxy Buffer Limits: Proxy Buffer High should be at least as big as the Send Buffer. Otherwise, if a large ACK clears the send buffer all at once there may be less data available than TCP can send. Proxy Buffer Low should be at least as big as the Receive Window on the peer TCP profile(i.e. for the clientside profile, use the receive window on the serverside profile). If not, when the peer connection exits the zero-window state, new data may not arrive before BIG-IP sends all the data it has. Proxy Buffer High should be significantly larger than Proxy Buffer Low (we like to use a 64 KB gap) to avoid constant flapping to and from the zero-window state on the receive side. Obviously, figuring out bandwidth and delay before a deployment can be tricky. This is a place where some iRule mojo can really come in handy. The TCP::rtt and TCP::bandwidth* commands can give you estimates of both quantities you need, even though the RTT isn't a minimum RTT. Alternatively, if you've enabled cmetrics-cache in the profile, you can also obtain historical data for a destination using the ROUTE::cwnd* command, which is a good (possibly low) guess at the value you should plug into the send and receive buffers. You can then set buffer limits directly usingTCP::sendbuf**,TCP::recvwnd**, and TCP::proxybuffer**. Getting this to work very well will be difficult, and I don't have any examples where someone worked it through and proved a benefit. But if your application travels highly varied paths and you have the inclination to tinker, you could end up with an optimized configuration. If not, set the buffer sizes using conservatively high inputs and carry on. *These iRule commands only supported in TMOS® version 12.0.0 and later. **These iRule commands only supported inTMOS® version 11.6.0and later.3.2KViews0likes6Comments
How do I record the IP assigned to a client after login?
Hello, I need to record clients' IP address assigned by network access. I searched on Ask f5 it looks like that the variable "session.assigned.clientip" is what I need. So I tried to use an irule to get it but failed. Here is my irule: when ACCESS_SESSION_STARTED { set user [ACCESS::session data get "session.logon.last.username"] set client [IP::client_addr] set assignip [ACCESS::session data get "session.assigned.clientip"] log local0. "LOGON:$user login successful from $client, assigned $assignip" } I have tried other events like ACCESS_POLICY_AGENT_EVENT, ACCESS_POLICY_COMPLETED but haven't worked either. Does anyone know how can I log the clients' IP address assigned by network access. I will appreciate it!Solved1.3KViews0likes13CommentsDisplay LTM connections??
I am very new to F5 Big IP, mainly worked with Cisco CSMs and Citrix NetScaler load balancers in the past.....what I am trying to find is how to display what hosts are connected to a particular virtual server, what pool member it's getting routed to and what SNAT address the source is being assigned, etc. WHat I have is a pair of F5 Big IP 4200s set up in a HA configuration. Thanks for any help...JeffSolved13KViews0likes16Comments